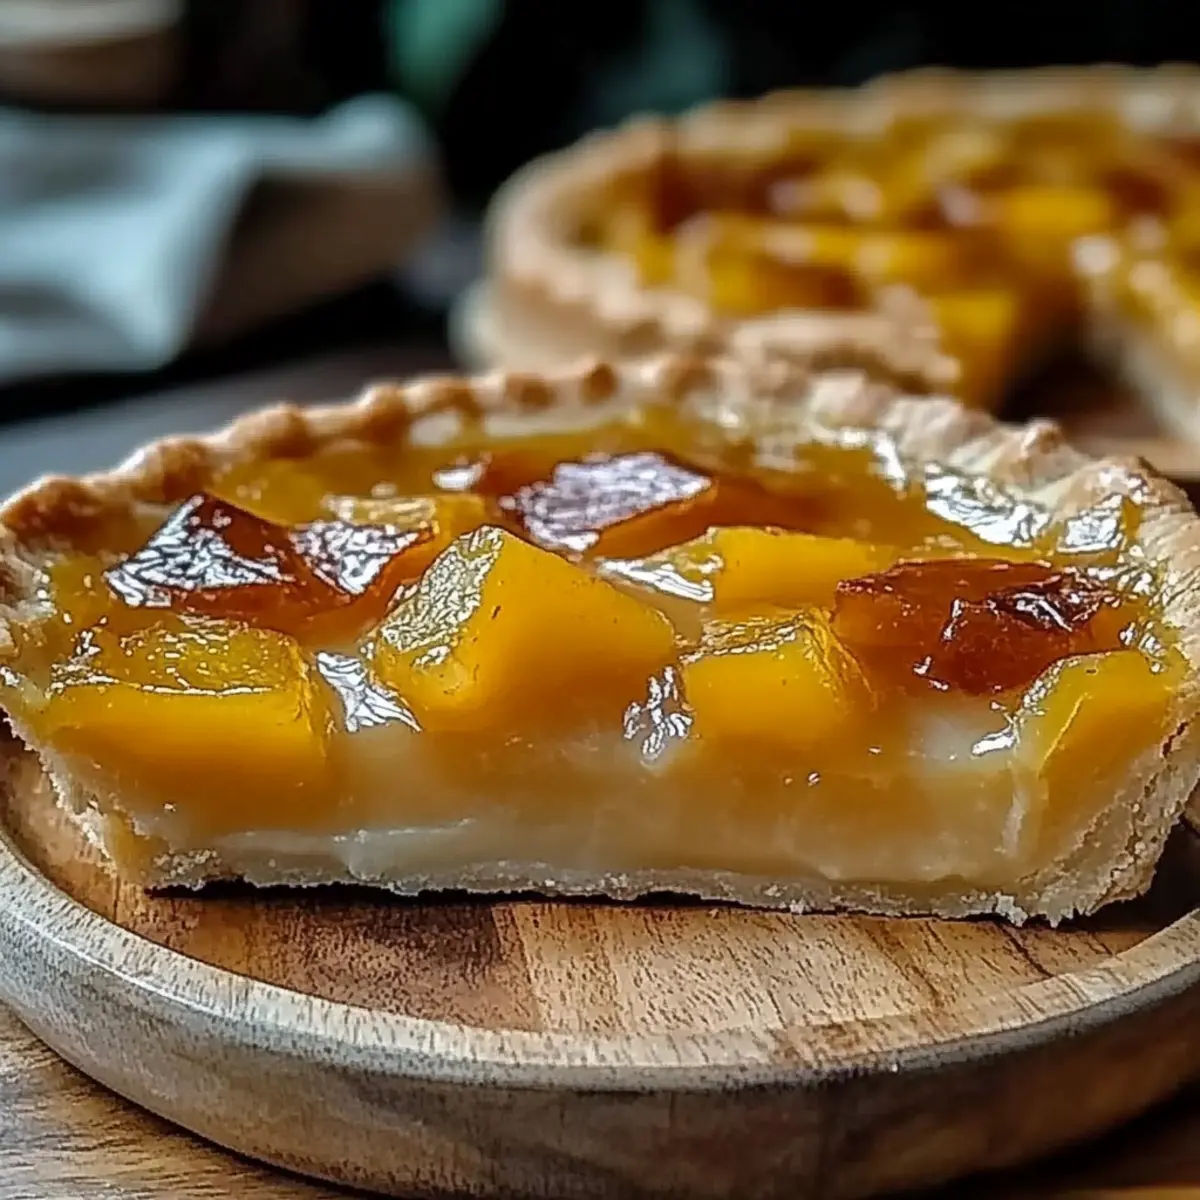
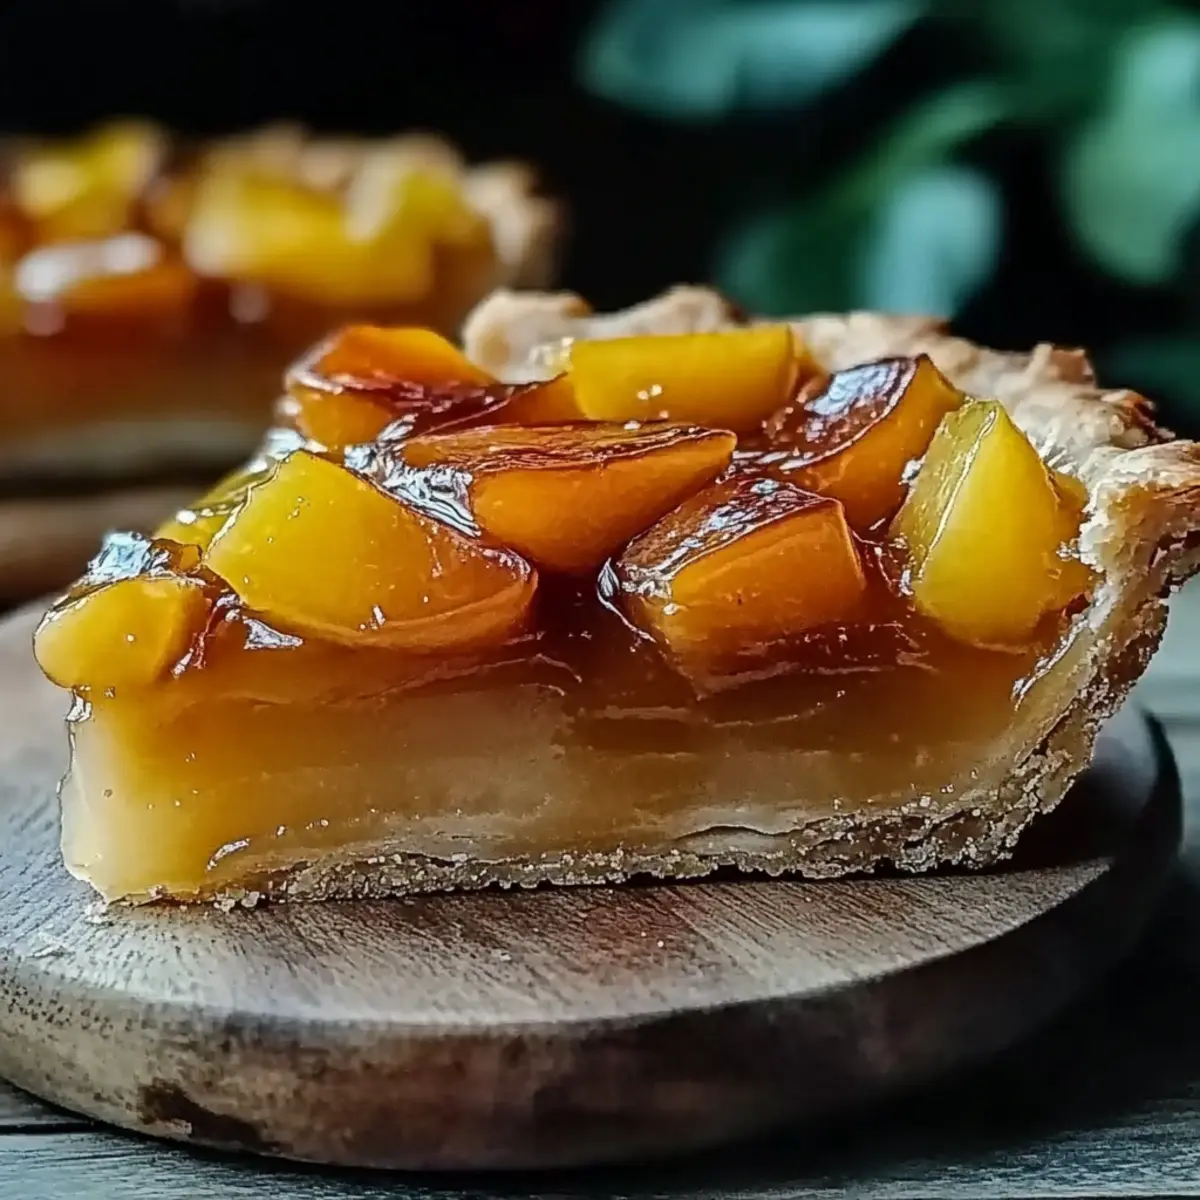
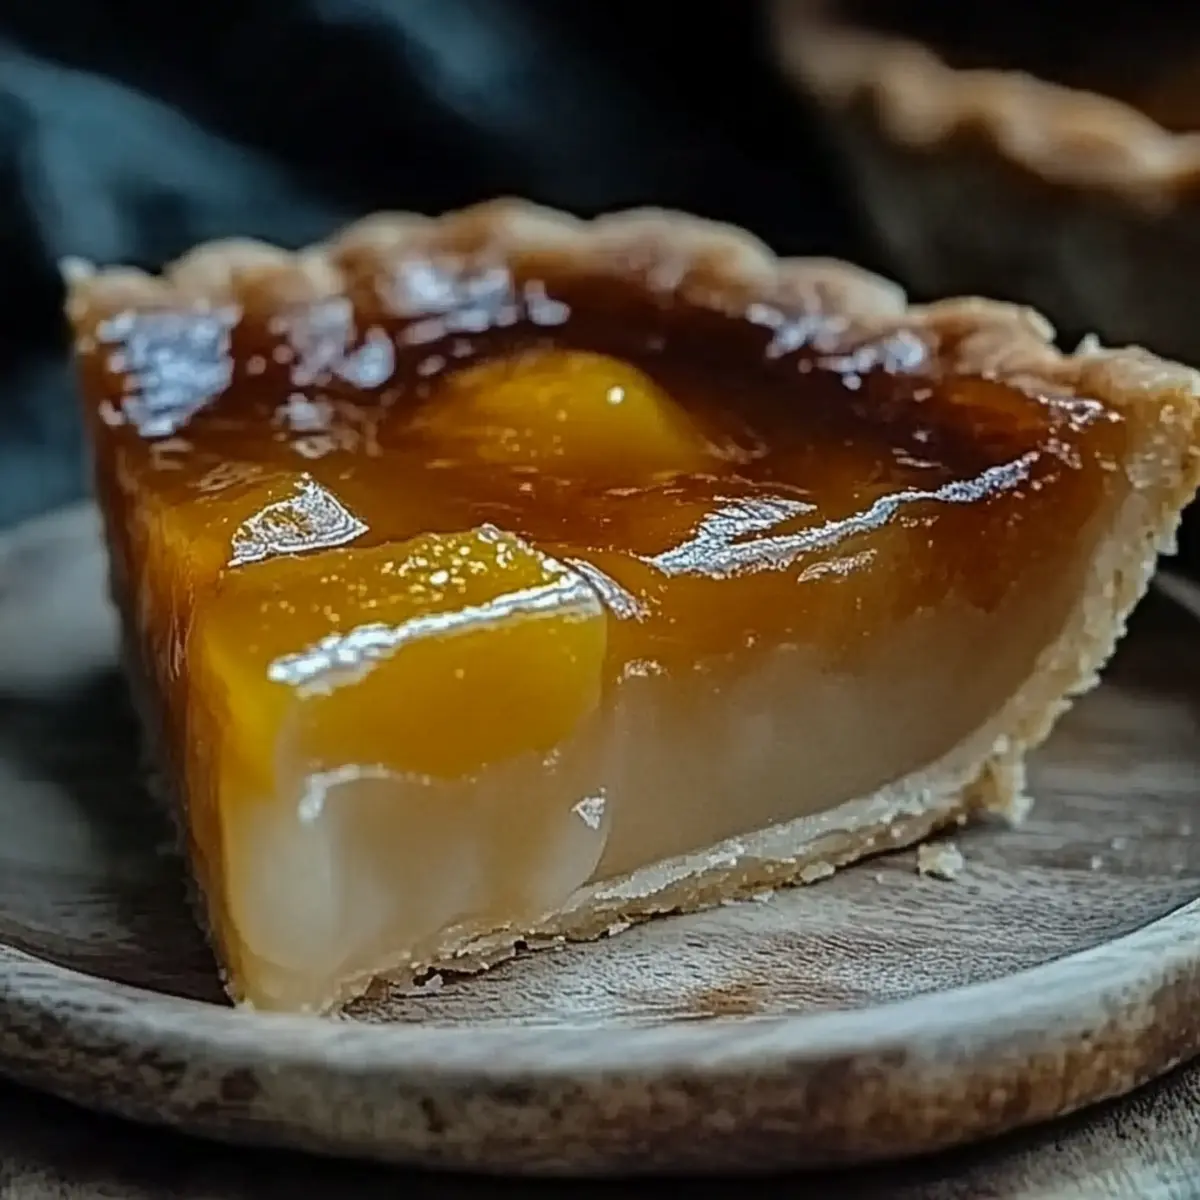
As I stood in my kitchen, the sweet aroma of caramelized honey began to fill the air, and I felt transported back to my childhood. That's the magic of this Burnt Honey Pie. This recipe brings together the richness of heavy cream, the warmth of honey, and a touch of vanilla, creating a delightful balance that enchants every palate. Not only does this pie elevate any gathering with its unique twist on dessert, but it also features a simple preparation process—perfect for both novice bakers and seasoned chefs. Imagine serving up a slice of this beauty, its golden top shimmering with a perfectly burnt glaze, enticing everyone to indulge. Ready to impress your loved ones with this irresistible dessert? Let’s dive into the making of this delectable Burnt Honey Pie!
Why is Burnt Honey Pie so special?
Uniqueness: This Burnt Honey Pie takes a beloved classic and adds a sweet twist that will leave everyone talking!
Effortless Preparation: With just 15 minutes of prep, you’ll have a stunning dessert ready to wow your friends and family.
Irresistible Flavor: The caramelized honey combined with rich cream and a touch of vanilla creates a symphony of taste that’s completely irresistible.
** crowd-pleaser**: Serve this at your next gathering and be prepared for compliments—it’s a showstopper that everyone will love!
Versatile Recipe: Whether you’re creating it for a special occasion or a casual weeknight treat, this pie adapts effortlessly to any setting. Add a scoop of ice cream on the side for an extra indulgence!
Explore more unique dessert ideas with our ultimate dessert guide to keep your baking adventures fresh and exciting!
Burnt Honey Pie Ingredients
Discover what makes this Burnt Honey Pie a delightful treat!
For the Filling
- Honey – 1 cup of honey gives the pie its signature caramelized sweetness.
- Heavy Cream – 1 cup for a luscious, rich texture that balances the flavors perfectly.
- Large Eggs – 3 eggs add structure and richness to the filling.
- Granulated Sugar – ½ cup to enhance sweetness and contribute to the caramelization.
- Sea Salt – ½ teaspoon enhances the flavors and brings out the sweetness.
- Vanilla Extract – ¼ teaspoon adds a warm, inviting aroma to the filling.
- Cornstarch – 1 tablespoon helps the filling to set beautifully.
For the Crust
- Unsalted Butter – 2 tablespoons make for a tender pie crust that pairs wonderfully with the creamy filling.
Elevate your culinary experience with this unique Burnt Honey Pie recipe!
Step‑by‑Step Instructions for Burnt Honey Pie
Step 1: Preheat the Oven
Begin by preheating your oven to 350°F (175°C). This crucial first step ensures your Burnt Honey Pie bakes evenly and achieves that perfect golden brown finish on top. While the oven warms up, you can gather and prep your ingredients, setting the stage for a delightful baking experience.
Step 2: Caramelize the Honey
In a medium saucepan, add 1 cup of honey and heat it over medium heat. Allow it to bubble gently for about 5–10 minutes, stirring occasionally, until it turns a deep amber color and caramelizes beautifully. Once the honey is bubbling and fragrant, remove it from heat and let it cool slightly to prevent curdling the eggs later.
Step 3: Whisk the Cream Mixture
In a large mixing bowl, combine 1 cup of heavy cream, 3 large eggs, ½ cup of granulated sugar, ½ teaspoon of sea salt, ¼ teaspoon of vanilla extract, and 1 tablespoon of cornstarch. Use a whisk to blend these ingredients together until they form a smooth and homogenous mixture. This creamy base is essential for the rich texture of your Burnt Honey Pie.
Step 4: Combine the Honey and Cream Mixture
Gradually pour the warm caramelized honey into the cream mixture, whisking continuously to combine. This step ensures that the warmth from the honey doesn't cook the eggs, resulting in a perfectly silky filling. Keep whisking until the mixture is fully incorporated and well combined, creating a beautiful blend of flavors.
Step 5: Prepare the Pie Crust
Take your prepared pie crust, whether homemade or store-bought, and place it in a 9-inch pie dish. Ensure the crust is evenly fit and crimp the edges if desired. The pie crust is the perfect vessel for your luxurious Burnt Honey filling, providing a crispy contrast to the creamy interior.
Step 6: Fill the Crust
Carefully pour the caramelized honey filling into the prepared pie crust, ensuring it fills the crust evenly. Give the pie dish a gentle shake to settle the filling and remove any air bubbles. This step sets the foundation for a beautifully baked pie and a lovely presentation when it’s time to serve.
Step 7: Bake the Pie
Place the filled pie in your preheated oven and bake for 40–45 minutes. You’ll know it’s ready when the edges are firm and the center has a slight jiggle but is mostly set. Keep an eye on the top; it should develop a gorgeous burnt layer that adds character to your Burnt Honey Pie.
Step 8: Cool and Serve
After baking, remove the pie from the oven and let it cool completely at room temperature. Cooling is vital for allowing the filling to set properly, making it easier to slice. Once cooled, slice your Burnt Honey Pie into wedges and serve it up, perhaps with a dollop of whipped cream or a scoop of ice cream for extra indulgence.
Expert Tips for the Best Burnt Honey Pie
Perfect Honey Heat: Always heat the honey until it's bubbling and caramelized to unlock its full flavor potential. Too little heat means bland sweetness.
Creamy Texture: Whisk the cream mixture thoroughly and make sure the caramelized honey is slightly cooled before combining to avoid curdling the eggs.
Watch the Bake Time: Keep a close eye while baking! If the top is burnt before the filling is set, cover it loosely with foil to prevent over-browning.
Cooling Matters: Be patient during the cooling process; letting the pie cool completely is crucial for clean slices and fully set filling.
Crust Choices: If using store-bought crust, choose a high-quality brand; it enhances the overall flavor of your Burnt Honey Pie.
Embrace these expert tips and enjoy the journey of bringing this delightful dessert to life!
Make Ahead Options
These Burnt Honey Pie preparations are perfect for busy home cooks looking to save time without sacrificing flavor! You can prepare the filling up to 24 hours in advance; simply follow the steps to caramelize the honey and mix it with the cream mixture, then refrigerate it in an airtight container to keep it fresh. The pie crust can also be blind-baked, cooled, and stored at room temperature. When you're ready to bake, pour the chilled filling into the crust and bake as instructed. This way, you’ll enjoy a delectable, homemade dessert with minimal effort right before serving, ensuring your Burnt Honey Pie is just as delightful as when freshly made!
Burnt Honey Pie Variations & Substitutions
Feel free to get creative with this recipe and make it your own—there's something delightful to discover in every twist!
- Dairy-Free: Substitute heavy cream with coconut cream for a rich, tropical flavor that pairs beautifully with honey.
- Gluten-Free: Use a gluten-free pie crust to accommodate dietary needs without sacrificing taste.
- Flavor Boost: Add a dash of cinnamon or nutmeg to the cream mixture for a warm, spiced note that will pleasantly surprise your taste buds.
- Nuts for Texture: Incorporate finely chopped pecans or walnuts in the crust for a delightful crunch that complements the creamy filling.
- Honey Variety: Experiment with different types of honey, like orange blossom or wildflower, to discover unique flavor profiles in your Burnt Honey Pie.
- Fruity Twist: Add fresh or dried fruit, such as sliced figs or peaches, beneath the filling for a fruity surprise in every bite.
- Chocolate Drizzle: Melt dark chocolate and drizzle over the top of the cooled pie for an indulgent touch that enhances the sweetness of the honey.
Explore even more delightful desserts by checking out our delectable tart recipes or dive into our ultimate dessert guide that promises to add excitement to your baking journey!
How to Store and Freeze Burnt Honey Pie
Room Temperature: Allow the Burnt Honey Pie to cool completely before leaving it at room temperature, where it can be stored for up to 2 days covered to maintain freshness.
Fridge: For longer storage, place your pie in the refrigerator, where it will stay fresh for 3–4 days. Cover it with plastic wrap or aluminum foil to prevent it from absorbing other odors.
Freezer: You can freeze the pie as well! Wrap it tightly in plastic wrap, followed by aluminum foil, and store it in the freezer for up to 3 months. Thaw in the fridge overnight before serving.
Reheating: To reheat, place individual slices in the oven at 350°F (175°C) for about 10–15 minutes until warmed through, bringing back that freshly baked flavor.
What to Serve with Burnt Honey Pie
Indulging in a slice of Burnt Honey Pie opens up a world of potential pairings that can elevate your dessert experience.
- Fresh Berries: Juicy, tart berries like raspberries and blueberries cut through the sweetness, adding a refreshing, vibrant burst.
- Whipped Cream: Light and airy, a dollop of freshly whipped cream enhances the rich filling while adding a lovely texture contrast.
- Vanilla Ice Cream: Creamy and sweet, a scoop of vanilla ice cream provides a delightful melt-in-your-mouth experience alongside warm pie. Its coolness is a perfect counterpoint to the warm, caramelized flavors.
- Nutty Crumble Topping: Consider a sprinkle of toasted nuts for added crunch. Almonds or pecans can enhance the flavor profile while offering a delightful textural contrast.
- Coffee or Espresso: A strong cup of coffee or espresso harmonizes wonderfully with the sweetness of the pie, creating a balanced moment of indulgence.
- Dark Chocolate Sauce: Drizzling some rich chocolate sauce over the pie brings a luxurious finishing touch that tantalizes the taste buds. The bitterness of dark chocolate pairs beautifully with honey’s sweetness.
- Cinnamon Spiced Pears: Serve alongside warm, cinnamon-spiced poached pears for a delightful seasonal touch. Their tender texture complements the pie’s creamy filling.
- Herbal Tea: For a lighter pairing, a warm cup of herbal tea, like chamomile or mint, can cleanse the palate and add a soothing end to your dessert experience.
Embrace creativity, and mix and match these delightful accompaniments to make your Burnt Honey Pie truly unforgettable!

Burnt Honey Pie Recipe FAQs
How do I select the right honey for this recipe?
Absolutely! For the best flavor, choose high-quality honey that’s pure and raw if possible. This type of honey retains more natural flavors and nutrients compared to processed honey. Look for honey that has a rich color and a robust aroma, which will deeply enhance the overall taste of your Burnt Honey Pie.
What’s the best way to store Burnt Honey Pie?
The best method to store your Burnt Honey Pie is to let it cool completely, then cover it and keep it at room temperature for 1-2 days. If you want it to last longer, refrigerate it for 3-4 days wrapped tightly with plastic wrap or aluminum foil to protect it from absorbing any other fridge odors.
Can I freeze Burnt Honey Pie?
Absolutely! To freeze your Burnt Honey Pie, wrap it thoroughly in plastic wrap followed by aluminum foil to prevent freezer burn. It can be stored in the freezer for up to 3 months. When you’re ready to enjoy it, simply thaw it overnight in the refrigerator before serving. If you prefer a warm slice, you can reheat it in the oven at 350°F (175°C) for about 10-15 minutes.
What should I do if my pie doesn’t set?
If your Burnt Honey Pie doesn’t set as expected, try not to worry! Sometimes, this can happen if the mixture wasn’t baked long enough. The edges should be firm with a slight jiggle in the center when done. If you find it’s still too runny after baking, you can return it to the oven, keeping a close eye on it. You can also try adding more cornstarch next time or ensuring the caramelized honey is not too hot when mixed in.
Is this recipe suitable for people with egg allergies?
This pie does contain eggs, but if you have egg allergies, you can try substituting the eggs with an equivalent mixture of 1 tablespoon of flaxseed meal mixed with 2.5 tablespoons of water for each egg. Mix it and let it sit for about 5 minutes to thicken before adding to your cream mixture. While it may alter the flavor slightly, it should still give a similar texture.
How can I tell when my pie is perfectly burnt?
Very! To achieve that ideal burnt layer, keep a watchful eye on your pie during the last few minutes of baking. You’re looking for a rich, deep color on the surface that’s slightly darker than golden brown but not completely blackened. If it seems to be browning too quickly, gently cover the top with aluminum foil to slow down the burning while allowing it to bake through.
Divine Burnt Honey Pie: A Sweet Twist on Classic Dessert
Ingredients
Equipment
Method
- Preheat your oven to 350°F (175°C).
- In a medium saucepan, add 1 cup of honey and heat over medium heat until it turns deep amber and caramelizes, about 5–10 minutes.
- In a large mixing bowl, combine 1 cup of heavy cream, 3 eggs, ½ cup of granulated sugar, ½ teaspoon of sea salt, ¼ teaspoon of vanilla extract, and 1 tablespoon of cornstarch. Whisk until smooth.
- Gradually pour the warm caramelized honey into the cream mixture, whisking continuously until fully combined.
- Prepare the pie crust in a 9-inch pie dish, ensuring it's evenly fit.
- Carefully pour the caramelized honey filling into the prepared pie crust, ensuring it fills evenly.
- Place the filled pie in the oven and bake for 40–45 minutes until edges are firm and center has a slight jiggle.
- Remove the pie from the oven and let it cool completely at room temperature before slicing.


Leave a Reply