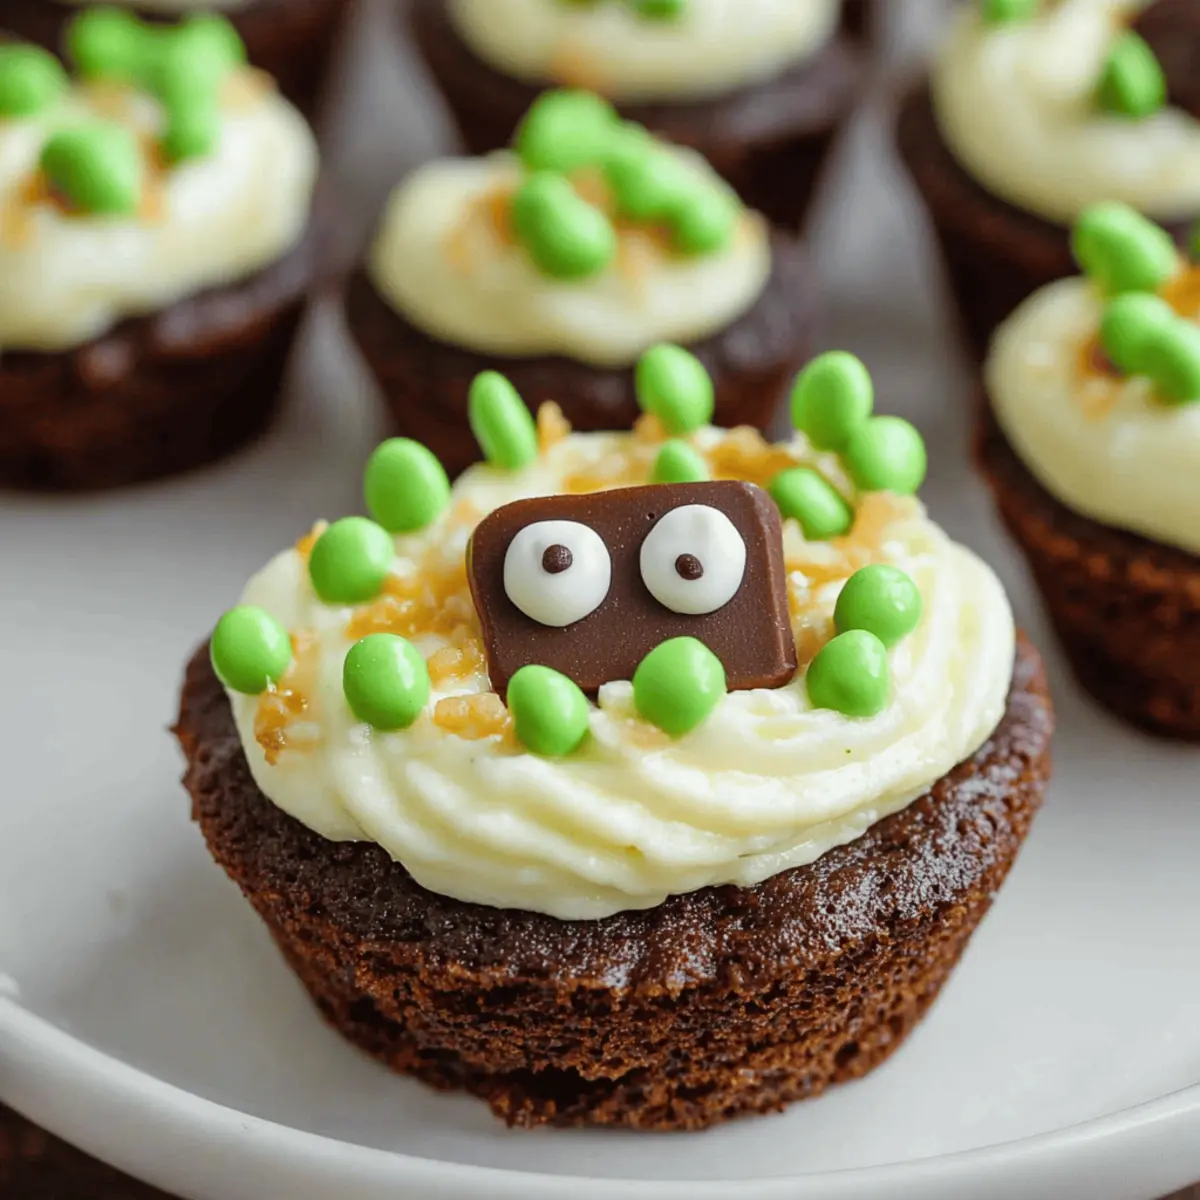
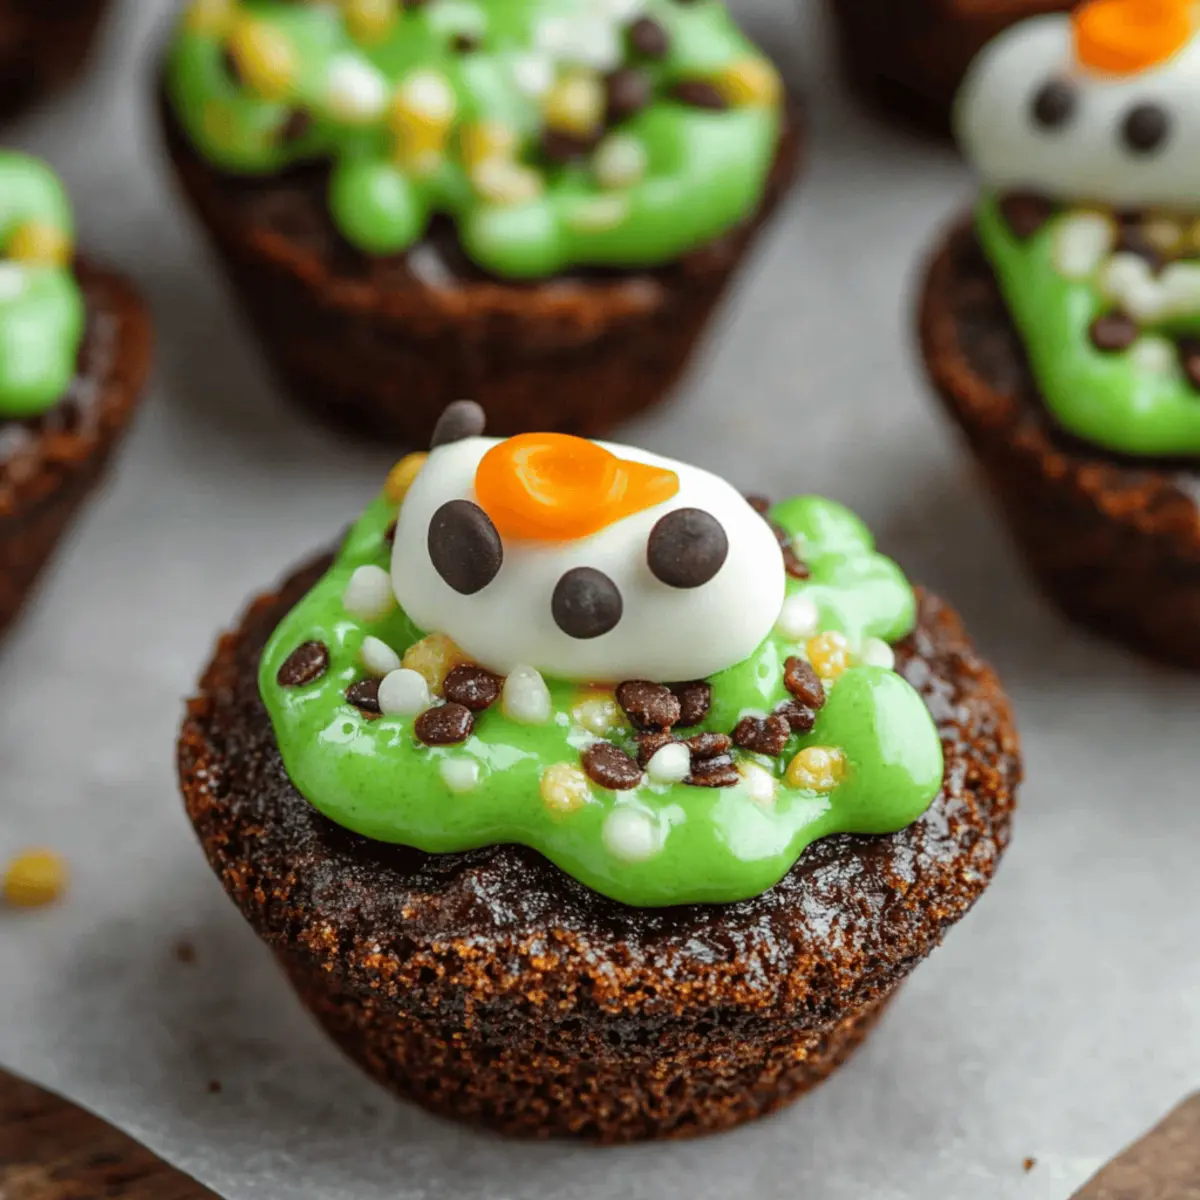
As I stood in my kitchen, I couldn't help but chuckle at the delightful chaos of Halloween treats that surrounded me. It was one of those magical moments where creativity meets confectionery, and that’s when I decided to whip up these irresistible Cauldron Cookie Cups. They’re not just any cookies; the magic lies in their whimsical design and comfort-food vibe, making them the ultimate party showstopper. With quick prep time and an eye-catching appearance that will impress both kids and adults alike, these cookie cups are sure to enchant your guests. Imagine each bite revealing a creamy, buttery filling draped in green sprinkles and candy eyeballs—who wouldn’t want in on such fun? Ready to conjure up some sweetness in your kitchen? Let’s dive into this enchanting recipe!
Why Are These Cookie Cups Magical?
Whimsical Design: Each cookie cup is a charming treat that captures the spirit of Halloween, perfect for festive gatherings.
Quick to Make: With only 28 minutes from prep to plate, you can whip them up quickly, making them ideal for last-minute parties or family fun.
Kid-Approved Fun: Kids will love the interactive element, from decorating with candy eyeballs to pretending they’re stirring a bubbling potion with pretzel sticks!
Deliciously Creamy: The buttery, smooth filling pairs perfectly with the rich chocolate cookie base, delivering a taste that will satisfy any sweet tooth.
Versatile Treat: While they shine during Halloween, these cookie cups can be customized for any occasion. Think color swaps and themes! Don’t miss out on more delightful ideas in our Halloween baking guide or explore other unique treats like our chocolate chip cookie variations.
Cookie Cups Ingredients
For the Cookie Base
• Devil's Food cake mix – offers a rich chocolate flavor that creates a delightful base for your cookie cups.
• Large eggs – bind the ingredients together for a chewy, moist texture.
• Canola or vegetable oil – adds moisture and helps create a soft cookie.
• Black food coloring (optional) – enhances the Halloween theme for a spooky, dark cookie.
For the Buttercream Filling
• Unsalted butter – provides a creamy texture and rich taste to the filling.
• Powdered sugar – sweetens the frosting and gives it a light, airy consistency.
• Vanilla extract – adds a lovely aroma and flavor depth to the buttercream.
• Salt – balances the sweetness for a well-rounded flavor.
• Milk – helps achieve a smooth and pipeable frosting consistency; add in small amounts.
• Green food coloring – injects a vibrant hue that mimics a bubbling potion!
For Decorating
• Round green sprinkles – add color and a festive touch to your cookie cups.
• Halloween sprinkles – provide an extra festive flair to match the spooky vibe.
• Candy eyeballs – give your cookie cups a fun and whimsical appearance.
• Pretzel sticks – make for adorable “stir sticks” that add a playful element to the treat.
Ready to conjure up these magical Cookie Cups? Gather your ingredients, and let the baking adventure begin!
Step‑by‑Step Instructions for Cookie Cups
Step 1: Preheat and Prepare
Begin by preheating your oven to 350 degrees F (175 degrees C). While the oven warms, lightly grease three 12-count mini muffin pans with non-stick spray or butter. This step ensures that your cookie cups release easily after baking and maintain their delightful shape.
Step 2: Mix the Cookie Dough
In a large mixing bowl, combine the Devil's Food cake mix, large eggs, canola oil, and black food coloring (if desired). Use a sturdy spatula or your hands to mix until the ingredients are fully integrated, creating a thick and gooey dough. This rich chocolate mixture will serve as the scrumptious base for your Cookie Cups.
Step 3: Form the Cookie Cups
Using a tablespoon, scoop about ½ tablespoon of the prepared dough and drop it into each compartment of the mini muffin pans. Flatten the dough slightly with your fingers to form small discs. Ensure each cup is relatively even to achieve uniform baking.
Step 4: Bake and Indent
Place the muffin pans into the preheated oven and bake for 8 to 10 minutes, or until the edges of the cookie cups are set. Keep an eye on them—they should be soft but not overly gooey. As soon as they are done, remove the pans from the oven and gently press the back of a 1 tablespoon measuring spoon into each cookie to create an indentation, which will hold your flavorful filling.
Step 5: Cool the Cookie Cups
Allow the cookie cups to cool in the pans for about 10 minutes. Once they are cool enough to handle, carefully remove them from the pans and let them cool completely on a wire rack. This cooling time helps them firm up for the next delicious layer of frosting.
Step 6: Make the Buttercream
While the cookie cups cool, prepare your luscious buttercream filling. In a medium mixing bowl, beat the softened unsalted butter until it reaches a creamy consistency. Gradually add the powdered sugar, vanilla extract, and salt, mixing until the frosting is smooth and fluffy. If it’s too thick, add milk, one tablespoon at a time, until you reach a pipeable texture.
Step 7: Color and Pipe the Buttercream
Once your buttercream is ready, add a few drops of green food coloring and mix until you achieve the desired vibrant shade. Next, fill a piping bag (or a resealable plastic bag with the corner snipped off) with the green buttercream. Pipe the frosting into the cooled cookie cups, filling each indentation generously to mimic a bubbling potion.
Step 8: Decorate and Serve
Finally, sprinkle your decorated Cookie Cups with round green sprinkles, candy eyeballs, and Halloween sprinkles for a fun, festive touch. Break the pretzel sticks in half and insert one into each cookie cup to serve as an adorable stir stick. Your enchanting Cookie Cups are now ready to delight both young and old!

How to Store and Freeze Cookie Cups
Room Temperature: Store unfilled cookie cups in an airtight container at room temperature for up to 3 days to maintain their delicious chewy texture.
Fridge: If you've filled them with buttercream, keep the decorated cookie cups in the fridge for up to 5 days. Just be sure they're in an airtight container to prevent the buttercream from drying out.
Freezer: For longer storage, freeze unfilled cookie cups in a single layer on a baking sheet, then transfer to a freezer-safe container after 2 hours. They can be stored for up to 3 months.
Reheating: When ready to enjoy your frozen cookie cups, thaw in the fridge overnight. Reheat in a 350°F oven for about 5 minutes to recapture that fresh-baked taste before decorating!
Cookie Cups: Endless Possibilities
Feel free to get creative and customize these delightful cookie cups in ways that inspire your taste buds!
-
Gluten-Free: Swap the Devil's Food cake mix with a gluten-free variety to make these cookie cups accessible for everyone, without sacrificing flavor. Taste testers will be none the wiser!
-
Nutty Flavor: Add ½ cup of finely chopped nuts, like walnuts or pecans, to the dough for an extra crunch! The nuts will provide a surprising texture that pairs beautifully with the creamy filling.
-
Chocolate Lovers: For an indulgent twist, mix in 1 cup of chocolate chips to the cookie dough. This will elevate the chocolate flavor and add delightful pockets of melted chocolate!
-
Filling Variations: Instead of green buttercream, try flavored buttercream like mint, raspberry, or caramel. Each option offers a new flavor profile that will thrill your guests.
-
Spicy Kick: Infuse a touch of heat by adding a pinch of cayenne pepper to the cookie dough. The spice might just surprise your palate, illuminating the richness of the chocolate!
-
Fruit Toppings: Swap out Halloween sprinkles for seasonal fruit-themed options. Use raspberries or orange zest to provide a fresh burst of flavor that complements the sweetness.
-
Dairy-Free: Substitute the butter with vegan butter and use a dairy-free milk alternative for the buttercream. You won’t even have to compromise on taste while catering to dietary needs!
-
Colorful Layers: Experiment with different colors of food coloring in the buttercream and decorate with sprinkles matching any event! Feel free to celebrate birthdays or holidays in vibrant style.
These variations enhance the festive spirit of your cookie cups, making them perfect for any gathering. Explore more inspiring ideas in our Halloween baking guide or check out our chocolate chip cookie variations for even more tasty delights!
Make Ahead Options
These delightful Cookie Cups are perfect for meal prep enthusiasts looking to save time during busy weeks! You can prepare the cookie cups up to 24 hours in advance by baking and cooling them completely. Store them in an airtight container at room temperature to maintain their softness. The buttercream filling can also be made up to 3 days ahead; simply store it in the refrigerator in an airtight container. When you’re ready to serve, allow the buttercream to come to room temperature before piping it into the cookie cups. With these make-ahead options, you can enjoy deliciously whimsical treats with minimal last-minute effort!
What to Serve with Cauldron Cookies
Indulging in these whimsical cookie cups opens up a world of delightful pairings that will make your gathering even more unforgettable.
-
Spiced Apple Cider: Warm, spiced apple cider complements the chocolatey cookies perfectly, adding a cozy vibe for your Halloween festivities. It’s both refreshing and comforting, evoking the flavors of fall.
-
Pumpkin Pie: The creamy, spiced richness of classic pumpkin pie balances the sweetness of your cookie cups, making a deliciously festive dessert spread. This duo can truly transport your guests into a seasonal wonderland.
-
Creamy Vanilla Ice Cream: Scoops of vanilla ice cream are a warm-weather favorite that will melt beautifully over your cookie cups, creating a delightful contrast of textures and temperatures. A simple drizzle of fudge syrup can take it to the next level!
-
Chocolate Dipped Strawberries: These fresh, sweet treats add a touch of elegance to your spooky dessert table, while their fruity flavor brightens up the rich chocolate of the cookie cups. A perfect balance of decadence and freshness awaits!
-
Gingerbread Cookies: The warm spices of gingerbread harmonize beautifully with the chocolatey cookie cups, creating a festive sampling experience that will evoke holiday nostalgia. This pairing is a great way to celebrate the season together!
-
Halloween-themed Fruit Skewers: Add a playful and healthy touch with skewers of colorful fruits like grapes, oranges, and berries. They bring a refreshing crunch that contrasts with the rich cookie cups while keeping it festive.
-
Chilled Milk: You can’t go wrong with a classic! A cold glass of milk is the perfect beverage to wash down these sweet treats, helping to enhance their rich, buttery flavors.
-
Spooky Cupcakes: Serve some cupcakes decorated with Halloween themes alongside your cookie cups to create a luxurious dessert spread. Plus, the different flavors will keep everyone guessing and delightfully surprised!
-
Hot Chocolate: Cozy up your gathering with rich hot chocolate, topped with whipped cream and colorful sprinkles, providing a nostalgic touch that pairs perfectly with the cookie cups. Who can resist a classic like this, especially on chilly evenings?
Expert Tips for Cookie Cups
Use Fresh Ingredients: Ensure your eggs and butter are fresh for the best taste and texture; stale ingredients can lead to flat cookie cups.
Don’t Overbake: Keep an eye on the cookie cups as they bake; pulling them out while still soft ensures a chewy texture once cooled.
Mixing Technique: When making the buttercream, start slow to avoid a sugar cloud, then beat on higher speed for a light and fluffy filling that perfectly complements the cookie cups.
Customize Your Sprinkles: Feel free to get creative with decorations! Different color sprinkles can match any theme or occasion beyond Halloween, making these cookie cups versatile.
Press Firmly: When creating the indentations, firmly but gently press to ensure a deep enough cavity for the buttercream, but not so hard that they collapse.

Cauldron Cookies Recipe FAQs
What kind of cake mix should I use for the cookie cups?
I recommend using Devil's Food cake mix for a rich chocolate flavor that really complements the buttercream filling. It adds that magical touch to your Cauldron Cookie Cups and makes them extra special for Halloween!
How should I store the cookie cups after baking?
Store unfilled cookie cups in an airtight container at room temperature for up to 3 days to keep them chewy. If they’re filled with buttercream, keep them in the fridge for up to 5 days, making sure they’re well-sealed to prevent drying out.
Can I freeze the cookie cups?
Absolutely! For freezing, arrange unfilled cookie cups in a single layer on a baking sheet and place them in the freezer for about 2 hours. Once they’re firm, transfer them to a freezer-safe container, where they'll keep for up to 3 months.
What if my buttercream is too thick or too runny?
If your buttercream is thick, add milk, one tablespoon at a time, until you like the consistency, usually needing just 1-3 tablespoons. If it's too runny, add more powdered sugar gradually until you achieve a thick and pipeable texture.
Can I use different decorations for the cookie cups?
Very much so! Feel free to swap out the green sprinkles and candy eyeballs for any colors or themes you desire, making these cookie cups versatile for any occasion beyond Halloween!
Are these cookie cups suitable for people with allergies?
It's essential to consider allergies. The recipe contains eggs and dairy, so it’s not suitable for vegetarians or those with lactose intolerance. You could use egg substitutes and dairy-free butter to create an allergy-friendly version, but always double-check specific allergies with your guests.
Delicious Cookie Cups: A Sweet Treat for Every Occasion
Ingredients
Equipment
Method
- Preheat your oven to 350°F (175°C) and grease three 12-count mini muffin pans.
- Combine Devil's Food cake mix, large eggs, canola oil, and black food coloring in a large mixing bowl.
- Scoop about ½ tablespoon of dough into each mini muffin compartment and flatten slightly.
- Bake for 8 to 10 minutes, then indent each cookie with a measuring spoon.
- Cool cookie cups in pans for 10 minutes, then transfer to a wire rack.
- Beat softened unsalted butter until creamy, then gradually add powdered sugar, vanilla, and salt.
- Add green food coloring to buttercream and pipe into cooled cookie cups.
- Decorate with sprinkles, candy eyeballs, and insert pretzel sticks as stir sticks.


Leave a Reply