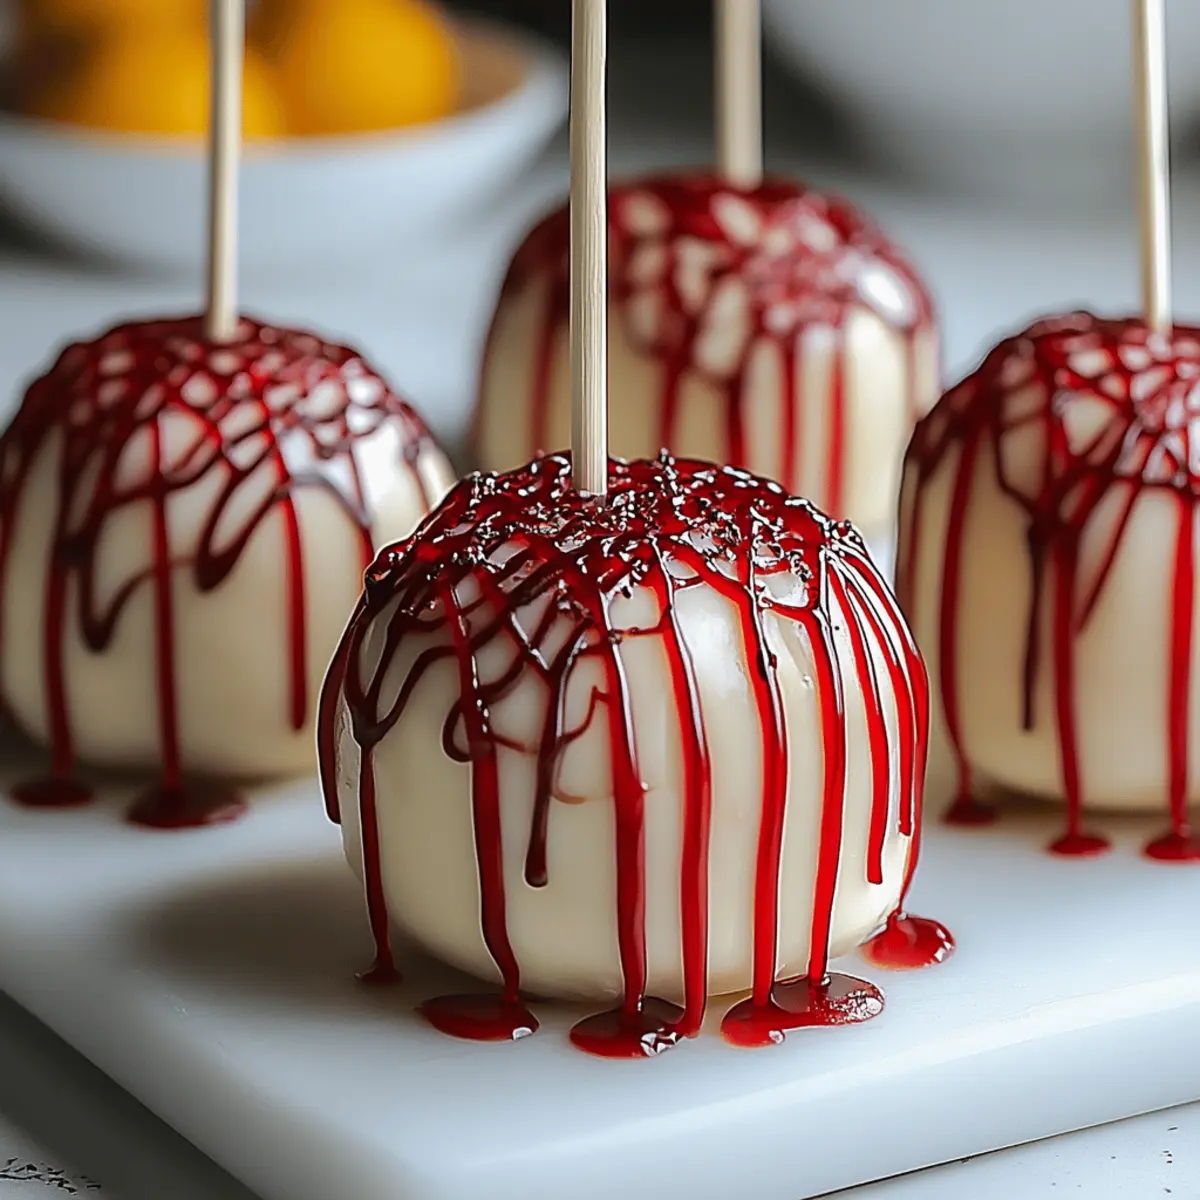
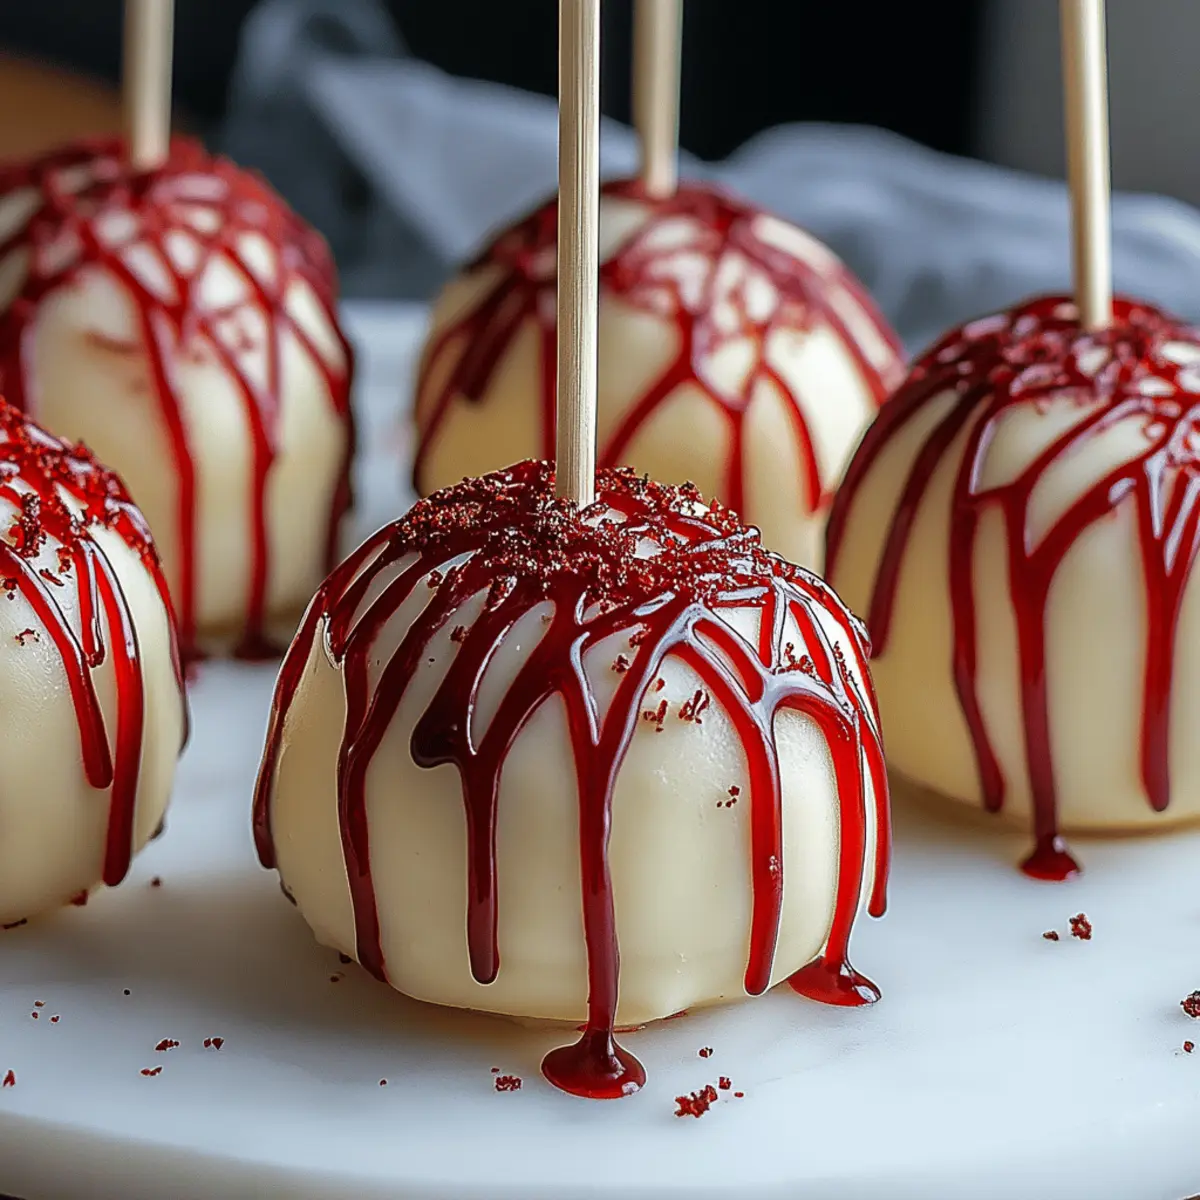
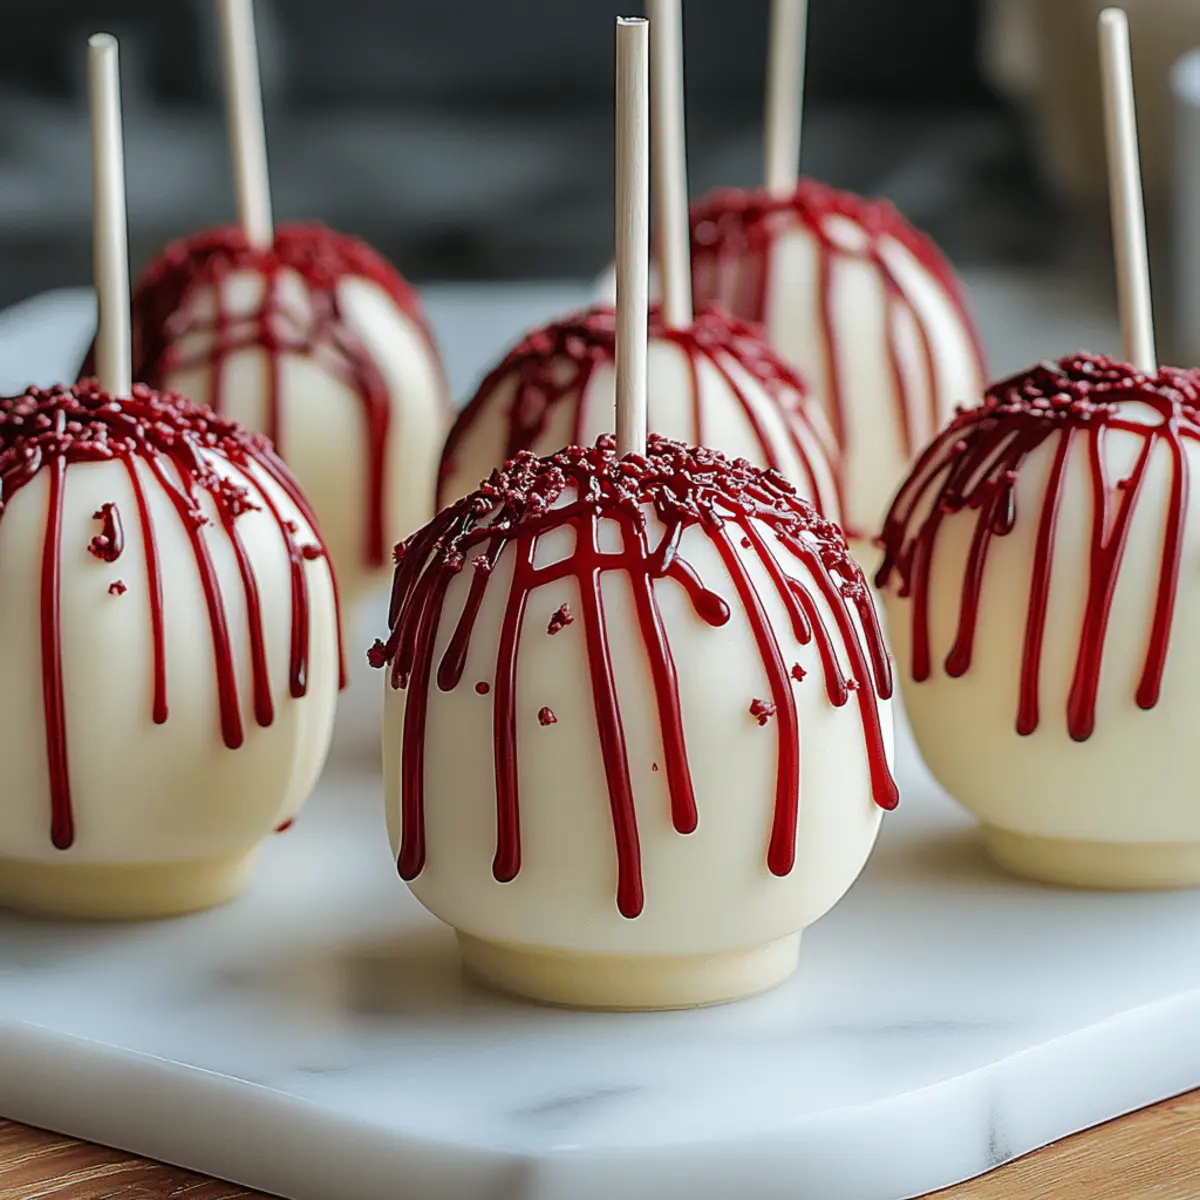
As I sifted through vibrant pumpkins and flickering candles, it struck me—Halloween isn't only about haunting décor but deliciously mesmerizing desserts! Imagine delighting your friends and family with Bloody Red Velvet Cake Pops that are not just festive but also so easy to whip up on a busy afternoon. These delightful treats are not only an eye-catching addition to your Halloween festivities but also a fantastic way to impress guests with something both playful and tasteful. With moist red velvet cake coated in creamy white chocolate, they marry the spooky spirit of the season with irresistible flavor. Trust me, these cake pops will vanish faster than a ghost at midnight! So, are you ready to bake a batch of these enchanting delights that beg to be shared?
Why Make Bloody Red Velvet Cake Pops?
Eye-catching and delicious: These Bloody Red Velvet Cake Pops are sure to steal the show at any Halloween gathering.
Easy to make: You’ll love how simple it is to transform a box mix into gourmet treats!
Festive twist: Their vivid red color and drizzled white chocolate bring the spooky spirit of Halloween right to your table.
Perfect for sharing: Individually sized bites make them fun and convenient for guests to grab—or to take home!
Versatile decoration: Customize your pops with toppings or clever designs, perfect for any Halloween theme!
Try pairing these treats with the delightful Ghost Meringues for a chillingly sweet dessert table that everyone will love!
Bloody Red Velvet Cake Pops Ingredients
For the Cake
- Red velvet cake mix – this is the star of your cake pops, providing the rich color and flavor.
- Large eggs – they add moisture and richness to the cake, helping it hold together beautifully.
- Vegetable oil – gives the cake its tenderness and a moist crumb.
- Water – helps to blend the cake mix for a perfectly smooth batter.
For the Coating
- White chocolate – this creamy goodness coats the cake pops and creates a stunning contrast with the red velvet.
For the Drizzle
- Red food coloring – drizzling this on top adds the perfect spooky touch for your Halloween celebration!
These Bloody Red Velvet Cake Pops are not just a treat for the taste buds, but also a feast for the eyes! Get ready to enchant your guests with these spooktacular delights.
Step‑by‑Step Instructions for Bloody Red Velvet Cake Pops
Step 1: Prepare the Cake
Start by preheating your oven to 350°F (175°C). In a large mixing bowl, combine the red velvet cake mix, eggs, vegetable oil, and water. Stir until you achieve a smooth batter, free of lumps. Pour the mixture into a greased 9x13 inch baking pan and bake for 25-30 minutes or until a toothpick comes out clean. Once baked, allow the cake to cool completely on a wire rack, which takes about 30 minutes.
Step 2: Crumble the Cake
Once the cake has cooled, use your hands or a fork to crumble it into fine crumbs in a large bowl. Aim for a consistency similar to sand—this will help form your cake pops. Add a few tablespoons of cream cheese frosting or store-bought icing to the crumbs, mixing well until cohesive. The mixture should be moist enough to hold together when rolled into balls.
Step 3: Shape the Cake Pops
Using your hands, scoop a tablespoon of the cake mixture and roll it into smooth balls, about 1 inch in diameter. Place the cake balls on a parchment-lined baking sheet. Once all the balls are formed, insert a lollipop stick into the center of each ball, allowing them to set in the fridge for about 30 minutes until firm. This chilling step is crucial for your Bloody Red Velvet Cake Pops to hold their shape.
Step 4: Melt the White Chocolate
While the cake pops chill, prepare your white chocolate coating. In a microwave-safe bowl, melt the white chocolate in 30-second intervals, stirring in between, until smooth and fully melted. Be careful not to overheat the chocolate. This melted chocolate will create a deliciously creamy layer on your cake pops, enhancing both flavor and appearance.
Step 5: Coat the Cake Pops
Carefully dip each chilled cake ball into the melted white chocolate, ensuring it's fully coated. Tap off any excess chocolate before placing the pops upright in a styrofoam block or a glass to cool. The chocolate will set quickly, creating a delightful shell around your Bloody Red Velvet Cake Pops. Allow them to rest for about 10-15 minutes until fully hardened.
Step 6: Decorate with Drizzle
To add a spooky finishing touch, melt a small amount of red food coloring in a bowl, then use a fork or piping bag to drizzle it over the set white chocolate-coated cake pops. Create a fun, bloody effect that will surely attract everyone's attention. Allow the decoration to dry for a few minutes before serving your wonderfully festive Bloody Red Velvet Cake Pops at your Halloween gathering!
Make Ahead Options
These Bloody Red Velvet Cake Pops are perfect for busy home cooks looking to save time during Halloween prep! You can bake the red velvet cake up to 3 days in advance. Allow it to cool completely, wrap it tightly in plastic wrap, and refrigerate to maintain its moistness. Once ready to prepare the cake pops, simply crumble the chilled cake and mix it with your icing (you can store this mixture in the fridge for up to 24 hours before shaping). When it’s time to serve, roll the cake mixture into balls, insert the sticks, and coat with melted white chocolate. This method ensures your cake pops are just as delicious, leaving you with more time to enjoy the festivities!
What to Serve with Bloody Red Velvet Cake Pops?
Imagine a whimsical Halloween feast where every bite brings a delightful surprise to your guests' taste buds.
-
Ghost Meringues: Light and airy, these sweet treats add a playful balance to the richness of the cake pops. Their whimsical form will complement the spooky theme effortlessly.
-
Pumpkin Spice Cookies: With their soft texture and fragrant spices, these cookies evoke the warm scents of fall, pairing perfectly with the vibrant cake pops for a charming dessert spread.
-
Witch Hat Cupcakes: These playful cupcakes crowned with sugar cones are not only visually appealing but their chocolaty goodness enhances the overall view of your dessert table.
-
Candy Corn Cheesecake Bars: Creamy and sweet, these bars bring a festive pop of color, creating an eye-catching combination with your Bloody Red Velvet Cake Pops.
-
Vampire Donuts: With a rich chocolatey base and dripping red icing, these donuts are delightfully messy, creating a fun juxtaposition to the elegant design of your cake pops.
-
Spooky Eyeball Truffles: Indulge in these creamy truffles packed with flavors and topped with candy eyes, creating a deliciously eerie combination that fits right into the Halloween spirit.
-
Frankenstein Rice Krispie Bars: These fun, gooey treats add a crunchy texture, contrasting beautifully with the smoothness of your cake pops while keeping the Halloween vibe alive.
-
Suggested Beverage: Pair your treats with chilled apple cider, which not only complements the flavors but also adds a refreshing element to your spooky dessert table!
How to Store and Freeze Bloody Red Velvet Cake Pops
Room Temperature: Store your cake pops in a cool, dry place in an airtight container for up to 2 days. This helps maintain their freshness and flavor.
Fridge: For longer storage, keep them in the fridge for up to a week. Make sure they're in a sealed container to avoid absorbing odors from other foods.
Freezer: You can freeze your Bloody Red Velvet Cake Pops for up to 3 months. Place them in a single layer on a baking sheet to freeze, then transfer to an airtight bag or container.
Reheating: To enjoy the cake pops after freezing, simply thaw them in the fridge overnight. Serve at room temperature for the best texture!
Variations & Substitutions for Bloody Red Velvet Cake Pops
Feel free to unleash your creativity with these scrumptious cake pops, transforming them to suit your taste and preferences!
-
Gluten-Free: Swap the red velvet cake mix for a gluten-free alternative to cater to gluten sensitivities! It’ll still deliver deliciously moist cake pops.
-
Vegan Delight: Use a vegan cake mix, plant-based eggs, and almond milk to create a delightful vegan version! Your friends will never know the difference!
-
Cream Cheese Frosting: Instead of store-bought frosting, make a homemade cream cheese frosting for an extra layer of tangy sweetness. It’s worth the effort!
-
Add Spice: Enhance the flavor with a hint of cinnamon or nutmeg in the cake mixture. The warm spices will elevate your cake pops and add complexity to every bite.
-
Colorful Drizzles: Experiment with vibrant food colorings for your chocolate drizzle; try orange or green for a fun twist! Embrace the Halloween spirit and I bet your kids will love the playful colors.
-
Roasted Nuts: Incorporate some finely chopped roasted nuts into the cake mixture for added texture and a nutty flavor. It’s a delightful unexpected surprise!
-
Chili Kick: If you’re feeling adventurous, add a pinch of cayenne pepper to the cocoa cake mix for a spicy contrast to the creamy sweetness of the white chocolate. It’s a bold twist!
-
Mini Pumpkin Spice Pops: Swap the red velvet mix for a pumpkin spice cake mix to create a seasonal favorite. These mini pops will be a hit for fall festivities!
These variations are perfect to breathe new life into your dessert table. And for even more Halloween treats, check out the whimsical Witch Hat Cupcakes or light and airy Ghost Meringues to bake alongside your spooktacular cake pops!
Expert Tips for Bloody Red Velvet Cake Pops
-
Use Room Temperature Ingredients: Ensure your eggs and water are at room temperature for a smoother batter that bakes evenly.
-
Moisture Matters: Don't skip the frosting when mixing with cake crumbs; it binds your mixture and keeps the cake pops from being dry.
-
Chill for Success: Firmly chilling the cake balls before coating is crucial; it keeps them from falling apart when dipped in chocolate.
-
Melt Carefully: When melting white chocolate, do it slowly and stir often to prevent it from seizing. This ensures a perfect coating for your bloody red velvet cake pops.
-
Creative Drizzling: Experiment with different designs when drizzling the red food coloring; let your creativity shine for extra spooky flair!
These tips will help ensure that your Bloody Red Velvet Cake Pops turn out both delicious and visually stunning!

Bloody Red Velvet Cake Pops Recipe FAQs
What is the best way to select a good red velvet cake mix?
Absolutely! When choosing a red velvet cake mix, look for a brand that lists cocoa powder and natural colors on the ingredient label. A high-quality mix will have vibrant color and flavor, ensuring your cake pops are both visually appealing and delicious.
How should I store my Bloody Red Velvet Cake Pops?
To keep your cake pops fresh, store them at room temperature in an airtight container for up to 2 days. If you want to extend their longevity, place them in the fridge, where they can last for up to a week. Always ensure they are sealed properly to avoid any unwanted odors from your fridge.
Can I freeze the cake pops for later?
Absolutely! You can freeze your Bloody Red Velvet Cake Pops easily. Start by placing them in a single layer on a baking sheet and freezing until solid. Then, transfer them to an airtight container or bag, where they can stay fresh for up to 3 months. When you're ready to enjoy, let them thaw in the fridge overnight and serve at room temperature for the best texture.
What should I do if my cake pop mixture is too dry?
If your cake pop mixture seems too dry, don’t worry! Simply add a little more cream cheese frosting or icing, mixing it in gradually until you achieve the right moist consistency. The goal is for the mixture to hold together well when rolled into balls. If you’re in a pinch, adding a tablespoon of milk can also help soften the mixture.
Are there any dietary considerations I should be aware of for this recipe?
Very much so! If you have guests with dietary restrictions, consider using gluten-free cake mix and checking for allergy-friendly white chocolate options. For a dairy-free variation, look for non-dairy alternatives for frosting and chocolate. Always check labels for allergens, especially if you're serving children or those with allergies.
Bloody Red Velvet Cake Pops That Are Spooktacularly Delicious
Ingredients
Equipment
Method
- Preheat your oven to 350°F (175°C). In a large mixing bowl, combine the red velvet cake mix, eggs, vegetable oil, and water. Stir until smooth, pour into a greased baking pan, and bake for 25-30 minutes.
- Once cooled, crumble the cake into fine crumbs. Mix in a few tablespoons of cream cheese frosting until cohesive.
- Roll the mixture into balls about 1 inch in diameter, insert lollipop sticks, and chill for about 30 minutes.
- Melt the white chocolate in 30-second intervals in a microwave-safe bowl until smooth.
- Dip each chilled cake ball into the melted white chocolate and tap off excess, then place upright to cool.
- Melt red food coloring and drizzle over the set chocolate-coated cake pops for a spooky effect. Allow to dry before serving.


Leave a Reply