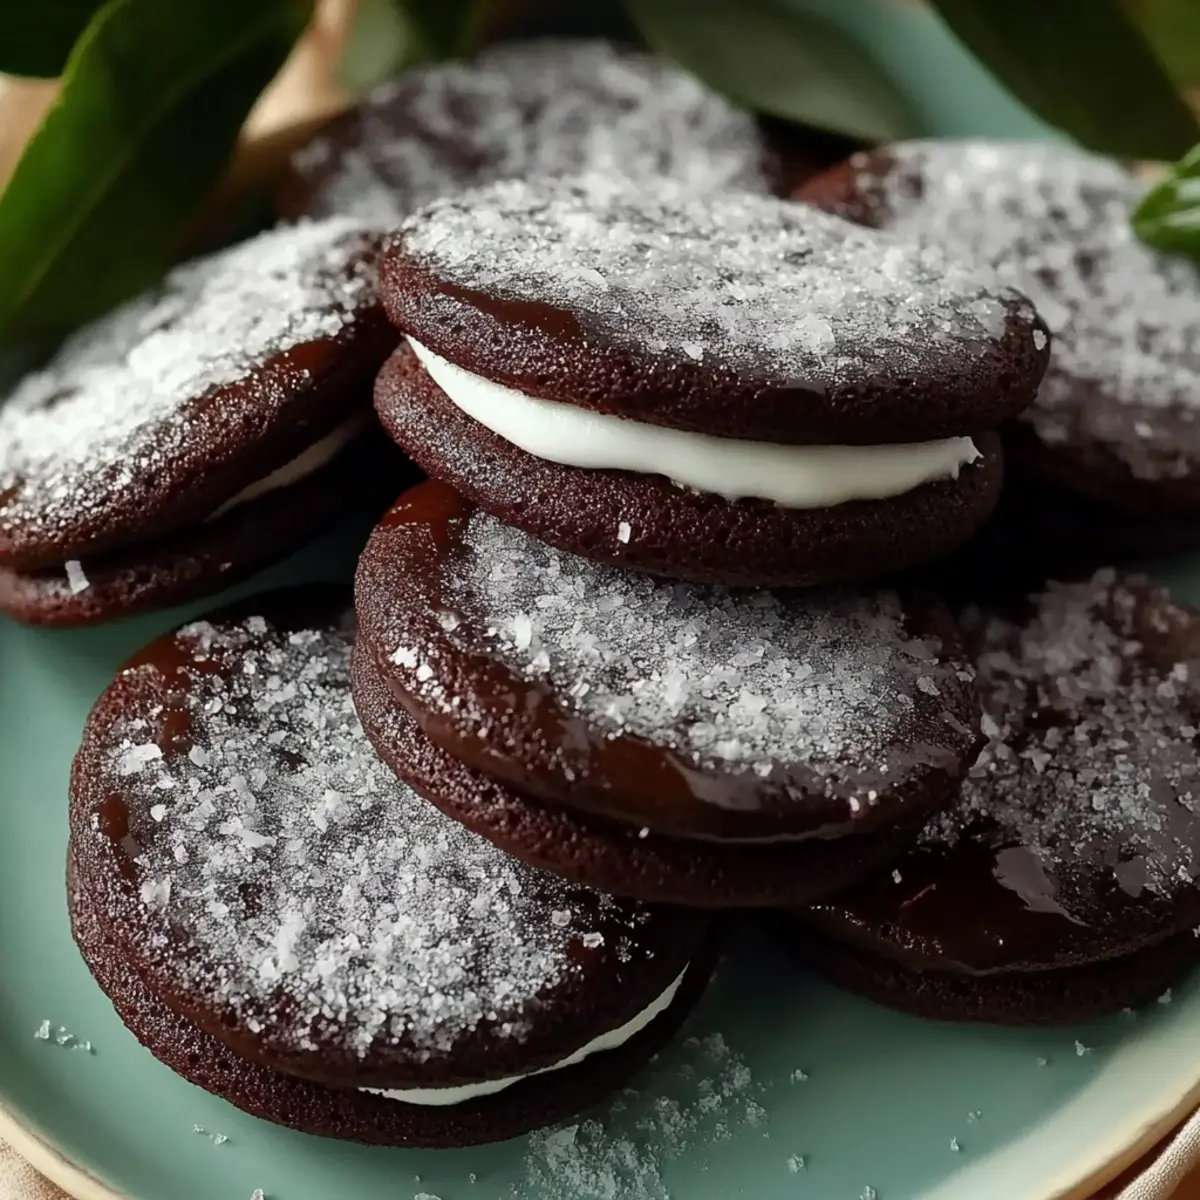
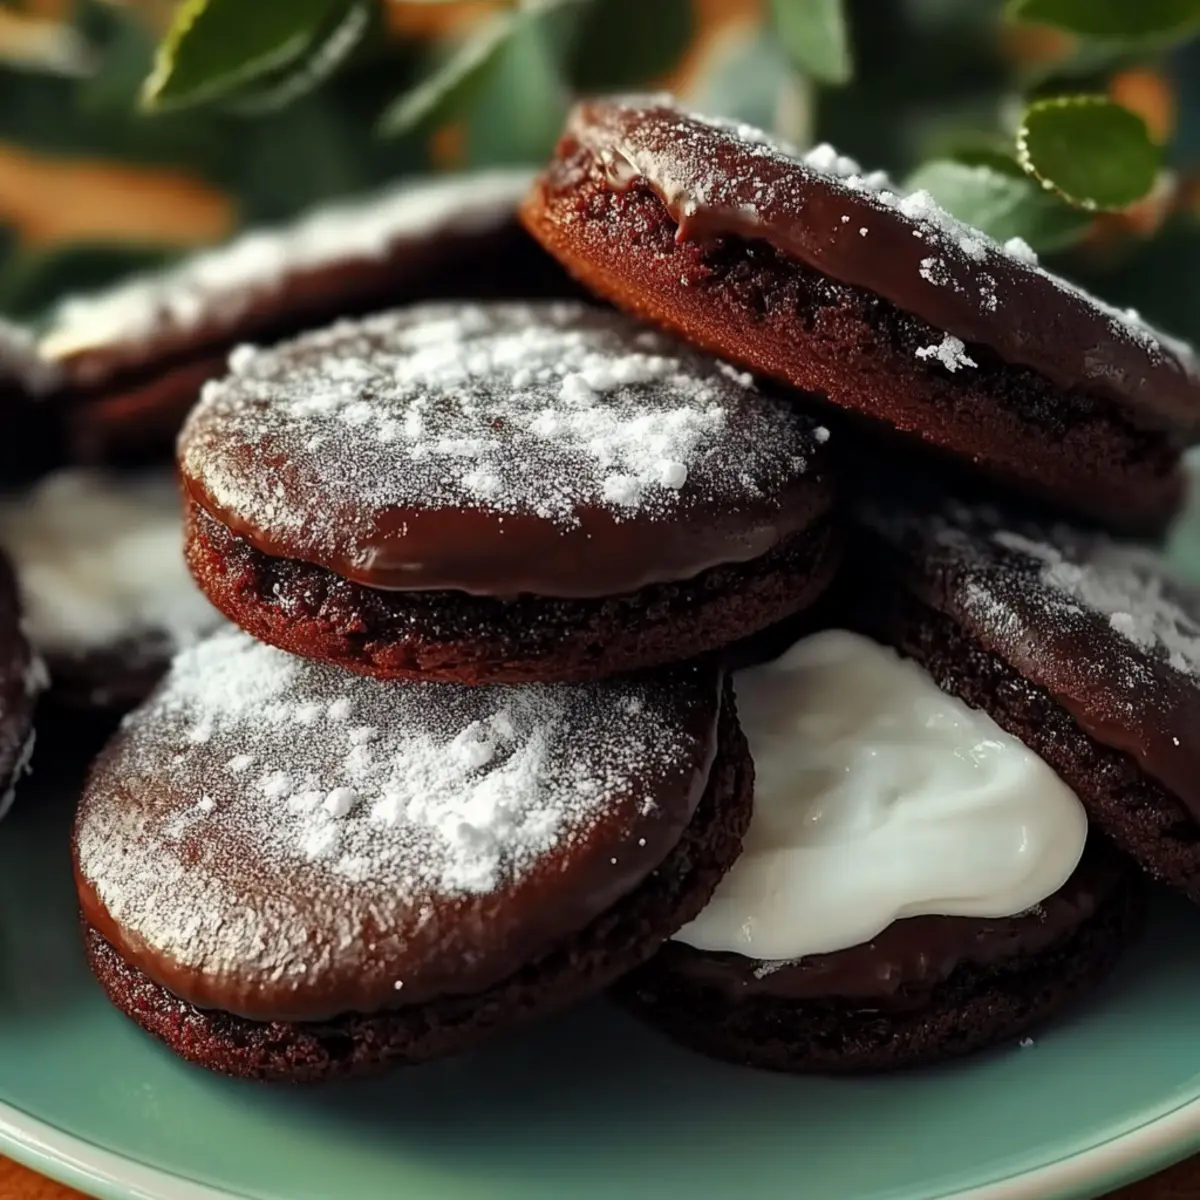
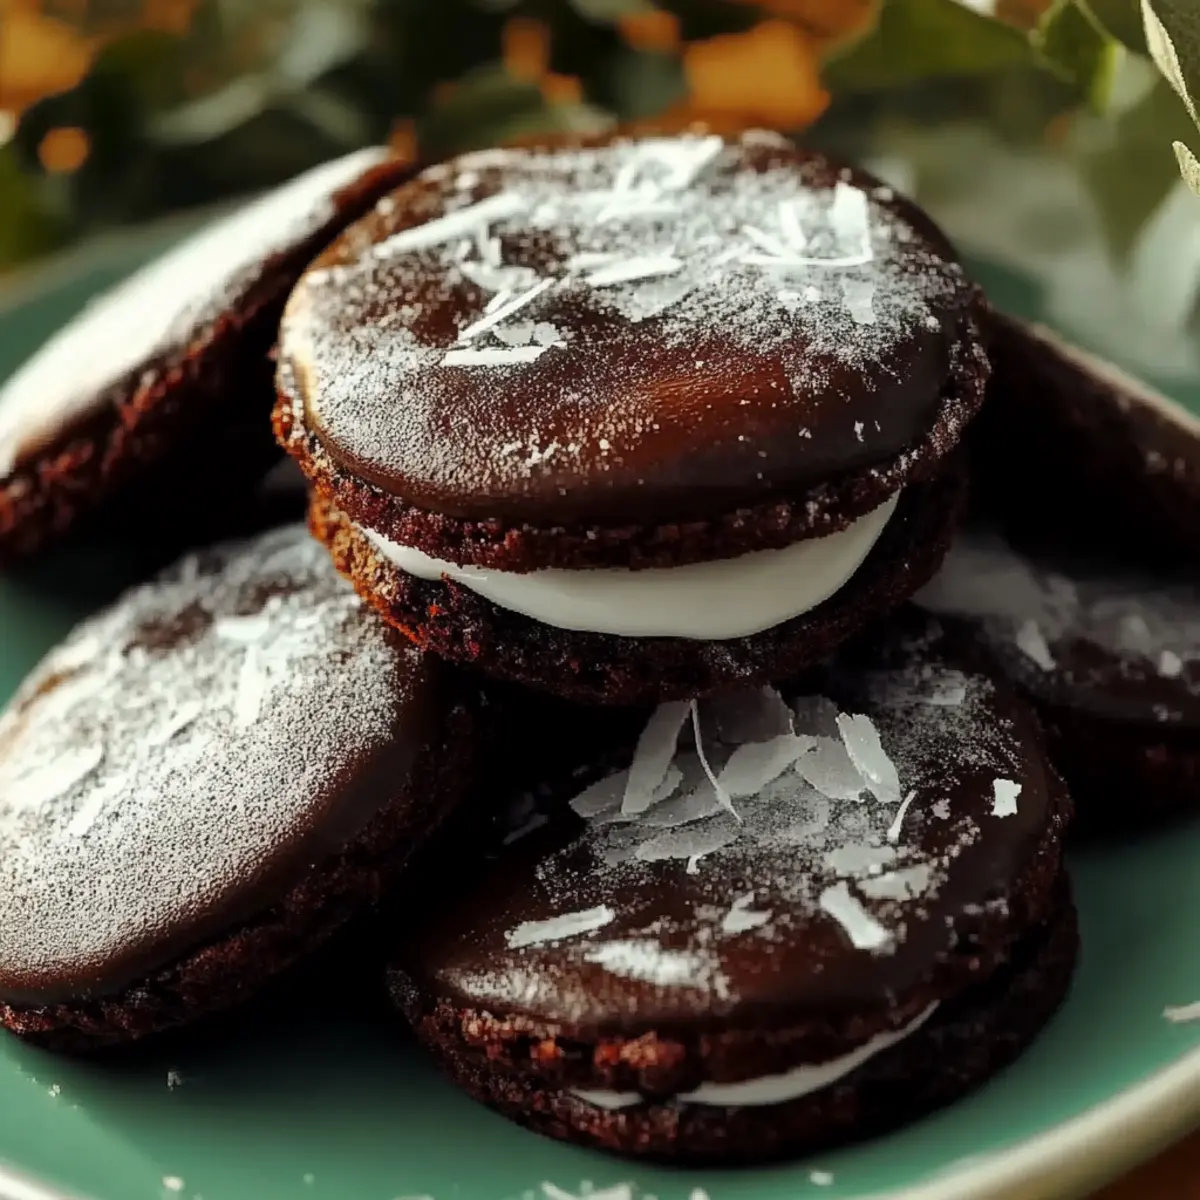
Stepping into the kitchen with a bowl of sugar and cocoa feels like unwrapping memories during the holiday season. That’s how I felt when I decided to recreate a childhood favorite: Homemade Peppermint Patties. These little minty delights are not just a nostalgic treat, but also an impressive homemade candy that you can whip up in under an hour. With this recipe, you'll enjoy the satisfaction of crafting a chocolatey treat that’s both a crowd-pleaser and a thoughtful gift for loved ones. Best of all, they come with the perks of being customizable—add your favorite toppings or adjust the minty intensity to suit your taste. Who’s ready to indulge in a sweet adventure and add some flair to their dessert table?
Why Make Homemade Peppermint Patties?
Simplicity at its finest: The process involves just a few ingredients and easy steps, making it perfect for both beginners and seasoned bakers.
Irresistible mint-chocolate flavor: Each bite is a harmonious blend of rich chocolate and refreshing peppermint, a delight for your taste buds.
Customization potential: Feel free to experiment with different add-ins—try crushed candies or sprinkles for a personal touch that impresses friends and family!
Perfect for gifting: Pack your homemade peppermint patties in a lovely box, and you have the ultimate holiday gift that shows you care.
Versatile treats: Enjoy them year-round, whether it's for a cozy night in or a festive gathering; they’re always a hit! Check out more about how to create delicious homemade candy like these treats!
Peppermint Patties Ingredients
• Just the essentials for homemade treats!
For the Filling
- Powdered sugar – This sweet base gives your patties their signature texture.
- Unsweetened cocoa powder – Adds depth and richness to the minty center.
- Corn syrup – Helps to bind the mixture and achieve a smooth consistency.
- Salt – A tiny pinch enhances the sweetness and balances the flavors.
- Peppermint extract – The star ingredient for that refreshing minty flavor in your peppermint patties.
For the Coating
- Semi-sweet chocolate chips – Melts into a luscious coating that pairs perfectly with the mint.
- Coconut oil (optional) – Stir in for a silky finish when dipping the patties in chocolate.
These ingredients make it possible to create delightful peppermint patties that are sure to impress!
Step‑by‑Step Instructions for Homemade Peppermint Patties
Step 1: Combine the Dry Ingredients
In a medium mixing bowl, whisk together 1 cup of powdered sugar and 2 tablespoons of unsweetened cocoa powder until there are no clumps. This creates a smooth base for your peppermint patties. Take a moment to admire the rich color of your cocoa, which will add depth to the flavor profile.
Step 2: Mix in the Wet Ingredients
Next, add 2 tablespoons of corn syrup, ⅛ teaspoon of salt, and ½ teaspoon of peppermint extract to the bowl. Stir with a spatula until the mixture starts to form a dough-like consistency. If the mixture feels too sticky, gradually incorporate more powdered sugar until it reaches a manageable texture.
Step 3: Knead the Dough
Lightly dust your work surface with powdered sugar to prevent sticking. Turn out the dough onto the surface and gently knead for about a minute until it becomes smooth and pliable. This step ensures your peppermint patties will have the perfect texture, so keep kneading until you feel the dough is just right.
Step 4: Shape the Patties
Divide the dough into small portions using a sharp knife or dough cutter. Roll each portion into a ball, then flatten it into a disc about ¼ inch thick. As you shape these discs, envision the delightful peppermint patties awaiting your taste buds—keeping them uniform will help with even coating later.
Step 5: Chill the Discs
Arrange the pressed discs on a baking sheet lined with parchment paper, ensuring they have space between them. Place the tray in the freezer for about 30 minutes; this will firm up the patties, making them easier to dip in chocolate later. You'll know they're ready when they feel firmer to the touch.
Step 6: Melt the Chocolate
While the discs chill, melt 2 cups of semi-sweet chocolate chips in a microwave-safe bowl. Heat in 30-second intervals, stirring after each, until the chocolate is smooth and glossy. For an extra touch, stir in 1 tablespoon of coconut oil, which will give your coating a richer, more luxurious finish.
Step 7: Dip the Chilled Patties
Once the peppermint discs are firm, remove them from the freezer. Dip each disc into the melted chocolate, ensuring they’re fully coated. Use a fork to lift them out, allowing excess chocolate to drip back into the bowl. Step back and admire how the chocolate beautifully envelops your homemade peppermint patties.
Step 8: Set the Coated Patties
Place the chocolate-covered patties back onto the parchment-lined baking sheet. If you like a little extra flair, sprinkle crushed peppermint on top before the chocolate sets. This will not only enhance the look but also add a satisfying crunch to each bite—making them even more irresistible.
Step 9: Refrigerate for Firmness
Put the tray of coated peppermint patties in the refrigerator for 20-30 minutes, allowing the chocolate to harden completely. You’ll know they’re ready when the chocolate shell feels firm to the touch. This final cooling step ensures that your homemade peppermint patties achieve that delightful, melt-in-your-mouth experience.
Step 10: Store Your Treats
Once your peppermint patties are set, carefully transfer them to an airtight container. Store them in the refrigerator for maximum freshness. They’ll be ready to enjoy anytime, whether as a sweet treat for yourself or a thoughtful gift for someone special, showcasing that homemade touch you’re proud of.
What to Serve with Homemade Peppermint Patties
Treat your taste buds to an indulgent experience by pairing these delightful minty chocolates with equally enticing sides.
-
Creamy Hot Chocolate: A rich hot chocolate is the perfect companion, enhancing the chocolatey goodness of your peppermint patties while adding a cozy touch.
-
Classic Brownies: The fudgy texture of brownies complements the minty freshness of the patties, creating a delightful contrast that chocolate lovers adore.
-
Vanilla Ice Cream: A scoop of smooth vanilla ice cream balances the intense flavors, bringing a cool creaminess that elevates the overall dessert experience.
-
Chocolate Dipped Fruit: Think strawberries or bananas; these fruity bites provide a refreshing, juicy contrast, making for a perfect bite to cleanse your palate.
For drinks, consider serving peppermint tea or a light cocktail to enhance the celebratory vibe of your dessert table. They’re sure to be a hit at any gathering!
-
Minty Mojito: This refreshing drink offers a burst of mint flavor that harmonizes beautifully with the patties, making every sip as delightful as the treat.
-
Coffee: A warm cup of coffee can act as a perfect contrast to the sweetness, igniting a delightful flavor journey that delights with every bite and sip.
Expert Tips for Perfect Peppermint Patties
-
Texture Matters: Make sure your dough is smooth and pliable. If it's too sticky, add a little more powdered sugar to avoid a messy coating process.
-
Chill Time: Don't skip the chilling step! Freezing the shaped discs is crucial for easier dipping in chocolate and helps maintain their shape.
-
Chocolate Technique: When melting chocolate, stir frequently to prevent burning. Gradually adding coconut oil can enhance the texture and make the coating smoother for your peppermint patties.
-
Crushed Peppermint Garnish: For added flair, sprinkle crushed peppermint on top of the chocolate before it sets. This not only looks stunning but also intensifies the minty flavor.
-
Storage Tips: Store your peppermint patties in an airtight container in the refrigerator. This keeps them fresh and delicious for longer, perfect for indulging later!
Peppermint Patties Variations & Substitutions
Feel free to explore these delightful twists that will make your peppermint patties even more exciting and tailored to your taste!
-
Dairy-Free: Substitute semi-sweet chocolate chips with dairy-free chocolate chips for a vegan-friendly alternative. You won’t lose any of that rich flavor!
-
Mint Lovers: Increase the peppermint extract to 1 teaspoon for an extra minty punch. Your taste buds will dance with joy!
-
Nutty Crunch: Incorporate finely chopped nuts like almonds or pecans into the filling for added texture. This twist adds a delightful crunch in every bite, a treat for nut lovers.
-
Chocolate-Dipped Variety: Instead of all milk chocolate, try using white chocolate or dark chocolate for dipping. This creates a beautiful layered effect that looks as good as it tastes!
-
Spicy Kick: Add a pinch of cayenne pepper to the filling for a surprising heat. It enhances the flavors and gives the patties a unique twist!
-
Flavor Infusion: Experiment with flavored extracts like orange or almond in place of peppermint for a different taste experience. Just a drop can turn your patties into a gourmet delight!
-
Mini Peppermint Patties: Instead of traditional-sized patties, make mini versions for bite-sized treats. Perfect for sharing at gatherings or gifting in cute little boxes!
Elevate your peppermint patty experience with these suggestions, and let your creativity shine! If you’re curious about other homemade candy options, explore how to create additional delicious treats like chocolate turtles or caramel bites. Each recipe opens a world of flavors to enjoy!
How to Store and Freeze Peppermint Patties
Fridge: Keep your freshly made peppermint patties in an airtight container in the refrigerator. They will stay fresh for up to two weeks, making it easy to grab a sweet treat whenever you crave it.
Freezer: For longer storage, freeze your peppermint patties in a single layer on a baking sheet; once firm, transfer them to an airtight container or freezer bag. They’ll maintain their delicious flavor for up to three months.
Reheating: When you're ready to enjoy frozen patties, simply let them thaw in the fridge for a few hours or overnight. Avoid microwaving, as it can cause the chocolate to lose its texture.
Layering: If stacking peppermint patties in your container, place parchment paper between layers to prevent them from sticking together, ensuring each bite remains perfect.
Make Ahead Options
These Homemade Peppermint Patties are perfect for those busy weeks when you need a sweet treat on hand! You can prepare the filling up to 24 hours in advance; simply follow the initial steps to mix and shape the patties, then freeze them instead of refrigerating. When you're ready to enjoy, dip the frozen patties into melted chocolate, allowing them to set as you would with freshly made ones. For the best quality, store them in an airtight container in the refrigerator for up to 3 days. This way, your treats remain just as delicious and ready to impress anyone who stops by!
Homemade Peppermint Patties Recipe FAQs
How do I select ripe ingredients for this recipe?
Absolutely! For the best results, ensure your powdered sugar is fresh and fine—clumpy sugar can lead to uneven textures in your patties. As for the peppermint extract, look for pure versions to guarantee a strong, authentic flavor. And when using semi-sweet chocolate chips, opt for high-quality brands as they will significantly enhance the taste of your delicious peppermint patties!
How should I store my peppermint patties once they are made?
To keep your peppermint patties fresh, store them in an airtight container in the refrigerator. They will stay delightful for up to two weeks, making it easy to indulge when those cravings hit! Ensure the container is sealed well to maintain their minty freshness and chocolatey goodness.
Can I freeze my peppermint patties? How?
Yes! You can freeze your peppermint patties for up to three months for longer enjoyment. First, place them in a single layer on a baking sheet and freeze until they are firm. Then, transfer them to an airtight container or freezer bag for optimal preservation. To enjoy them later, simply let them thaw in the fridge for a few hours—this method helps maintain their creamy texture.
What should I do if my peppermint patties are too sticky?
If your peppermint dough turns out too sticky while mixing, don't worry! Simply add more powdered sugar gradually until you reach a smooth, workable consistency. Kneading the dough gently for about a minute can also help. If the patties are still difficult to shape, chilling them for about 10–15 minutes can also make the process easier.
Are there any dietary considerations I should be aware of?
Yes, definitely! Since this recipe contains chocolate and other sweet ingredients, it's important to note any allergies your guests may have. For a pet-friendly option, avoid giving these peppermint patties to dogs, as chocolate is toxic to them. You might also explore using dairy-free chocolate chips if you're accommodating anyone with lactose intolerance or a dairy allergy, making these peppermint patties an even more versatile treat for all.
Can I customize the flavor of my peppermint patties?
Very much! One of the delights of homemade peppermint patties is the ability to play with flavors. If you’re looking for variations, consider adding a few drops of orange extract or even mixing in some crushed nuts for added texture. Remember to adjust the peppermint extract if you incorporate other flavors—just a little goes a long way!

Delicious Peppermint Patties You Can Make at Home Today
Ingredients
Equipment
Method
- Whisk together powdered sugar and cocoa powder until smooth.
- Add corn syrup, salt, and peppermint extract; mix to form dough.
- Knead dough on a powdered sugar-dusted surface until smooth.
- Divide dough, roll into balls, and flatten to discs.
- Chill discs on a lined baking sheet in the freezer for 30 minutes.
- Melt chocolate chips in 30-second intervals until smooth; add coconut oil if using.
- Dip chilled discs into melted chocolate, coat well.
- Place on baking sheet, sprinkle with crushed peppermint if desired.
- Refrigerate for 20-30 minutes to harden chocolate.
- Store in an airtight container in the refrigerator.


Leave a Reply