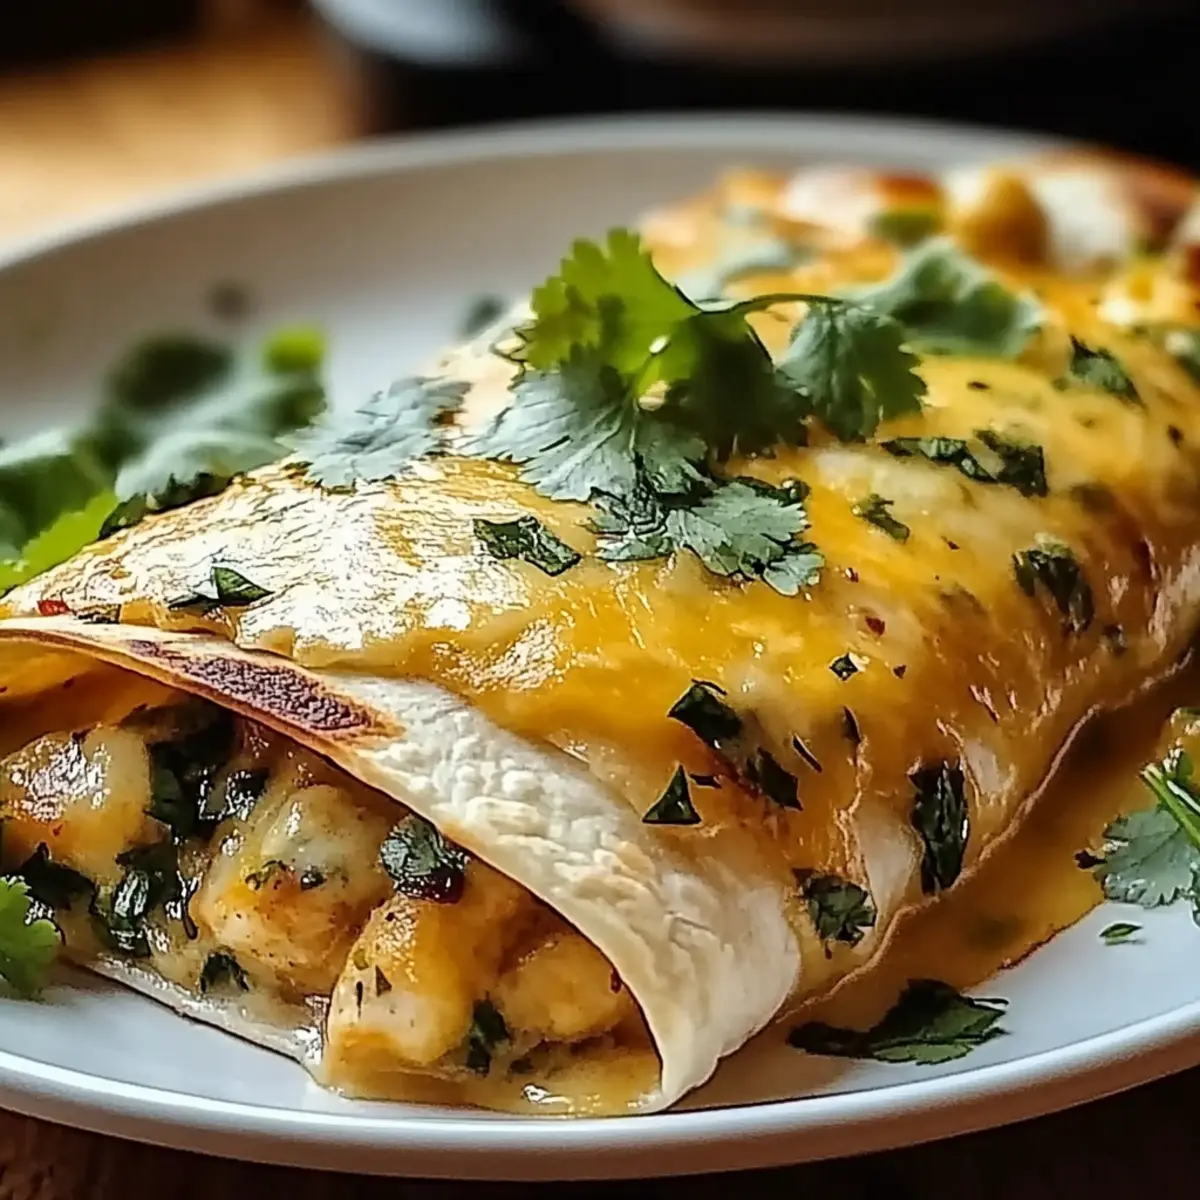
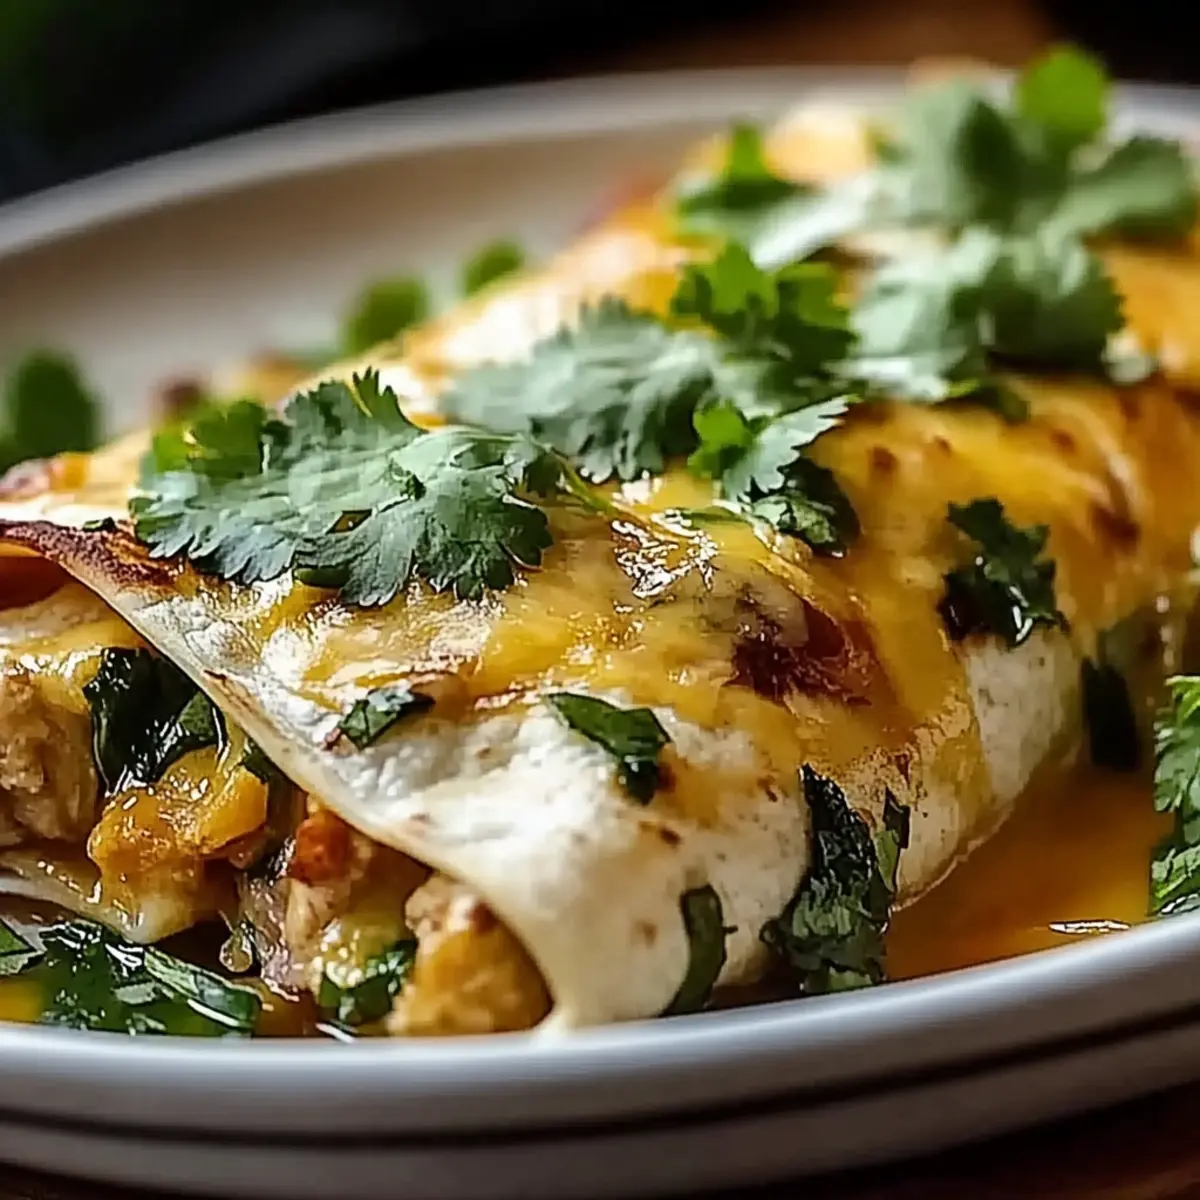
As I opened my fridge in search of inspiration, the vibrant green of my Hatch chiles practically jumped out at me. That's when the vision of Spicy Hatch Chile Enchiladas came to life—comfort food at its finest, perfect for cozy weeknight dinners or a gathering with friends. The beauty of this recipe lies in its customizability; you can swap in your favorite fillings like shredded beef or even a medley of beans for a hearty vegetarian option. Plus, it’s baked to perfection with gooey cheese on top, making it a true crowd-pleaser. Whether you’re crafting these for a busy family or an intimate dinner, you’ll find that each mouthful brings comfort and warmth. Curious to discover how to whip up this delightful dish? Let’s dive in!
Why are Spicy Hatch Chile Enchiladas a Must-Try?
Flavor-packed Delight: These enchiladas burst with the rich, smoky flavors of roasted Hatch chiles, elevating your dinner to new heights.
Customizable Options: Whether you prefer chicken, beef, or going vegetarian, you can tailor the filling to your liking—perfect for picky eaters!
Quick Assembly: With just 30 minutes of prep and one dish to clean, this recipe offers a time-saving solution for busy weeknights.
Crowd Pleaser: The combination of gooey cheese and zesty sauce makes these enchiladas a hit at any gathering. Impress your friends and family!
Comfort Food Vibes: Warm, cheesy, and oh-so-satisfying, these enchiladas are the ultimate comfort food, ideal for cozy nights in or celebratory feasts.
Spicy Hatch Chile Enchiladas Ingredients
For the Enchiladas
• 12 corn tortillas – soft and pliable, they cradle all the deliciousness within.
• 2 cups cooked shredded chicken (or beef) – easily customizable; swap with beans for a veggie-friendly twist!
• 1 cup shredded cheese (cheddar or Monterey Jack) – the gooier, the better for that perfect melt on top.
• 2 cups Hatch green chiles, roasted and chopped – these add a smoky kick that's the star of the dish.
• 1 cup sour cream – for a creamy, tangy finish that balances the spice.
• 1 cup green enchilada sauce – drenching the enchiladas ensures they bake into a delicious, cohesive dish.
• 1 teaspoon ground cumin – brings warmth and depth to the flavor profile.
• 1 teaspoon garlic powder – enhances the savory notes in every bite.
• 1 teaspoon onion powder – adds a subtle sweetness that complements the other flavors.
• Salt and pepper to taste – essential for lifting all the flavors.
• Fresh cilantro for garnish (optional) – a bright touch that elevates the presentation.
Feel excited to unveil these Spicy Hatch Chile Enchiladas, perfect for your next cozy gathering!
Step‑by‑Step Instructions for Spicy Hatch Chile Enchiladas
Step 1: Preheat the Oven
Begin by preheating your oven to 350°F (175°C). This will ensure that it reaches the perfect temperature for baking your Spicy Hatch Chile Enchiladas to golden perfection. While the oven heats up, gather all your ingredients and equipment, such as a mixing bowl and a baking dish, to streamline your cooking process.
Step 2: Prepare the Filling
In a mixing bowl, combine the cooked shredded chicken (or beef), roasted and chopped Hatch chiles, ground cumin, garlic powder, onion powder, and a pinch of salt and pepper. Mix well until all the ingredients are thoroughly combined, and the smoky aroma fills the air. This flavorful filling is the heart of your enchiladas, so take a moment to ensure it's mixed uniformly.
Step 3: Heat the Tortillas
To make the corn tortillas pliable, heat a dry skillet over medium heat. Once hot, warm each tortilla for about 30 seconds on each side until they are soft and flexible. This process will help prevent them from cracking when you roll up your Spicy Hatch Chile Enchiladas and will enhance their deliciousness.
Step 4: Assemble the Enchiladas
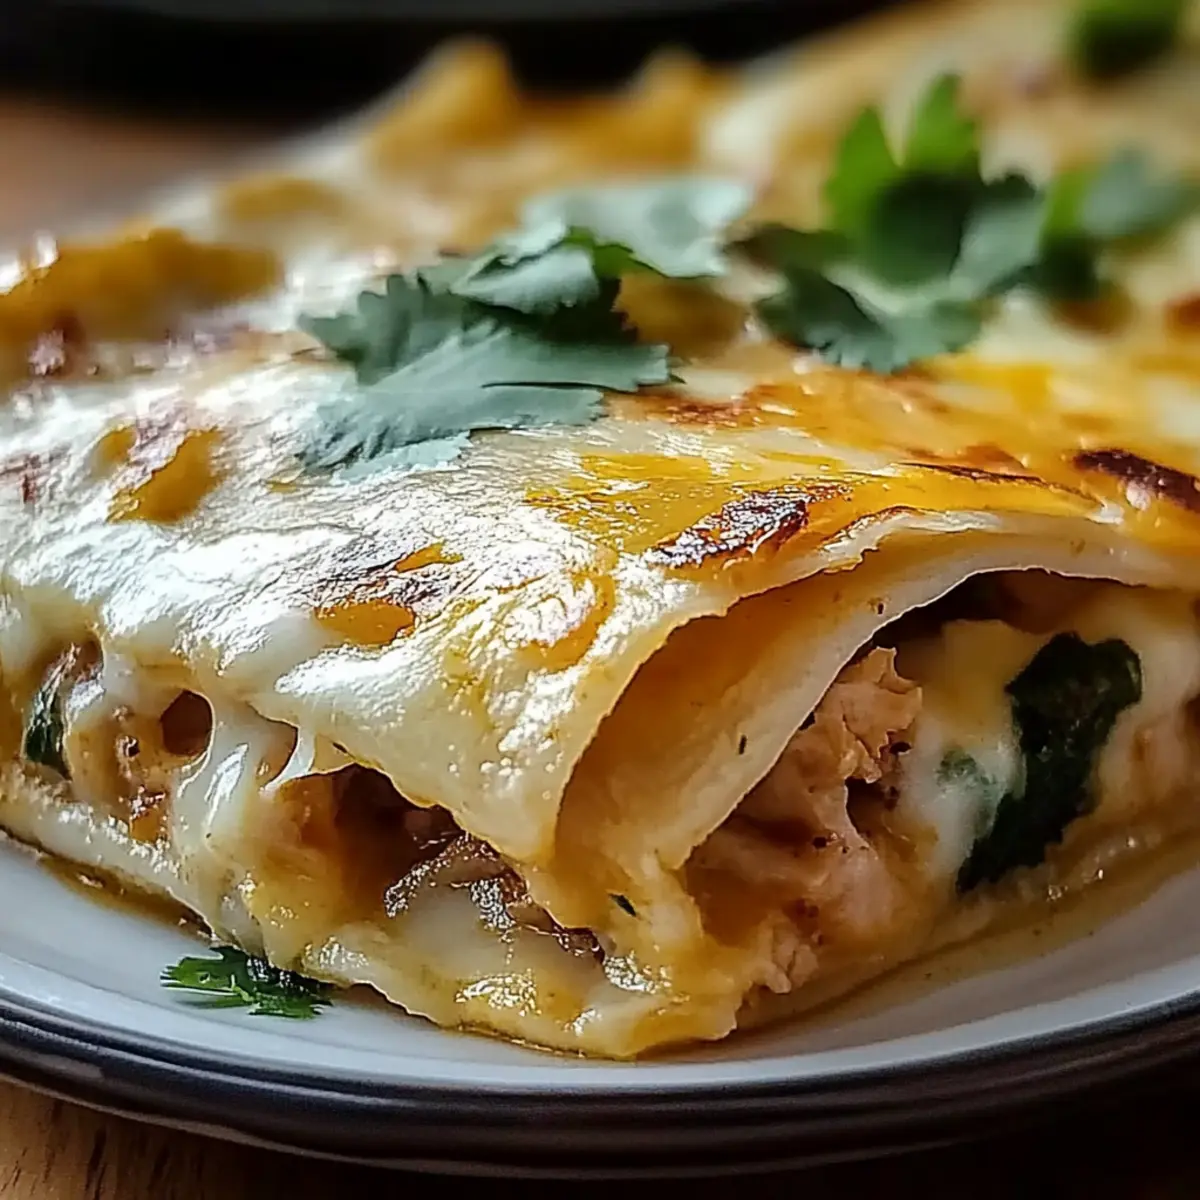
Take a warmed tortilla and place a generous scoop of the filling mixture in the center. Carefully roll it up tightly, then place it seam-side down in a greased baking dish. Repeat this process with the remaining tortillas, fitting them snugly together in the dish. The colorful assembly will have your kitchen smelling irresistible!
Step 5: Add Enchilada Sauce
Once all the tortillas are filled and placed in the baking dish, pour the green enchilada sauce evenly over the top. Make sure every enchilada is generously drizzled for that extra flavor and moisture. This sauce will blend beautifully during baking, creating mouthwatering layers of zesty goodness in your Spicy Hatch Chile Enchiladas.
Step 6: Sprinkle Cheese
Now, sprinkle the shredded cheese evenly on top of the enchilada sauce. As the cheese melts during baking, it will form a delicious, gooey layer that brings all the flavors together. Choose your favorite cheese, such as cheddar or Monterey Jack, for that perfect melty finish that enchiladas are known for.
Step 7: Bake to Perfection
Carefully place the baking dish in the preheated oven and bake for 25-30 minutes. Keep an eye on the enchiladas as they bake until the cheese is melted, bubbly, and lightly golden. The intoxicating aroma filling your kitchen will signal that your Spicy Hatch Chile Enchiladas are nearly ready to serve!
Step 8: Let it Cool
Once baked, remove the dish from the oven and allow the enchiladas to cool for about 10-15 minutes. This resting period helps them set slightly, making it easier to serve and creating that perfect look when you dish them out. You'll want to take your time; the anticipation will only heighten your enjoyment!
Step 9: Garnish and Serve
Just before serving, add a dollop of sour cream on top of each enchilada and sprinkle fresh cilantro for a vibrant finish. The creamy contrast and fresh herb flavor will elevate your Spicy Hatch Chile Enchiladas, welcoming friends and family to enjoy this delicious, homemade comfort food!

What to Serve with Spicy Hatch Chile Enchiladas
As you savor each bite of these delightful enchiladas, why not round out your meal with some perfect pairings?
- Creamy Refried Beans: These silky beans provide a hearty and savory contrast, complementing the flavors in the enchiladas wonderfully.
- Mexican Street Corn Salad: This colorful salad brings together sweet corn, lime, and cheese that adds brightness and freshness to your plate.
- Guacamole: The creamy richness balances the spice of the enchiladas beautifully, giving every bite a cooling touch.
- Fresh Pico de Gallo: This zesty salsa adds a burst of freshness with tomatoes, onion, and cilantro, enhancing the overall flavor.
- Savory Spanish Rice: Lightly seasoned rice soaks up the enchilada sauce, providing a satisfying base for your meal.
- Crispy Tortilla Chips: Serve with a side of salsa verde for a crunchy, addictive appetizer that preps your taste buds for the main event.
- Chilled Margaritas: A refreshing cocktail like a lime margarita cuts the heat of the enchiladas, making it a delightful drink pairing.
- Key Lime Pie: End on a sweet note with a slice of this tangy dessert that offers a perfect finish after the spices.
- Cilantro Lime Rice: The fragrant cilantro and zesty lime elevate the dish while keeping the meal light and flavorful.
Spicy Hatch Chile Enchiladas Variations
Feel free to get creative and make these enchiladas your own with a few simple tweaks!
-
Vegetarian Delight: Substitute shredded chicken or beef with a blend of black beans, corn, and sautéed vegetables for a hearty yet plant-based option. This twist packs all the flavor and elevates the dish without missing the meat!
-
Cheesy Kick: Add pepper jack cheese to the filling for an extra layer of heat and creaminess. Mixing flavors enhances the depth of the dish, making it an enticing choice for spice lovers!
-
Creamy Green Sauce: Swap the green enchilada sauce for a creamy cilantro sauce that adds a luscious twist, bringing a cooling contrast to the spice of the chiles. This option does wonders in transforming flavors!
-
Spicy Sausage: Incorporate chorizo or your favorite spicy sausage into the filling for a deliciously meaty version. The rich and smoky flavor complements the enchiladas beautifully, making each bite a hearty experience.
-
Extra Crunch: Top your enchiladas with crushed tortilla chips before baking for a delightful crunch that contrasts with the gooey cheese. This fun texture twist makes for an exciting presentation!
-
Heat Level Adjustments: For a milder version, use poblano peppers instead of Hatch chiles or remove the seeds from the chiles to reduce their heat. This way, everyone can enjoy these flavorful enchiladas without being overwhelmed!
-
Flavored Tortillas: Consider using flavored or spinach tortillas to add a unique look and taste to your enchiladas. Not only does it add color, but the flavors can enhance the overall dish beautifully!
-
Zesty Lime Infusion: Squeeze fresh lime juice into the filling or drizzle over the finished enchiladas for a citrusy burst. The zesty addition cuts through the richness, giving your taste buds a delightful surprise.
Experimenting with these variations delivers delightful surprises on your dinner table! For more personalized meals, check out my tips for Flavor Balance where you can learn to adjust spice levels, and enjoy even more filling ideas!
Make Ahead Options
These Spicy Hatch Chile Enchiladas are perfect for meal prep enthusiasts! You can prepare the filling (chicken, chiles, spices) up to 24 hours in advance and store it in an airtight container in the refrigerator, allowing the flavors to meld beautifully. Additionally, you can assemble the enchiladas completely and cover them tightly with foil, storing them in the fridge for up to 3 days. When you're ready to bake, pour the enchilada sauce and sprinkle cheese on top, then pop them in the oven directly from the fridge—there's no need to thaw. This ensures that each bite remains just as delicious and comforting as if you made them freshly that day!
How to Store and Freeze Spicy Hatch Chile Enchiladas
Fridge: Store leftover Spicy Hatch Chile Enchiladas in an airtight container for up to 3 days. Reheat in the oven at 350°F (175°C) until warmed through for the best texture.
Freezer: If you want to save some for later, freeze the assembled but unbaked enchiladas. Place them in a freezer-safe container for up to 3 months. No need to thaw; just bake directly from the freezer, adding about 10 extra minutes to the cooking time.
Reheating: To enjoy refrigerated leftovers, cover with foil and reheat in a 350°F (175°C) oven for about 20 minutes, or until heated through.
Avoid Sogginess: If you plan to freeze the enchiladas, use a thicker enchilada sauce to prevent them from becoming too watery upon reheating.
Expert Tips for Spicy Hatch Chile Enchiladas
• Perfect Tortilla Texture: Warm tortillas in a dry skillet rather than the microwave to keep them pliable without making them soggy.
• Flavor Balance: Adjust the spice level by adding more or fewer Hatch chiles based on your taste. Don't forget to balance flavor with a touch of sour cream!
• Filling Variations: Get creative with your filling by incorporating vegetables or beans for a vegetarian option. Make sure to adjust the seasoning accordingly!
• Cheese Choice: Opt for a blend of cheeses like cheddar and Monterey Jack for a richer flavor and meltiness in your Spicy Hatch Chile Enchiladas.
• Baking Perfection: Keep an eye on the baking time; you want the cheese to be bubbly and slightly golden, but not burnt. Enjoy the tantalizing aroma that fills your kitchen!
Spicy Hatch Chile Enchiladas Recipe FAQs
What should I look for when selecting Hatch chiles?
Choose Hatch chiles that are firm and have a vibrant green color. Avoid any that show dark spots or wrinkles, as these can indicate over-ripeness. Roasting the chiles brings out their smoky flavor, making them the heart of your enchiladas, so pick the freshest ones available for the best taste!
How long can I store leftovers in the fridge?
Store your leftover Spicy Hatch Chile Enchiladas in an airtight container in the refrigerator for up to 3 days. When reheating, wrap them in foil and bake in a preheated oven at 350°F (175°C) for about 20 minutes, or until they're warmed through.
Can I freeze Spicy Hatch Chile Enchiladas, and if so, how?
Absolutely! To freeze, assemble the enchiladas without baking them first. Once assembled, place them in a freezer-safe container and store them in the freezer for up to 3 months. When you're ready to enjoy them, bake directly from the freezer, just adding an extra 10-15 minutes to the cooking time. This way, you can savor the flavors fresh out of the oven!
What should I do if my enchiladas seem dry after baking?
If your Spicy Hatch Chile Enchiladas turn out a little dry, consider these tips for the next time: ensure you're using enough enchilada sauce to generously cover the rolled tortillas, as this helps keep them moist while baking. You can also add more sour cream or a sprinkle of broth before covering them in cheese to add moisture to the mix.
Are these enchiladas suitable for people with dietary restrictions?
Yes! You can easily make these enchiladas suitable for various dietary needs. For a gluten-free alternative, use corn tortillas labeled as gluten-free. If you're accommodating vegetarians, simply replace the chicken or beef with a mixture of beans, corn, and veggies. Just remember to adjust the seasoning to enhance the flavors according to your preferences!
Can I use a different type of cheese?
Very! While cheddar and Monterey Jack are popular choices for Spicy Hatch Chile Enchiladas, feel free to experiment with other cheeses! Queso blanco or pepper jack can add a creamy texture and additional kick, respectively. Use a blend for a more layered flavor profile that your taste buds will love!
Deliciously Spicy Hatch Chile Enchiladas Your New Comfort Food
Ingredients
Equipment
Method
- Preheat your oven to 350°F (175°C).
- In a mixing bowl, combine shredded chicken (or beef), Hatch chiles, ground cumin, garlic powder, onion powder, and a pinch of salt and pepper. Mix well.
- Heat a dry skillet over medium heat and warm each tortilla for about 30 seconds on each side.
- Take a warmed tortilla, place a scoop of filling in the center, roll tightly, and place seam-side down in a greased baking dish.
- Pour green enchilada sauce evenly over the top.
- Sprinkle shredded cheese on top of the enchilada sauce.
- Bake for 25-30 minutes or until cheese is melted and bubbly.
- Allow the dish to cool for 10-15 minutes before serving.
- Garnish with sour cream and fresh cilantro before serving.

Leave a Reply