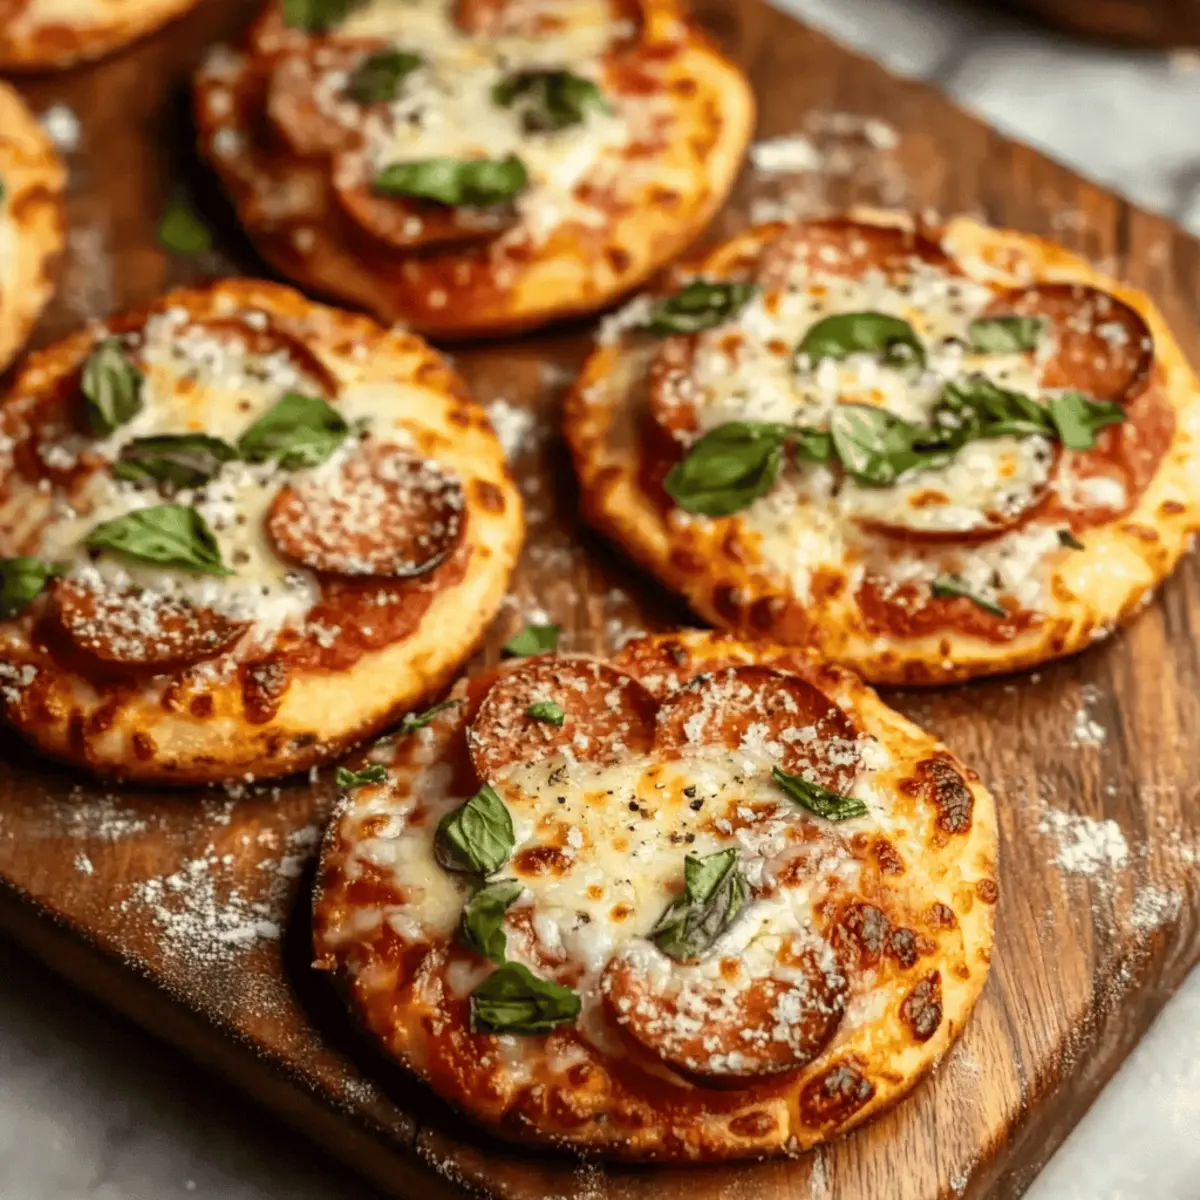
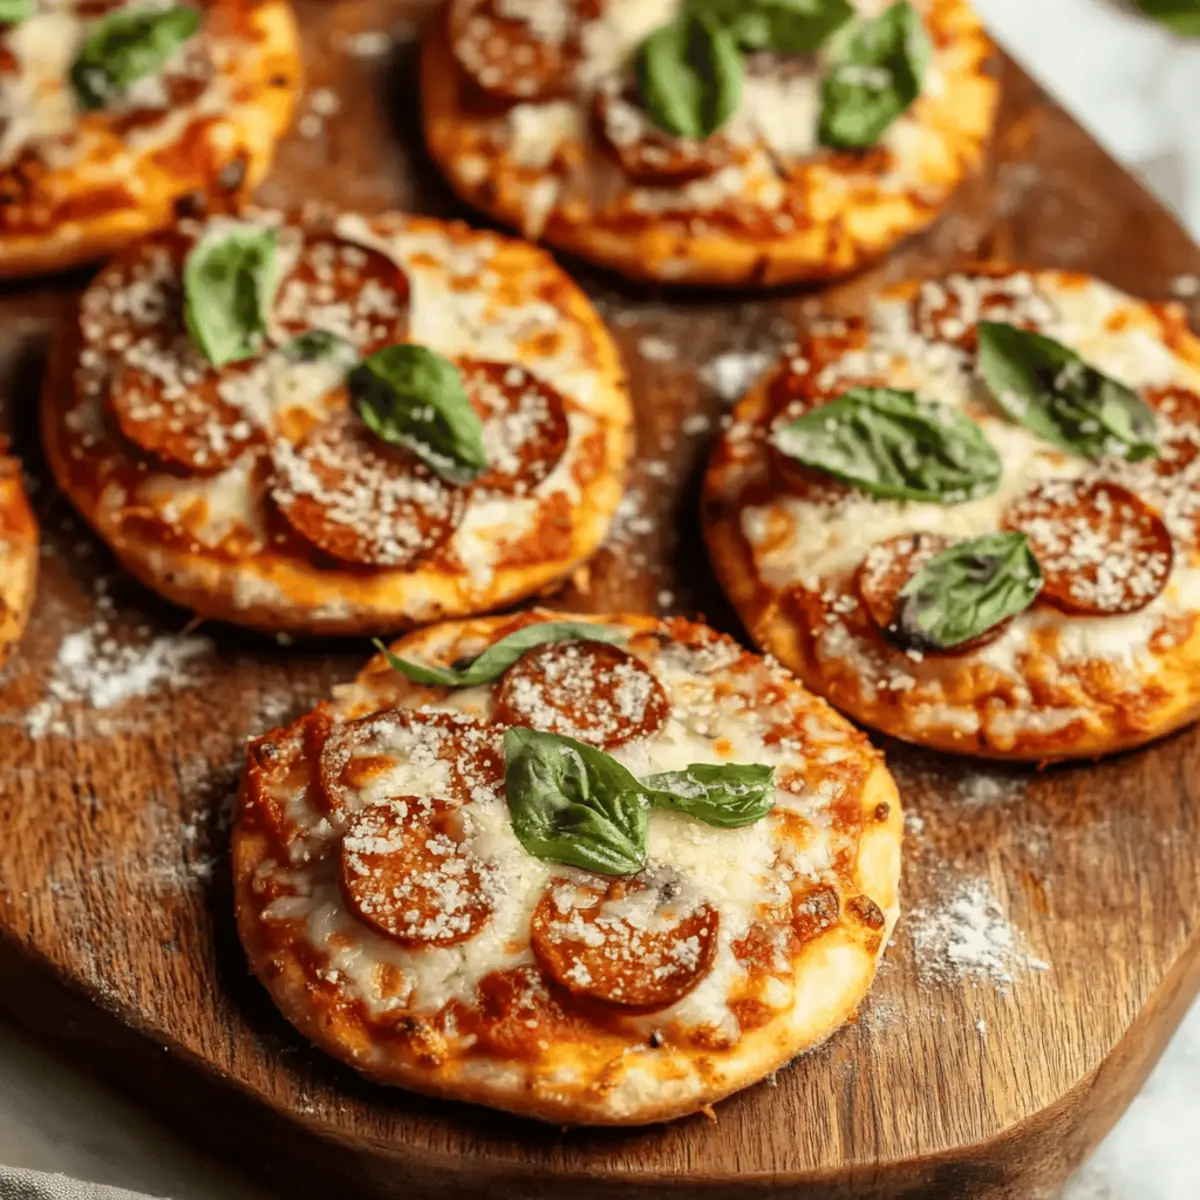
As I stood in my kitchen, the tantalizing aroma of baking pizza started to fill the air, transforming my home into a cozy pizzeria. These Mini Pizzas are a delectable solution for those busy weeknights when you want something homemade yet quick to prepare. With just a handful of ingredients and only 20 minutes from start to finish, this recipe is perfect for anyone craving a comforting meal that doesn’t require hours of prep. Each golden crust is a blank canvas, just waiting for your favorite toppings—whether it’s classic pepperoni or a vibrant veggie medley. Get ready to dive into a world of customization with these delightful Mini Pizzas that the whole family will love. Can you smell those warm, cheesy bites coming out of the oven?
Why will you love Mini Pizzas?
Simplicity at its Best: With just a few ingredients and minimal prep time, these Mini Pizzas offer a hassle-free cooking experience for busy schedules.
Customizable Creations: They are perfect for showcasing your favorite toppings, making it easy to cater to everyone’s taste—whether you prefer classic pepperoni or colorful veggies.
Crowd-Pleasing Fun: These mini delights are great for family gatherings or friendly get-togethers, allowing everyone to indulge in their personalized pizza creations.
Quick and Delicious: Ready in only 20 minutes, you’ll have warm, cheesy goodness that satisfies even the biggest cravings without keeping you in the kitchen all night.
A Perfect Weekend Project: Kids and grown-ups alike can enjoy making these together, transforming mealtime into a fun family activity that fosters creativity and connection.
Embrace more flavors with your own unique toppings and enjoy the delightful experience of homemade pizza right at your table!
Mini Pizzas Ingredients
For the Dough
• Refrigerated biscuit dough – a quick base that saves time and delivers a flaky texture perfect for pizza.
For the Sauce
• Pizza sauce – adds a rich, flavorful layer; feel free to swap for tomatoes or pesto if desired.
For the Toppings
• Shredded mozzarella cheese – melts beautifully for that ooey-gooey effect that's a pizza must-have.
• Pepperoni or favorite toppings – personalize with your choices like veggies or cooked sausage for added flavor.
For Baking
• Cornmeal – dusting the baking sheets prevents sticking and adds a lovely crunch to the base.
• Grated Parmesan – sprinkle on top for a savory finish that enhances your Mini Pizzas' taste.
Make these Mini Pizzas your own by experimenting with different toppings; this recipe is all about your favorite flavors!
Step‑by‑Step Instructions for Mini Pizzas
Step 1: Preheat the Oven
Begin by preheating your oven to 400°F (200°C). This ensures that when your Mini Pizzas are ready to bake, the oven is already hot, providing that perfect crispy crust. While the oven warms up, gather your ingredients and prep your workspace for an efficient cooking experience.
Step 2: Prepare the Dough
On a lightly floured surface, take your refrigerated biscuit dough and roll each biscuit into a flat round, about ¼ inch thick. Use a rolling pin or your hands to shape them evenly. As you work, look for a soft but firm texture that will hold your toppings beautifully without tearing.
Step 3: Set Up the Baking Sheets
Dust two baking sheets with cornmeal to prevent your Mini Pizzas from sticking. Place the rolled-out dough rounds on the baking sheets, ensuring they are about 1 inch apart. The cornmeal adds a nice crunch to the crust, enhancing the overall texture as they bake.
Step 4: Add the Sauce and Cheese
Now, take 1–2 tablespoons of pizza sauce and spread it evenly on each dough round. Next, generously sprinkle shredded mozzarella cheese on top. Aim for a nice, even layer that will melt and create that gooey, delicious topping we all love on our Mini Pizzas.
Step 5: Customize Your Toppings
Add your choice of toppings, whether it’s classic pepperoni, colorful veggies, or any other favorite ingredients. Don’t overload them too much; a balanced topping will help cook evenly. This is your chance to get creative, so have fun making each Mini Pizza unique!
Step 6: Bake the Pizzas
Carefully place the baking sheets in your preheated oven and bake for 15–18 minutes. Keep an eye on them as they bake; you're looking for a golden-brown crust and bubbling cheese. For an extra layer of color and flavor, consider broiling for 1–2 minutes at the end to get that sought-after browning.
Step 7: Garnish and Serve
Once done, remove the Mini Pizzas from the oven and immediately sprinkle them with grated Parmesan for an added savory kick. Let them cool for a minute, then serve warm to your family or friends, welcoming them to enjoy the delightful experience of homemade Mini Pizzas right at the table!

Make Ahead Options
These Mini Pizzas are perfect for meal prep enthusiasts! You can prepare the dough rounds up to 24 hours in advance by rolling them out and placing them on a baking sheet lined with cornmeal. Cover with plastic wrap to keep them fresh in the refrigerator. Additionally, you can pre-sauce and top your Mini Pizzas with cheese and toppings of your choice, storing them in airtight containers for up to 3 days. When you're ready to bake, simply uncover, pop them in a preheated oven at 400°F, and cook for 15–18 minutes until golden. This way, you get to enjoy delicious, homemade Mini Pizzas with minimal effort on busy weeknights!
Tips for the Best Mini Pizzas
Dough Thickness Matters: A uniform thickness helps ensure even cooking and a tender crust. Aim for about ¼ inch thick when rolling out the biscuit dough.
Don’t Overdo the Sauce: Keep the sauce layer light to prevent sogginess. One to two tablespoons per pizza is usually perfect for flavor without the mess.
Cheese Control: While mozzarella is a must, don't go overboard. A moderate amount will melt beautifully without overwhelming your Mini Pizzas.
Topping Wisely: Choose toppings that cook quickly, like pepperoni or pre-cooked veggies. This way, everything will be done in tandem, keeping prep quick and easy.
Watch the Baking Time: Everyone's oven is different! Start checking at 15 minutes to ensure your Mini Pizzas achieve that lovely golden hue without burning.
Let It Cool: Allowing the pizzas to rest a minute after baking helps the cheese set slightly, making them easier to eat—plus, nobody wants to burn their mouth!
What to Serve with Mini Pizzas
Create a delightful dining experience by pairing your homemade flavor with scrumptious sides and drinks that enhance your meal.
-
Crispy Garlic Bread: This buttery, seasoned delight adds a satisfying crunch and irresistible aroma, perfectly complementing the gooey cheese of your Mini Pizzas.
-
Garden Salad: A refreshing mix of crisp greens and vibrant veggies balances the richness of the pizzas, adding a burst of freshness and crunch. Toss in a light dressing for extra flavor!
-
Chili or Marinara Dipping Sauce: Serve these warm, tangy sauces on the side, inviting everyone to dunk those delicious mini creations and experience layers of flavor with every bite.
-
Chocolate Chip Cookies: End the meal on a sweet note! These classic treats offer a comforting finish to your pizza feast, merging warm and gooey textures.
-
Sparkling Lemonade: This refreshing drink with its zesty citrus notes is a thirst-quencher that brightens up your meal, perfectly offsetting the savory goodness of your pizzas.
-
Stuffed Mushrooms: These tasty appetizers pack a flavorful punch, making for a hearty prelude to the main attraction—your delectable Mini Pizzas!
-
Fruit Platter: A colorful assortment of seasonal fruits adds a sweet, juicy contrast to the savory mini pizzas, making for a light and refreshing side.
-
Caprese Skewers: These vibrant skewers with fresh mozzarella, basil, and tomatoes offer a delightful burst of flavor, creating a lovely, Mediterranean vibe that pairs beautifully with your main dish.
Storage Tips for Mini Pizzas
Fridge: Store any leftover Mini Pizzas in an airtight container in the fridge for up to 3 days. This helps maintain their flavor and texture for later enjoyment.
Freezer: For longer storage, freeze the Mini Pizzas individually wrapped in plastic wrap, then place them in a freezer-safe container. They can last for up to 2 months.
Reheating: To reheat, place frozen Mini Pizzas directly on a baking sheet at 375°F (190°C) for about 15-20 minutes. If refrigerated, reheat at the same temperature for 10-12 minutes until warmed through.
Serving Fresh: Enjoy your Mini Pizzas warm and fresh, and don’t hesitate to create new combinations of toppings to keep mealtime exciting!
Mini Pizzas Variations & Substitutions
Feel free to explore these wonderful ideas and customize your Mini Pizzas to suit your family’s tastes!
-
Gluten-Free: Use gluten-free pizza dough or tortillas to make these Mini Pizzas accessible for everyone. You'll still get the delightful pizza experience without the gluten!
-
Vegan: Swap out mozzarella for a vegan cheese alternative and use a dairy-free pizza sauce for a delicious dairy-free option. It's a lovely way to cater to plant-based diets while keeping all the flavors intact.
-
Spicy Kick: Add crushed red pepper flakes or jalapeños for a spicy twist that will warm your taste buds. The heat will balance beautifully with the melty cheese and savory toppings.
-
Herb-Infused: Mix fresh or dried herbs like oregano, basil, or thyme into your dough for an aromatic burst that elevates your Mini Pizzas. This little touch enhances the flavor and adds a fragrant note.
-
Sweet Treat: Try a dessert variation using Nutella or chocolate spread as the sauce, topped with banana slices and mini marshmallows. Baking this gives you a warm, gooey dessert that’s perfect for finishing any meal.
-
Veggie-Packed: Load up on the veggies by adding sliced bell peppers, mushrooms, or spinach for a nourishing twist. This not only boosts the nutrition but also adds vibrant colors to your plate.
-
Cheesy Ultimate: Mix in different cheese types like cheddar or gouda along with mozzarella to create an irresistible cheesy explosion. Each cheese brings its unique flavor profile, adding depth to your Mini Pizzas.
-
BBQ Delight: Swap the pizza sauce for BBQ sauce and top with shredded chicken and red onions for a delightful BBQ-inspired twist. The sweet and tangy flavors harmonize well with the crust, offering something different yet satisfying.
Don't forget, these Mini Pizzas are an invitation to have fun in the kitchen! Feeling adventurous? Try pairing them with a fresh garden salad or homemade garlic knots as delightful sides for a comforting meal. Every topping you choose adds a special touch of love and creativity to your culinary masterpiece!
Mini Pizzas Recipe FAQs
How do I choose the right ingredients for Mini Pizzas?
Absolutely! When selecting ingredients, opt for fresh or lightly chilled items. For the biscuit dough, check the expiration date to ensure it's fresh, and make sure any toppings, like veggies or meats, don’t show dark spots or signs of spoilage. Fresh mozzarella will melt beautifully, enhancing your Mini Pizzas’ taste and texture.
How should I store leftover Mini Pizzas?
For storing leftovers, place your Mini Pizzas in an airtight container and refrigerate them for up to 3 days. This helps maintain their flavor and prevents them from becoming stale. Alternatively, you can freeze them for longer storage; these delightful bites can last for up to 2 months when wrapped securely.
Can I freeze Mini Pizzas and how?
Yes! To freeze Mini Pizzas, I recommend wrapping each pizza individually in plastic wrap, ensuring they’re tightly sealed. Once wrapped, place them in a freezer-safe container or a heavy-duty freezer bag. When ready to enjoy, simply preheat your oven to 375°F (190°C), and bake directly from the freezer for about 15-20 minutes, or until heated through and golden.
What should I do if my Mini Pizzas are soggy?
Very common! If your Mini Pizzas are soggy, ensure you’re not using too much sauce, as a light layer works best. If they do become soggy, try baking them a bit longer or broiling for 1-2 minutes to create a crispier texture. Sticking with toppings that cook quickly, like pepperoni or pre-cooked veggies, can also help avoid this issue.
Can Mini Pizzas be made allergy-friendly?
Definitely! If you have dietary considerations, you can experiment with gluten-free biscuit dough or a cauliflower base for a gluten-free option. For dairy-free Mini Pizzas, try using vegan cheese alternatives, which melt nicely when baked. Always check ingredient labels to avoid allergens, especially with sauces and dough.
How can I make Mini Pizzas healthier?
To create a healthier version of Mini Pizzas, consider using whole wheat biscuit dough or a zucchini base. Load them up with veggies, like spinach, bell peppers, or mushrooms, and opt for a low-sodium pizza sauce to reduce the salt content. You can also use less cheese and incorporate lean proteins, such as grilled chicken, to boost the nutrition factor while keeping that classic pizza flavor.

Delicious Mini Pizzas for Quick Family Fun and Flavor
Ingredients
Equipment
Method
- Preheat your oven to 400°F (200°C).
- On a lightly floured surface, roll each refrigerated biscuit dough into a flat round, about ¼ inch thick.
- Dust two baking sheets with cornmeal and place the rolled-out dough rounds on the sheets, spacing them about 1 inch apart.
- Spread 1–2 tablespoons of pizza sauce on each dough round, then sprinkle shredded mozzarella cheese evenly on top.
- Add your choice of toppings, being careful not to overload them.
- Bake for 15–18 minutes, until golden brown and bubbly. Optionally broil for 1–2 minutes for extra browning.
- Remove from the oven and sprinkle with grated Parmesan before serving warm.


Leave a Reply