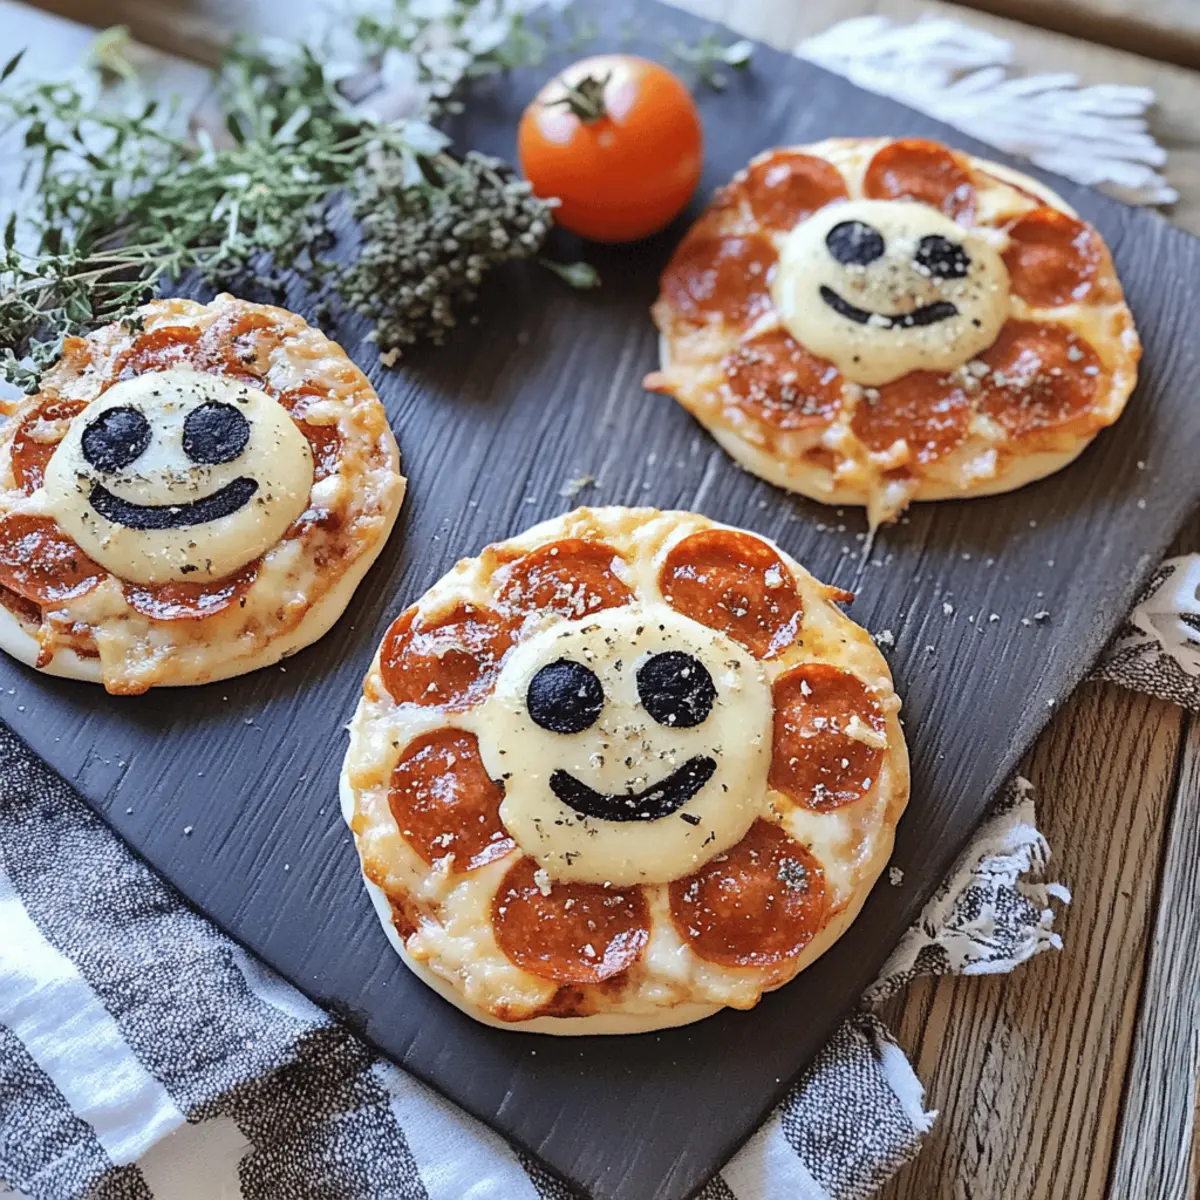
As I stood in the kitchen, the scent of bubbling cheese and tangy pizza sauce filled the air, transporting me back to childhood Halloween parties where the fun was only rivaled by the delicious treats. These Halloween Mini Pizzas are not just a whimsical way to celebrate the spooky season; they’re also a breeze to whip up, making them perfect for busy evenings. With just 27 minutes from prep to plate, you can create a spread that thrills both kids and adults alike. Plus, they invite creativity—shape them like mummies or carve jack-o’-lantern faces, ensuring everyone is engaged in the fun of making their own personalized pizza. Are you ready to dive into a cauldron of culinary creativity? Let's get baking!
Why Are Halloween Mini Pizzas a Must-Try?
Simplicity: With just 27 minutes from start to finish, you can create a fun meal that doesn’t skimp on flavor.
Endless Creativity: These mini pizzas allow everyone to unleash their inner artist! Shape them into mummies or spooky jack-o'-lanterns for memorable fun.
Kid-Friendly: Delight your young ones with these visually fun and delicious bites that they'll love making and eating.
Crowd-Pleaser: Perfect for any gathering, sharing these festive pizzas will surely amplify the flavors and smiles at your table.
Nutritional Joy: Packed with veggies like bell peppers and olives, these treats are a tasty way to sneak in some nutrition, making them better than any fast food.
If you're interested in more creative Halloween ideas, check out our post on Spooky Snacks for the Whole Family.
Halloween Mini Pizzas Ingredients
For the Pizza Base
• Mini pizza crusts – choose personal-size bases for easier handling and fun customization.
• Pizza sauce – a generous spread adds that classic, tangy flavor to each bite.
For the Toppings
• Mozzarella cheese – this gooey cheese is a must for that irresistible melty goodness.
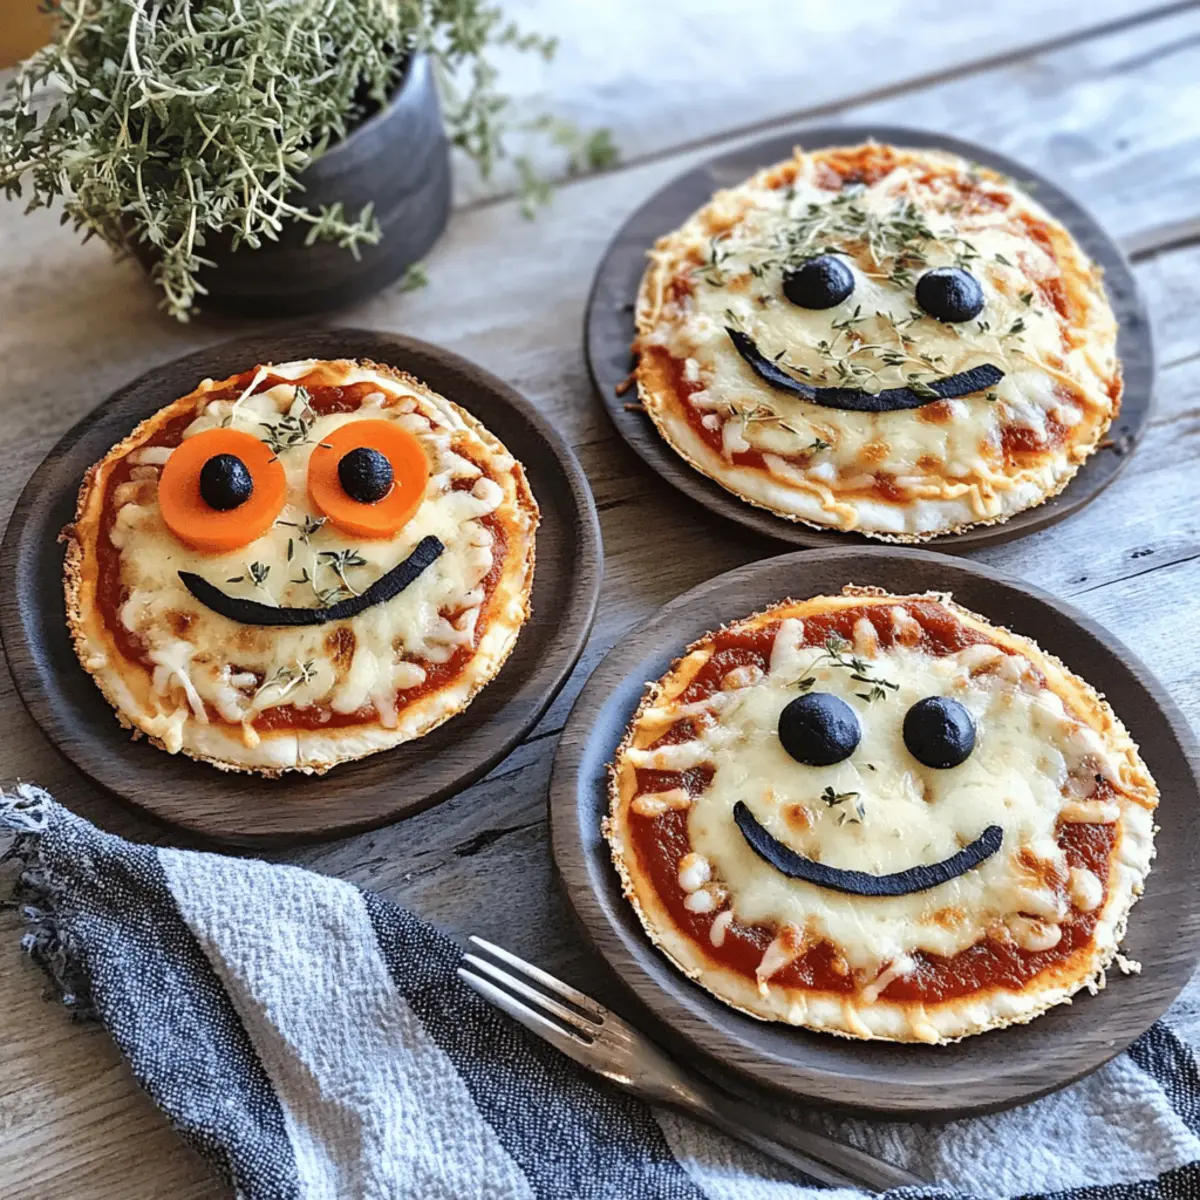
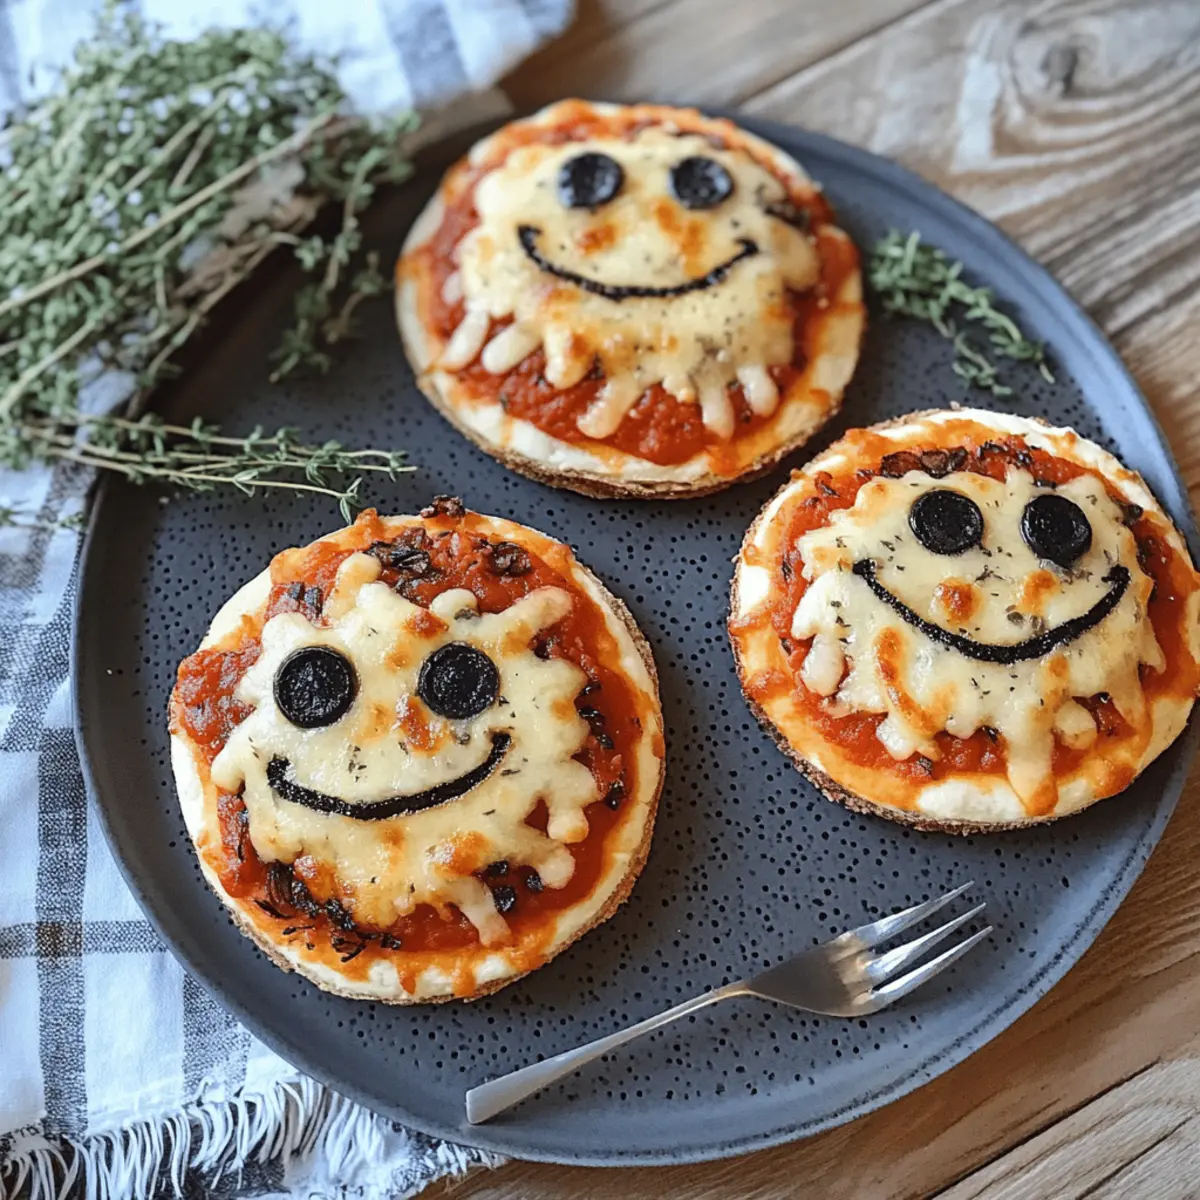
• Black olives – perfect for spooky spider eyes or as a savory twist to the flavor profile.
• Mini pepperoni – optional but adds a delightful touch for those who want a little extra umami.
• Orange & green bell peppers – use thin strips to craft festive jack-o’-lantern designs that make these pizzas pop visually.
For the Decoration
• Part-skim string cheese – pulled apart to create fun "bandages" for mummy faces.
• Fresh basil – chiffonade for a burst of flavor and a beautiful finishing touch.
• Olive oil spray – lightly mist your baking sheet to ensure golden, crispy crusts without sticking.
These Halloween Mini Pizzas are a delightful way to add some spooky flair to your festivities! Happy cooking!
Step‑by‑Step Instructions for Halloween Mini Pizzas
Step 1: Preheat the Oven
Start by preheating your oven to 425°F (220°C). While the oven warms up, grab a baking sheet and lightly mist it with olive oil spray to prevent the pizza crusts from sticking. You want a nice, golden crust with a bit of crispy texture, and this spray will help achieve that golden finish.
Step 2: Add Pizza Sauce
Next, take your mini pizza crusts and spread 1–2 tablespoons of pizza sauce on each one. Ensure to leave a small border around the edges for a delightful crust on your Halloween Mini Pizzas. The vibrant red sauce will contrast beautifully with the toppings, adding a festive flair that will entice everyone.
Step 3: Sprinkle the Cheese
Once the sauce is spread evenly, generously sprinkle shredded mozzarella cheese over half of the mini pizzas. For the mummies, grab your part-skim string cheese and pull it apart into strands to lay in a criss-cross pattern over the cheese. These will form the “bandages” that create a spooky look when the cheese melts.
Step 4: Decorate the Pizzas
Time to get creative! Use the sliced black olives to form spider bodies or eyes, and place strips of orange and green bell peppers to craft jack-o’-lantern mouths. If you’re using mini pepperoni, dot them around as “cheeks” for added charm. Your Halloween Mini Pizzas should now look festively spooky and ready to bake!
Step 5: Bake to Perfection
Carefully place your decorated mini pizzas in the preheated oven. Bake them for 10–12 minutes, or until the crusts have turned a beautiful golden brown and the cheese is melted and bubbling. Remember to rotate the pan halfway through baking for even browning—you want them to look as good as they taste!
Step 6: Cool and Garnish
Once baked, remove the pizzas from the oven and allow them to cool for about 2 minutes. This short cooling time lets the cheese set a bit. Right before serving, garnish your Halloween Mini Pizzas with a sprinkle of fresh basil for a pop of color and flavor that will make them even more inviting.
Halloween Mini Pizzas Variations
Feel free to let your creativity shine as you customize these delightful mini pizzas for your Halloween festivities!
- Gluten-Free: Swap regular pizza crusts for gluten-free alternatives to accommodate dietary needs.
- Dairy-Free: Use dairy-free cheese to keep it vegan while enjoying that satisfying cheesy goodness.
- Spicy Kick: Add sliced jalapeños or a sprinkle of red pepper flakes for a pop of heat that contrasts beautifully with the savory flavors.
- Veggie Boost: Sneak in some finely chopped spinach or mushrooms beneath the cheese for extra nutrition and a rich flavor profile.
- Sweet Twist: Brush a thin layer of BBQ sauce instead of pizza sauce for a sweet and tangy spin that kids will adore.
- Change Up the Cheese: Experiment with different cheeses; goat cheese or feta can lend a unique flavor that pairs well with the savory toppings.
- Fruit Fusion: Try adding pineapple tidbits—sweet and savory harmony that can make each bite an adventure!
- Shape Shifting: Instead of traditional pizzas, use cookie cutters to create spooky shapes, like bats or ghosts, adding an extra layer of fun to your gathering.
Each variation offers a new flavor experience, ensuring your Halloween Mini Pizzas are anything but ordinary! If you're intrigued by other fun ideas, check out our post on Spooky Snacks for the Whole Family for even more delicious inspiration.
Make Ahead Options
These Halloween Mini Pizzas are fantastic for meal prep, saving you valuable time on busy days! You can prepare the mini pizza crusts topped with sauce, cheese, and decorations up to 24 hours in advance. Simply assemble the pizzas as directed, cover them tightly with plastic wrap, and refrigerate to keep them fresh. When it's time to bake, just pop them in the oven directly from the fridge—there's no need to thaw! For the best results and to prevent sogginess, avoid adding fresh herbs until just before serving. In no time, you'll have these spooktacular delights ready for everyone to enjoy!
What to Serve with Halloween Mini Pizzas?
As you gather around with friends and family, complement your festive mini pizzas with vibrant sides and sweet treats that add to the fun.
-
Crispy Veggie Sticks: Bright carrot and cucumber sticks add a refreshing crunch, perfect for balancing the richness of the cheesy pizzas. Pair them with a creamy ranch dip for extra flavor.
-
Garlic Bread Twists: Soft, buttery garlic bread twists are a delightful side that keeps the Italian vibe going. Their savory taste pairs perfectly with the tangy pizza sauce.
-
Spooky Salad: A colorful mix of greens, cherry tomatoes, and black olives creates a striking “witches’ brew” salad. Toss in a zesty vinaigrette to brighten the meal.
-
Pumpkin Soup: Creamy pumpkin soup served in small cups makes for an excellent starter. Its warm, autumn flavors set the perfect seasonal tone for your gathering.
-
Fruity Halloween Punch: A fun, fruity punch made with orange juice, ginger ale, and floating gummy worms will keep the spooky spirit alive, making every sip feel like a treat.
-
Chocolate Dipped Marshmallows: For a sweet finish, serve chocolate-dipped marshmallows decorated to look like ghosts. They're easy to grab and full of sweet nostalgia, perfect for guests of all ages.
-
Mini Cupcakes: Whip up or buy mini cupcakes adorned with Halloween-themed frosting. The sweetness of the cupcakes contrasts wonderfully with the savory pizzas while keeping with the festive spirit.
With these delightful accompaniments, your Halloween feast will be a playful and memorable celebration!
How to Store and Freeze Halloween Mini Pizzas
Fridge: Store your leftover Halloween Mini Pizzas in an airtight container for up to 3 days. This keeps them fresh and ready for a quick snack!
Freezer: For longer storage, wrap the pizzas individually in plastic wrap and place them in a freezer-safe bag. They can last for up to 2 months in the freezer.
Reheating: When ready to enjoy, reheat the pizzas in a preheated oven at 375°F (190°C) for about 10 minutes, or until warmed through and crispy again.
Enjoy Anytime: These mini pizzas make for a delightful treat any time, so don't hesitate to whip some up and pop them in the freezer for easy, fun meals later!
Tips for the Best Halloween Mini Pizzas
Use Fresh Ingredients: Always use fresh vegetables and quality cheese for the best flavor. Fresh ingredients elevate your Halloween Mini Pizzas to a new level!
Don't Overcrowd Toppings: While it’s tempting to pile on the toppings, avoid overcrowding as it can lead to soggy crusts. Less is often more!
Watch the Baking Time: Every oven is different. Keep an eye on your pizzas during the last few minutes of baking to prevent any burning.
Creative Shapes: Have fun with shapes! Use cookie cutters for cheese and veggies to enhance the Halloween theme without complicating your decoration process.
Cool Slightly Before Serving: Allow your Halloween Mini Pizzas to cool for a few minutes post-baking. This helps the cheese set and makes them easier to handle.
Mix and Match: Experiment with different toppings each time you make these pizzas. Your variations will keep the fun alive and please diverse taste buds!
Halloween Mini Pizzas Recipe FAQs
What type of mini pizza crusts should I use?
I recommend using personal-size mini pizza crusts, as they’re easy to handle and perfect for customization. Look for whole wheat or gluten-free options if you have dietary preferences.
How should I store leftover Halloween Mini Pizzas?
Absolutely! You can store your leftover mini pizzas in an airtight container in the fridge for up to 3 days. Just make sure they’re completely cool before sealing the container to maintain freshness.
Can I freeze Halloween Mini Pizzas for later?
Yes, you can! To freeze, wrap each pizza individually in plastic wrap, then place them in a freezer-safe bag. They can stay fresh for up to 2 months. When you’re ready to enjoy, simply reheat them in a preheated oven at 375°F (190°C) for about 10 minutes.
What should I do if my pizzas come out soggy?
If you find your pizzas are soggy, it’s likely due to too many toppings or sauce. To prevent this, limit the amount of sauce to 1-2 tablespoons per crust and avoid overloading with toppings. If sogginess persists, bake them for an additional 2-3 minutes to crisp them up again.
Are there any dietary considerations for this recipe?
Very! If you're catering to allergies, be cautious with the toppings—especially cheese and olives. You can substitute with dairy-free cheese for those with lactose intolerance, and opt for fresh veggies that suit your guests’ preferences. Always check ingredient labels when cooking for those with allergies.
What’s the best way to make these pizzas more festive?
Get creative! You can use cookie cutters for slices of cheese or vegetables to make shapes like bats or ghosts. Additionally, experiment with different toppings each time to keep it exciting and seasonal. The more the merrier in the spirit of Halloween!

Spooktacular Halloween Mini Pizzas Everyone Will Love
Ingredients
Equipment
Method
- Preheat your oven to 425°F (220°C) and mist a baking sheet with olive oil spray.
- Spread 1–2 tablespoons of pizza sauce on each mini pizza crust, leaving a small border.
- Sprinkle shredded mozzarella cheese over half of the mini pizzas and use string cheese for mummy faces.
- Decorate with black olives, bell pepper strips, and mini pepperoni to get festive.
- Bake in the preheated oven for 10–12 minutes until crusts are golden brown and cheese is bubbling.
- Allow pizzas to cool for about 2 minutes before garnishing with fresh basil.


Leave a Reply