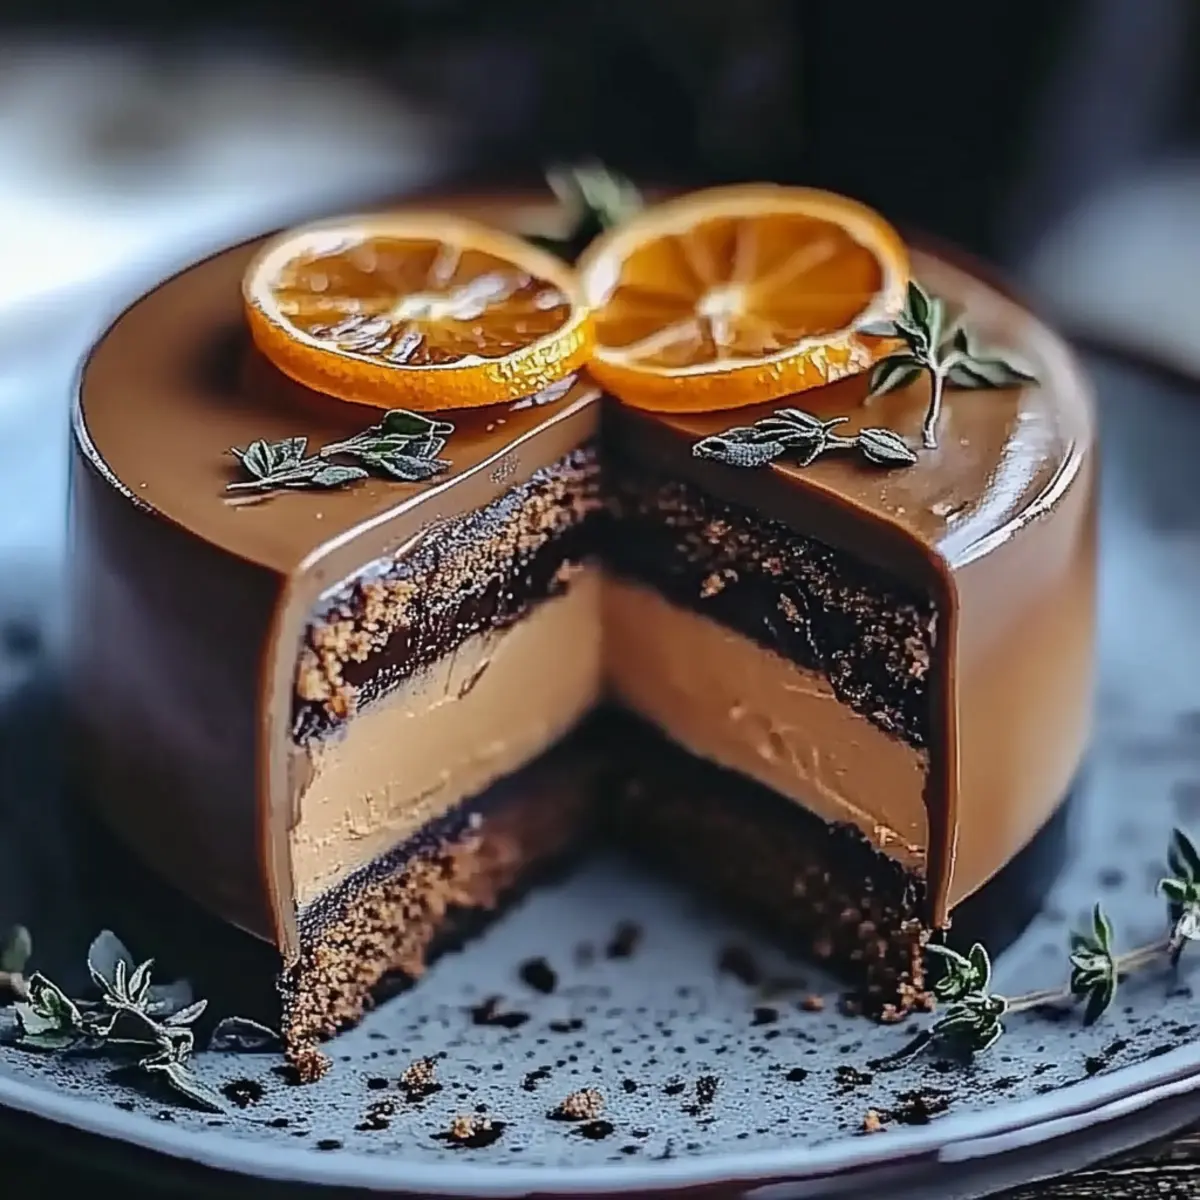
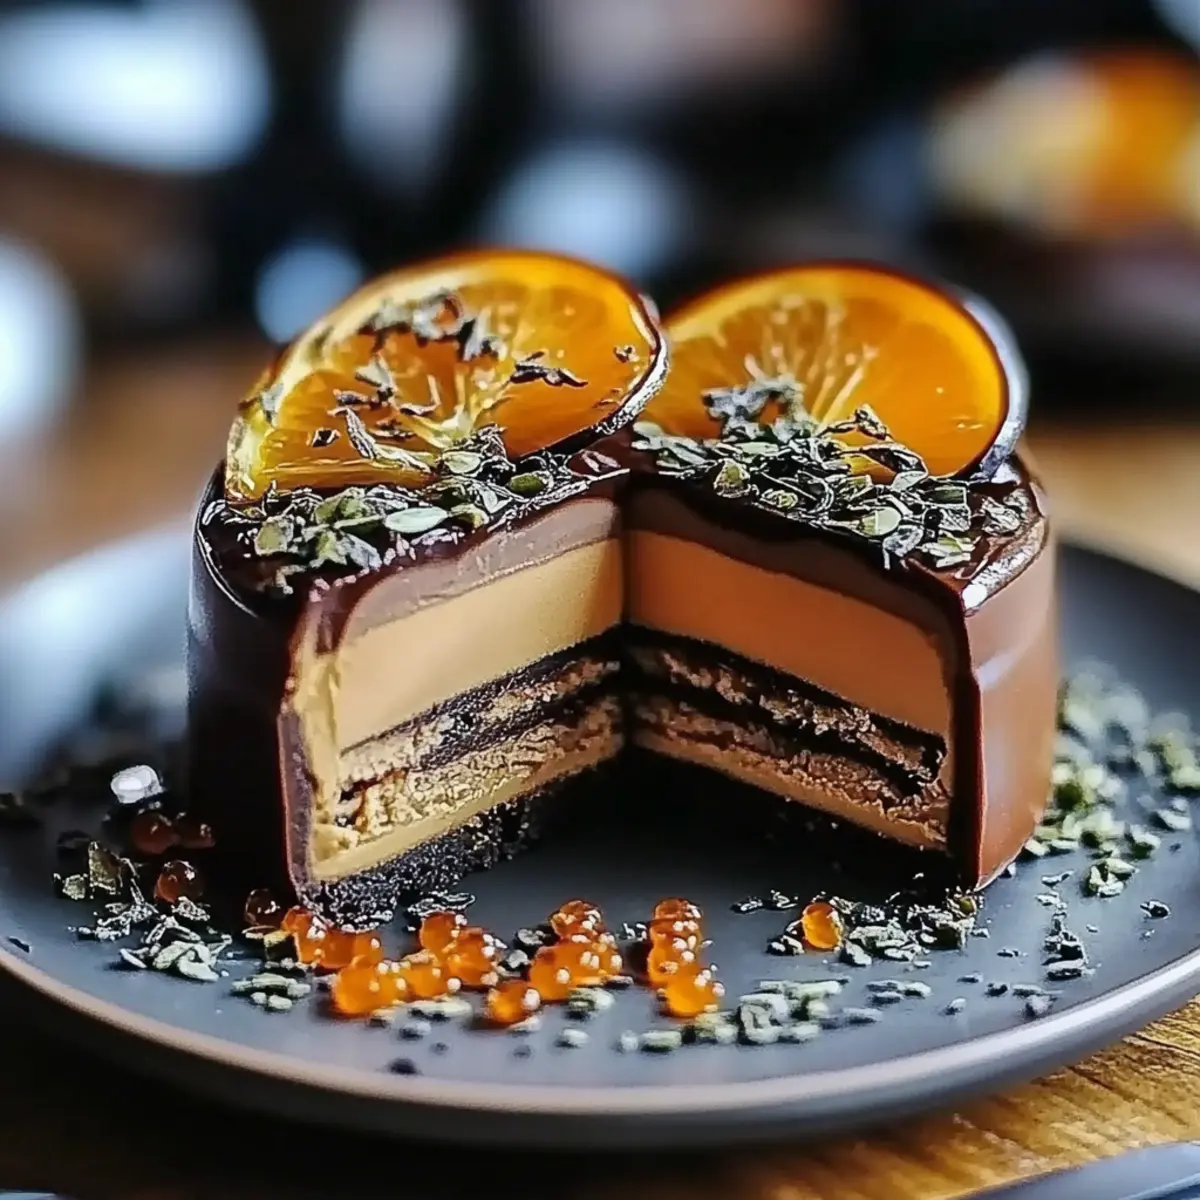
As I walked past the local café, the rich aroma of chocolate mingled with a hint of citrus danced in the air, pulling me in like a magnet. This memory sparked my craving for a dessert that balances indulgence with a refreshing twist—enter the showstopper: Chocolate-Orange Bliss. This delightful cake not only promises a heavenly chocolate experience but also brings a zesty brightness that turns every bite into a celebration. It’s the perfect solution for those who cherish homemade goodness but need a quick and elegant treat for gatherings or just a cozy afternoon at home. With minimal prep time and the charm of a classic bakery delight, you won’t want to miss out on crafting this delectable masterpiece. Ready to treat yourself to a slice of happiness? Let’s dive into the scrumptious details!

Why is Chocolate-Orange Bliss irresistible?
Irresistible flavors: The rich chocolate paired with zesty orange creates a delightful symphony that awakens your taste buds.
Effortless preparation: With just 30 minutes of prep time, this cake fits perfectly into even the busiest of schedules.
Versatile serving: Whether for a fancy gathering or a casual tea time, it’s sure to impress family and friends alike.
Moist and decadent: Thanks to buttermilk and boiling water, each bite melts in your mouth, making it hard to resist going back for seconds!
Elevate your baking: This recipe is ready to rival your favorite bakery cakes and leave everyone asking for your secret!
Chocolate-Orange Bliss Ingredients
Ready to create your dreamy dessert? Here are the key ingredients you need for your Chocolate-Orange Bliss!
For the Cake
• All-purpose flour – Provides the structure needed for a light and airy cake.
• Granulated sugar – Sweetens the cake beautifully, balancing the cocoa and orange flavors.
• Unsweetened cocoa powder – This rich ingredient gives your cake that sumptuous chocolate flavor.
• Baking powder – A must for making the cake rise and become fluffy.
• Baking soda – Helps enhance the cake's leavening when combined with acidic ingredients.
• Salt – A pinch enhances the overall flavor of this Chocolate-Orange Bliss.
• Large eggs – Adds richness and moisture while helping bind ingredients together.
• Buttermilk – Keeps your cake moist and adds a subtle tanginess that complements the chocolate and orange.
• Vegetable oil – Ensures your cake stays soft and tender without making it greasy.
• Orange zest – Infuses a bright, citrusy aroma, taking the chocolate flavor to new heights.
• Vanilla extract – A classic addition that enhances the sweetness and depth of flavor.
• Boiling water – Helps create a smooth batter and intensifies the chocolate flavor.
For the Frosting
• Chocolate ganache – Rich and glossy, this luscious topping is the perfect final touch for your cake!
Step‑by‑Step Instructions for Chocolate-Orange Bliss
Step 1: Preheat Your Oven
Begin by preheating your oven to 350°F (175°C). This temperature is crucial for creating that perfectly baked Chocolate-Orange Bliss cake. While the oven warms up, gather your two 9-inch round cake pans and prepare them by greasing and lightly flouring them to ensure your cakes release easily after baking.
Step 2: Mix the Dry Ingredients
In a large mixing bowl, combine 1 ¾ cups of all-purpose flour, 1 ½ cups of granulated sugar, ¾ cup of unsweetened cocoa powder, 1 teaspoon of baking powder, ½ teaspoon of baking soda, and ½ teaspoon of salt. Whisk the ingredients together until they are evenly mixed. This dry mixture lays the foundation for your Chocolate-Orange Bliss and should look rich and chocolatey.
Step 3: Incorporate the Wet Ingredients
Add 2 large eggs, 1 cup of buttermilk, ½ cup of vegetable oil, 1 tablespoon of freshly grated orange zest, and 1 teaspoon of vanilla extract to the dry ingredients. Mix everything together until the batter is smooth—this should take about 2-3 minutes of vigorous mixing. The aroma of the orange zest should now fill your kitchen, enhancing the excitement for your Chocolate-Orange Bliss.
Step 4: Add Boiling Water
Carefully stir in 1 cup of boiling water to the batter. The heat will help meld the flavors together and create a silky-smooth consistency. The batter will be quite thin, but don’t worry; that’s how it should be! Make sure everything is well combined before moving to the next step.
Step 5: Divide and Pour the Batter
Evenly divide the batter between the two prepared cake pans. Use a spatula to gently smooth the tops for even baking. As you pour, you’ll see the rich, dark batter contrasting with the pan—this is a great visual cue that your Chocolate-Orange Bliss is about to transform in the oven.
Step 6: Bake the Cakes
Place the cake pans in the preheated oven and bake for 25-30 minutes. To check for doneness, insert a toothpick into the center of the cakes; it should come out clean or with just a few crumbs. Enjoy the heavenly scent filling your kitchen as the cakes rise and develop a lovely sheen.
Step 7: Cool the Cakes
Once baked, remove the cakes from the oven and let them cool in the pans for 10 minutes. This step is essential to prevent them from breaking apart. Afterward, gently transfer the cakes to wire racks to cool completely. The sight of your Chocolate-Orange Bliss will become even more inviting as they cool.
Step 8: Frost with Ganache
Once the cakes are completely cooled, it’s time to frost with rich chocolate ganache. Pour the ganache over the top of each layer, allowing it to cascade down the sides for a beautiful finish. This luscious layer will elevate your Chocolate-Orange Bliss and make it irresistibly decadent, perfect for any occasion!
What to Serve with Chocolate-Orange Bliss
Treat your friends and family to a delightful spread that enhances the experience of your indulgent dessert.
- Fresh Berries: A medley of strawberries, raspberries, and blueberries adds a juicy, vibrant contrast that balances the rich chocolate.
- Vanilla Ice Cream: A scoop of creamy vanilla perfectly complements the warm, chocolatey goodness, creating a classic dessert duo.
- Whipped Cream: Light and airy, a dollop of whipped cream enhances the flavors while adding a delightful texture to each bite.
- Orange-Infused Drink: A sparkling orange soda or a simple citrus spritzer brightens up the meal, echoing the cake's orange zest.
- Chocolate-Covered Almonds: The crunchy texture and chocolatey touch offer a delightful snack option that mirrors your cake's flavor profile.
- Coffee or Espresso: A cup of strong coffee enhances the chocolate flavor, serving as a warm companion that rounds out the dessert experience beautifully.
- Mint Garnish: Fresh mint leaves not only add a pop of color but also introduce a refreshing note that brightens the rich dessert.
- Dark Chocolate Shavings: Sprinkling shavings on top adds sophistication, enhancing visual appeal while emphasizing the chocolate theme.
- Citrus Salad: A light salad of citrus fruits can serve as a refreshing palate cleanser, bringing a zesty contrast to the richness of the cake.
Chocolate-Orange Bliss Variations
Feel free to mix things up and make this delightful cake your own—you'll create a masterpiece every time!
-
Gluten-Free: Substitute all-purpose flour with a gluten-free flour blend for a cake everyone can enjoy. Be sure to check the blend's instructions for best results!
-
Dairy-Free: Swap buttermilk with almond milk and add a tablespoon of vinegar. This keeps it moist while accommodating dietary needs. Your friends with lactose intolerance will thank you!
-
Zesty Boost: Incorporate more orange zest into the batter for an extra citrus kick. Imagine taking a bite and being blanketed with a vibrant orange flavor burst.
-
Nutty Texture: Add ½ cup of finely chopped walnuts or pecans to the batter before baking for a delightful crunch. They’ll bring a lovely contrast to the soft cake.
-
Spicy Twist: For a warm, cozy flavor, include a teaspoon of cinnamon or a dash of cayenne pepper in the dry ingredients. This subtle warmth can elevate your Chocolate-Orange Bliss even further.
-
Fruity Layers: Layer the cake with fresh strawberries or raspberries between the tiers. The tartness of the fruit complements the sweetness beautifully, creating a stunning visual and taste experience.
-
Decadent Ganache: Experiment with flavored ganache by adding a splash of espresso or peppermint extract to the chocolate. This adds an exciting twist that will surprise and delight your taste buds!
-
Reduced Sugar: Substitute half of the granulated sugar with applesauce for a lower-sugar option. This tweak maintains the moistness while keeping the cake delicious and satisfying.
Expert Tips for Chocolate-Orange Bliss
• Use Room Temperature Ingredients: Allow eggs and buttermilk to reach room temperature before mixing. This helps them combine seamlessly, resulting in a better texture for your Chocolate-Orange Bliss.
• Don't Overmix: Gently mix the batter until just combined. Overmixing can lead to a dense cake instead of the desired fluffy texture.
• Measure Flour Correctly: Spoon and level the flour to ensure you don’t use too much. An excess amount can make your cake heavy and dry.
• Check for Doneness: Insert a toothpick into the center around 25 minutes. If it comes out with a few moist crumbs, your Chocolate-Orange Bliss is ready, but if it’s wet, give it a few more minutes.
• Cool Completely Before Frosting: Patience is key! Ensure your cakes are entirely cooled before applying the ganache. This prevents it from melting and sliding off, ensuring a beautiful finish.
• Add Extra Zest: For an even brighter flavor, consider adding an extra teaspoon of orange zest to the ganache for that citrus burst that complements the chocolate delightfully!
How to Store and Freeze Chocolate-Orange Bliss
Fridge: Store any leftover Chocolate-Orange Bliss in an airtight container for up to 3 days. This keeps the cake moist and flavorful, ready to enjoy whenever a craving hits.
Freezer: For longer storage, wrap slices or the whole cake tightly in plastic wrap, then place in a freezer-safe bag or container. This will preserve your delicious dessert for up to 3 months.
Reheating: When ready to indulge again, thaw your frozen Chocolate-Orange Bliss in the fridge overnight. Reheat individual slices in the microwave for about 10-15 seconds for a warm treat!
Garnishing: Consider garnishing with fresh orange slices or a sprinkle of cocoa powder before serving to add a touch of elegance and a burst of flavor.
Make Ahead Options
These Chocolate-Orange Bliss cakes are perfect for busy home cooks looking to save time! You can prepare the cake batter and refrigerate it up to 24 hours before baking. Simply mix the dry and wet ingredients, then mix in the boiling water, and store in an airtight container. To maintain quality, cover the batter tightly to prevent drying out. When you’re ready to bake, just pour the batter into greased pans and bake as directed. Frosting can also be made up to 3 days in advance; just refrigerate the ganache and reheat gently before frosting. This way, you can enjoy a deliciously moist cake without the last-minute rush!
Chocolate-Orange Bliss Recipe FAQs
What is the best way to select ripe oranges for zesting?
Absolutely! When choosing oranges, look for ones that are firm, heavy for their size, and have smooth, shiny skin. Avoid any with dark spots or wrinkles, as these may indicate overripeness. Fresh oranges will provide a vibrant zest that truly enhances the flavor of your Chocolate-Orange Bliss.
How should I store my Chocolate-Orange Bliss leftovers?
You can keep any leftover cake in an airtight container in the fridge for up to 3 days. This method preserves the cake's moisture and flavor. Alternatively, if you want to enjoy it later, wrap each slice tightly in plastic wrap, then store them in a freezer-safe container for up to 3 months.
Can I freeze the Chocolate-Orange Bliss cake?
Yes, you can! To freeze, allow the cake to cool completely first. Then, wrap slices or the whole cake in plastic wrap, ensuring there are no air pockets, and place it in a freezer-safe bag or container. When you’re ready to enjoy, thaw the cake in the fridge overnight before serving.
What should I do if my cake doesn't rise?
Very often, a cake won't rise due to expired baking powder or baking soda, so it’s crucial to check their freshness before using. Also, avoid overmixing; this can lead to a denser cake. If this happens, don't worry—your Chocolate-Orange Bliss will still taste fantastic, just a bit more like a fudgy brownie!
Is this recipe suitable for someone with a gluten allergy?
The original recipe contains all-purpose flour, which is not gluten-free. However, you could substitute it with a 1:1 gluten-free baking flour blend. Make sure to check the other ingredients, like baking powder, to ensure they are also gluten-free. This way, everyone can enjoy Chocolate-Orange Bliss at your gathering!
Can I make this cake in advance for a party?
Absolutely! You can bake and assemble your Chocolate-Orange Bliss a day or two ahead of your event. Just store it in the fridge wrapped tightly to maintain moisture. When it’s time to celebrate, your cake will be ready to impress, and you’ll have less to worry about on the big day!

Indulge in Chocolate-Orange Bliss: A Dreamy Dessert Delight
Ingredients
Equipment
Method
- Preheat your oven to 350°F (175°C) and prepare two 9-inch round cake pans by greasing and flouring them.
- In a large mixing bowl, combine the dry ingredients: all-purpose flour, granulated sugar, cocoa powder, baking powder, baking soda, and salt.
- Add the wet ingredients: eggs, buttermilk, vegetable oil, orange zest, and vanilla extract to the dry mixture. Mix until smooth.
- Carefully stir in the boiling water until well combined.
- Pour the batter evenly into the prepared pans and smooth the tops.
- Bake for 25-30 minutes, checking for doneness with a toothpick.
- Cool the cakes in the pans for 10 minutes, then transfer to wire racks to cool completely.
- Frost with chocolate ganache after the cakes have completely cooled.


Leave a Reply