The first chill of autumn brings a flurry of excitement, and I can almost hear the joyful squeals of kids gearing up for Halloween! This festive season, I'm thrilled to share my favorite way to add some spook-tacular fun to the table: Halloween Cake Pops. These delightful treats are not only a breeze to whip up—using a simple box cake mix—but they also double as a creative project that sparks joy for both kids and adults alike. With a splash of vibrant colors and playful decorations, you’ll find these cake pops to be a crowd-pleaser at any gathering, whether it’s a spooky bash or a cozy get-together. Plus, they’re perfect for indulging in a homemade treat while steering clear of the usual fast-food traps. Ready to dive into a world of ghoulishly good fun? Let’s get started!
Why are Halloween Cake Pops a Must-Try?
Fun and Festive: What better way to celebrate Halloween than with these adorable cake pops? They're playful, easy to decorate, and perfect for parties of all sizes.
Kid-Friendly: Get the little ones involved! Rolling and decorating these pops makes for a memorable activity that both kids and adults can enjoy together.
Endless Customization: Choose your favorite flavors or colors. From chocolate to red velvet, the possibilities are as limitless as your creativity.
Quick & Easy: With just a cake mix and some frosting, you can whip up these treats in no time—perfect for those last-minute Halloween gatherings.
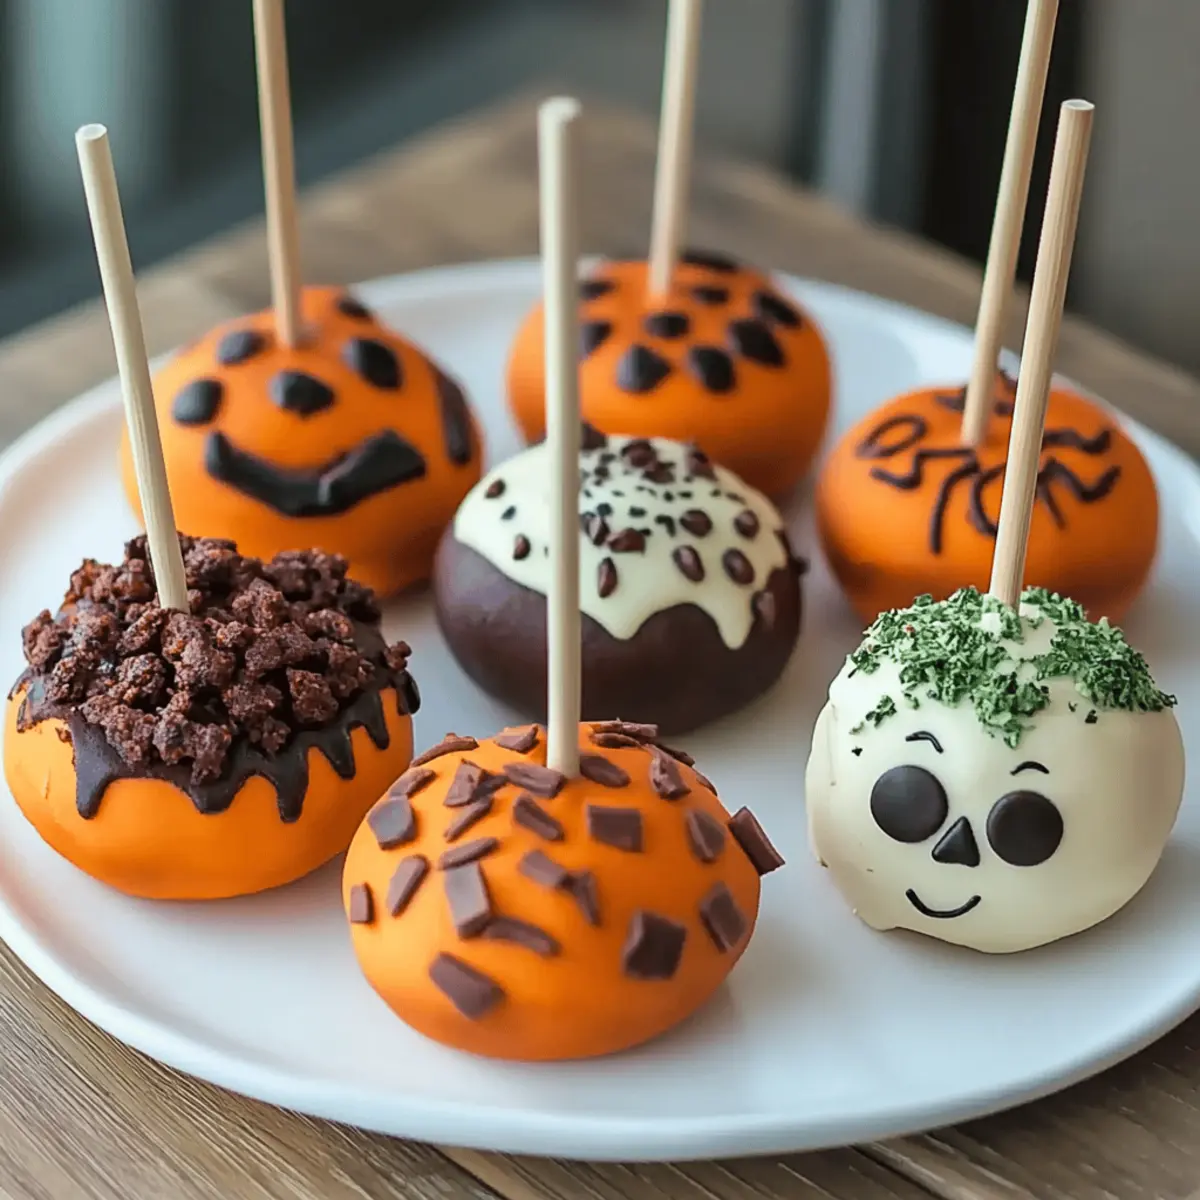
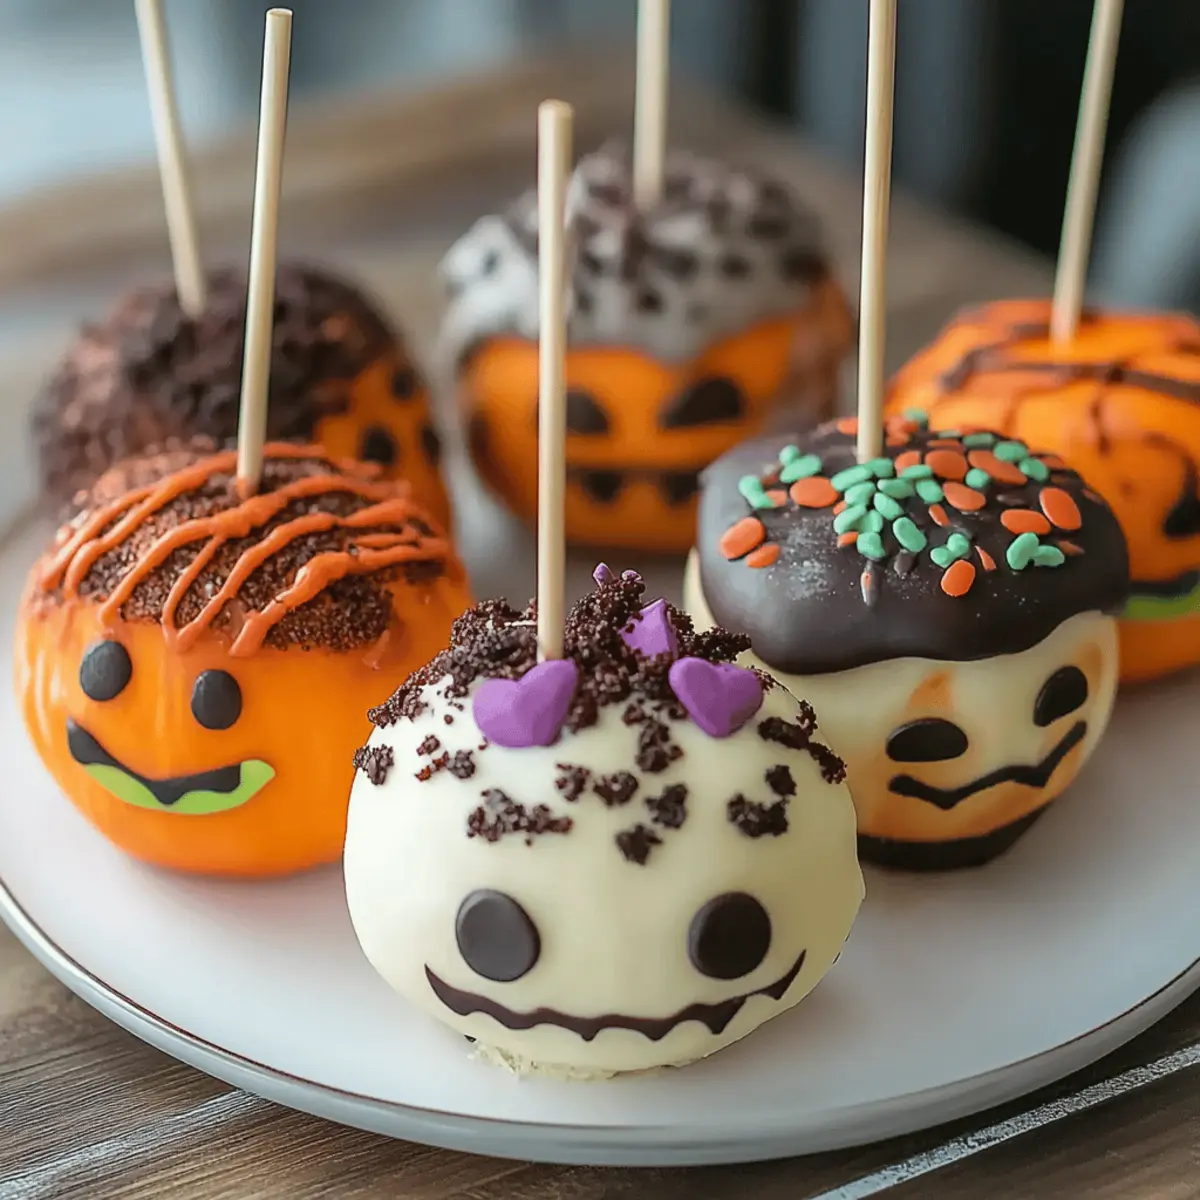
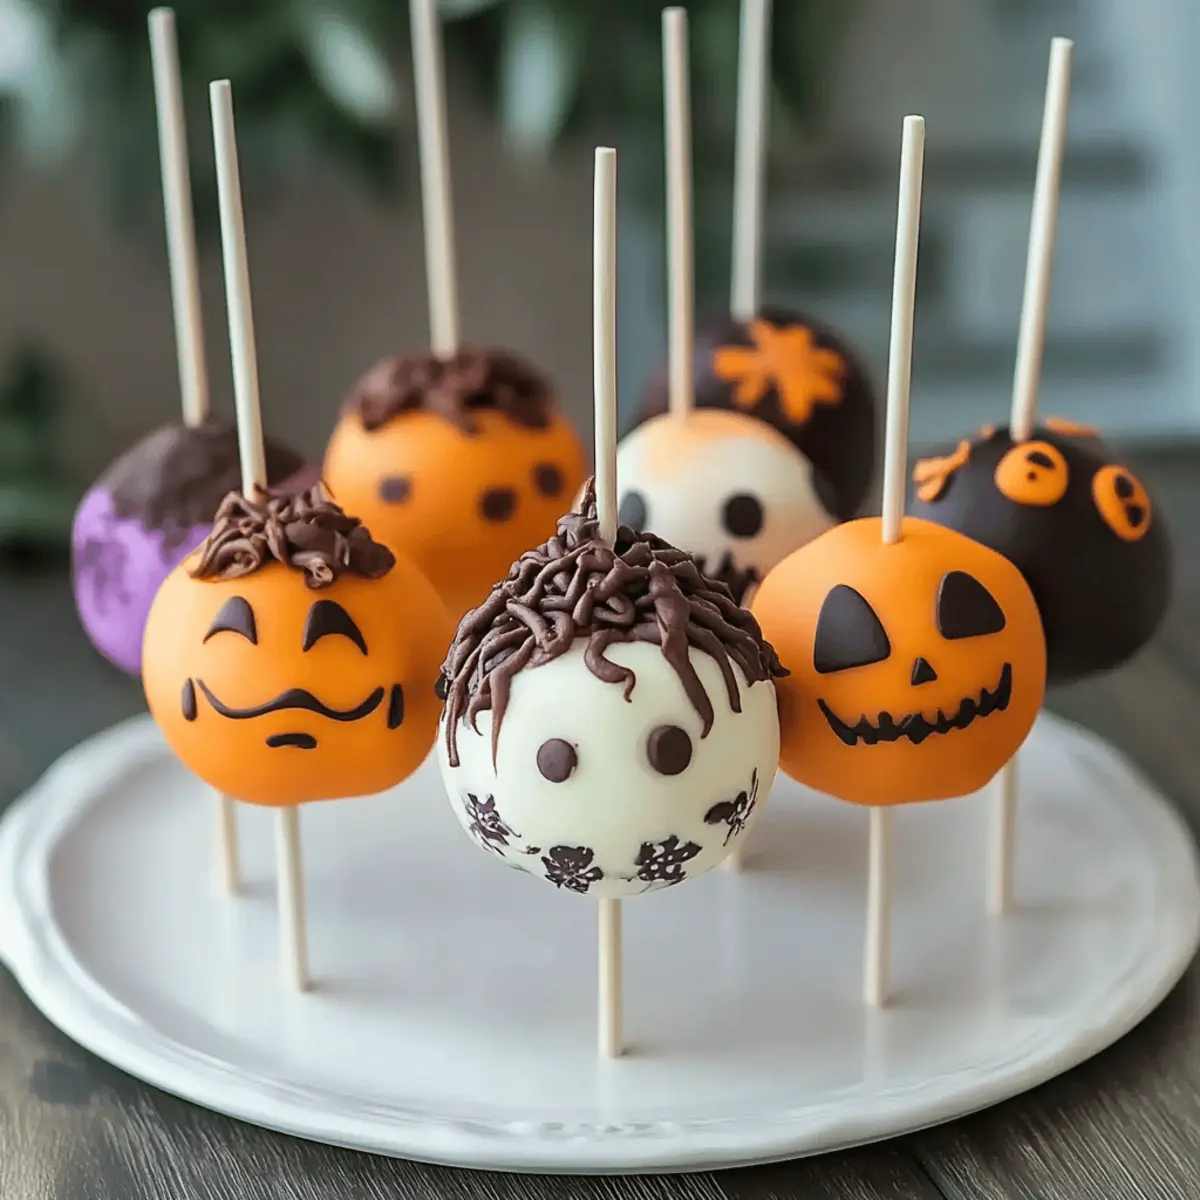
Impressive Presentation: Dress them up with candy eyeballs and sprinkles for a show-stopping dessert that looks as good as it tastes.
Try them at your next celebration and enjoy the smiles they bring—who can resist a festive treat like these?
Halloween Cake Pops Ingredients
• Transform your Halloween party with these simple yet delightful cake pops!
For the Cake
- 1 box cake mix – Any flavor works, but chocolate and red velvet scream Halloween excitement!
- Eggs, oil, and water – Use the amounts specified in the cake mix box instructions for perfect texture.
For the Filling
- ½ to 1 cup frosting – Choose cream cheese or chocolate for a deliciously rich and creamy filling.
For the Coating
- 12 oz candy melts or chocolate – Opt for festive colors: orange, black, white, or green to make them spook-tacular!
For Assembly
- 24 lollipop sticks – Essential for turning those tasty bites into fun pops!
- Candy eyeballs – Add a whimsical touch that makes your cake pops even more delightful.
For Decoration
- Halloween sprinkles – Sprinkle on some fun and color before the coating sets!
- Colored sugar (orange, black, purple) – Use to create a shimmering effect for a magical Halloween vibe.
- Gel food coloring (optional) – Tint your white chocolate with vibrant colors to enhance the visual appeal.
- Red gel icing – Perfect for giving your candy eyeballs a spooky detail with eyeball veins.
- Green frosting or fondant – Ideal for creating playful pumpkin stems—add a dash of creativity!
With these ingredients, you'll be well on your way to making unforgettable Halloween Cake Pops that are sure to impress!
Step‑by‑Step Instructions for Halloween Cake Pops
Step 1: Bake the Cake
Preheat your oven according to the box instructions for the cake mix. Prepare your baking pan as directed, and mix the cake ingredients—eggs, oil, and water. Pour the batter into the pan and bake for the recommended time until golden and a toothpick inserted in the center comes out clean. Once baked, let the cake cool completely on a wire rack.
Step 2: Crumble the Cake
Once the cake is cool, break it into fine crumbs in a large mixing bowl. Use your hands or a fork to crumble the cake thoroughly, ensuring no large pieces remain. Gradually mix in the frosting, one spoonful at a time, until you achieve a consistency that resembles sticky dough. This mixture forms the base of your Halloween Cake Pops.
Step 3: Shape the Cake Balls
Scoop out portions of the cake mixture and roll them into 1-inch balls using your hands. Place each ball on a lined baking sheet, ensuring they are evenly spaced. Once all the cake pops are shaped, refrigerate them for 1-2 hours or, for quicker results, freeze for about 30 minutes until they are firm to the touch.
Step 4: Prepare the Lollipop Sticks
In a microwave-safe bowl, melt a small amount (about 2 oz) of candy melts using 30-second intervals, stirring in between until smooth. Take each chilled cake ball and dip one end of a lollipop stick into the melted chocolate. Gently insert the stick into the center of each cake ball, about halfway through, to create a stable base for your Halloween Cake Pops.
Step 5: Chill Again
After inserting the lollipop sticks, chill the cake pops in the refrigerator for an additional 10 minutes. This step helps the chocolate adhere better and keeps the cake balls from falling off the sticks. This quick chill ensures your cake pops are ready for the next delicious coating.
Step 6: Coat the Cake Pops
Melt the remaining candy melts according to the package instructions until completely smooth. Carefully dip each cake pop into the melted chocolate, allowing excess chocolate to drip off. Make sure to coat each pop evenly to achieve that beautiful finish. A gentle twisting motion helps achieve a uniform layer of chocolate.
Step 7: Decorate Immediately
As soon as the cake pops are coated, it’s time to add some fun! While the chocolate is still wet, sprinkle on Halloween sprinkles, candy eyeballs, and colored sugar to your heart's desire. Get creative with your decorations, as this is where your unique touch shines through on the Halloween Cake Pops.
Step 8: Set the Cake Pops
Finally, place the decorated cake pops upright in a Styrofoam block or a cardboard box with holes poked into it for support. Let them set completely at room temperature for about 15-20 minutes, or place them in the refrigerator for about 10 minutes if you're short on time. Once set, your Halloween Cake Pops are ready to shine at your party!
Halloween Cake Pops Variations & Substitutions
Get ready to put your own spin on these delightful Halloween Cake Pops with these fun and creative variations!
-
Gluten-Free: Use a gluten-free cake mix instead of a regular one for a safe, tasty treat everyone can enjoy.
-
Vegan: Swap the eggs for flaxseed meal and use plant-based frosting and dairy-free chocolate to make these pops vegan-friendly.
-
Flavor Boost: Add a splash of vanilla extract or almond extract to the cake mixture for an extra layer of flavor that elevates the pop experience.
-
Spooky Citrus Twist: Incorporate citrus zest from orange or lemon into the cake mix for a refreshing twist that brightens the chocolate coating.
-
Nutty Crunch: Mix in finely chopped nuts or crushed cookies into the cake dough for added crunch. Almonds or Oreos work wonderfully and add a delightful texture.
-
Heat It Up: Sprinkle cayenne pepper or chili powder into the melted chocolate for a sweet and spicy surprise. Just a pinch can make these pops fascinatingly flavorful!
-
Chocolate Coating Options: Instead of colored candy melts, use high-quality dark, milk, or white chocolate for a richer taste. You can also mix different types of chocolate for a layered effect.
-
Seasonal Sprinkles: Customize your decorations by using themed sprinkles that match the season or any holiday. Think autumn leaves or Christmas colors after Halloween!
With these variations, your Halloween Cake Pops can cater to everyone's preferences and make them even more special. If you’re looking to make them extra festive, consider pairing them with some homemade caramel sauce for dipping, or try them alongside delicious fall treats. Enjoy the creative process, and happy baking!
Make Ahead Options
These Halloween Cake Pops are a fantastic choice for meal prep enthusiasts looking to save time during the busy Halloween season! You can bake and crumble the cake up to 3 days in advance, storing the crumbled cake in an airtight container in the refrigerator to maintain freshness. Additionally, you can roll the cake mixture into balls and refrigerate them for up to 24 hours before inserting the lollipop sticks. When you’re ready to finish the cake pops, simply dip them in melted chocolate and decorate as instructed. This way, you'll have delightful treats ready to impress your guests with minimal effort on the day of the party!
Expert Tips for Halloween Cake Pops
-
Proper Cooling: Always let the baked cake cool completely. This prevents sogginess and ensures the cake pops maintain their shape during assembly.
-
Sticky Dough: When mixing cake crumbs with frosting, start with less frosting. You want a sticky texture—too much frosting can lead to messy cake pops.
-
Chill for Firmness: Don’t skip the chilling steps! Refrigerating the shaped cake balls is crucial for keeping them sturdy when inserting the lollipop sticks and dipping in chocolate.
-
Even Coating: When dipping the cake pops in melted candy melts, twirl the pop to ensure even coverage. Tapping gently on the side to let excess chocolate drip off helps achieve a smooth finish.
-
Creative Decor: Feel free to experiment with decorations! Use various colored sprinkles, edible glitter, or themed Halloween toppings to personalize your Halloween Cake Pops and make them truly festive.
What to Serve with Halloween Cake Pops?
The joy of Halloween isn’t just in decorating—it's also in savoring a delightful spread that brings the festivities to life.
-
Spooky Fruit Platter: Fresh fruit cut into Halloween shapes adds a refreshing crunch, balancing the sweetness of cake pops wonderfully.
-
Witch’s Brew Punch: A colorful, fizzy drink full of tropical flavors can enchant guests and keep the spooky spirit alive!
-
Crispy Veggie Sticks: Pair with a creamy dip to add crunch and contrast to the rich sweetness of the cake pops, making your table more inviting.
-
Chocolate Dipped Pretzels: The salty-sweet combination creates a tantalizing texture that enhances the overall dessert experience.
-
Pumpkin Spice Cupcakes: These mini cakes echo the Fall flavors, bringing warmth and rustic charm to your Halloween celebration.
-
Cheese and Crackers Board: Offer an assortment of cheeses, nuts, and crackers for those who prefer savory bites alongside their sweet treats.
-
Themed Cookies: Ghost, pumpkin, and spider-shaped cookies will delight children and adults alike, creating a magical dessert table.
-
Candy Corn Delight: A playful nod to Halloween, this candy mix provides bright color and sweetness, complementing the festive vibe.
Immerse your guests in the spirit of the season by pairing these enchanting dishes with your fun Halloween Cake Pops!
How to Store and Freeze Halloween Cake Pops
Room Temperature: Keep leftover Halloween Cake Pops in an airtight container for up to 3 days. This helps retain their moisture and flavor without the need for refrigeration.
Fridge: For longer freshness, store them in the fridge for up to 1 week. Just make sure they are well-wrapped to prevent them from absorbing other odors.
Freezer: Freeze the cake pops for up to 2 months. Before freezing, place them in a single layer in a resealable bag or airtight container to avoid sticking.
Reheating: If thawed, simply let them sit at room temperature for 15-20 minutes before enjoying to bring back their delightful taste and texture.

Halloween Cake Pops Recipe FAQs
How do I choose the right cake mix for Halloween Cake Pops?
Absolutely! Chocolate and red velvet are popular choices due to their rich flavors and spooky colors. However, any flavor you love will work just as well. Just make sure the cake mix is fresh and check the expiration date before using!
What’s the best way to store leftover Halloween Cake Pops?
To keep your Halloween Cake Pops fresh, store them in an airtight container at room temperature for up to 3 days. If you want to extend their lifespan, they can last up to 1 week if you refrigerate them. Just make sure they’re well-wrapped to avoid absorbing any unwanted odors!
Can I freeze Halloween Cake Pops?
Yes, you can! These delightful treats freeze beautifully. Place them in a single layer in a resealable bag or an airtight container, and they will stay fresh for up to 2 months. When you’re ready to enjoy, simply let them sit at room temperature for about 15-20 minutes before indulging!
What should I do if my cake pops are falling off the sticks?
Very commonly, this happens if the cake pops weren't chilled enough before inserting the lollipop sticks. Make sure to chill the shaped cake balls for at least 1-2 hours or freeze them for 30 minutes before dipping. Reinserting the stick into a firmer cake ball can also help keep them stable. If the chocolate coating is too warm, it may not hold the pop securely—cool temperatures are key!
Are there any dietary concerns for Halloween Cake Pops?
Yes, if you're making these for guests with dietary restrictions, pay attention to the ingredients. Be cautious of gluten and dairy for those with allergies. For a vegan or gluten-free option, seek out cake mixes and frosting that cater to those needs. Always double-check labels to ensure everyone can enjoy these festive treats!
Delightful Halloween Cake Pops: Fun, Festive Treats to Impress
Ingredients
Equipment
Method
- Preheat your oven according to the box instructions for the cake mix. Prepare your baking pan and mix cake ingredients. Pour the batter and bake until golden.
- Once cooled, break the cake into fine crumbs. Mix in frosting until it resembles sticky dough.
- Roll the mixture into 1-inch balls and place on a lined baking sheet. Refrigerate or freeze to firm up.
- Melt a small amount of candy melts. Dip lollipop sticks in the chocolate and insert into the center of each cake ball.
- Chill again for 10 minutes to secure the sticks.
- Melt the remaining candy melts and dip each cake pop until evenly coated.
- Add decorations while the chocolate is still wet. Get creative!
- Set the cake pops in a Styrofoam block to let them set completely.


Leave a Reply