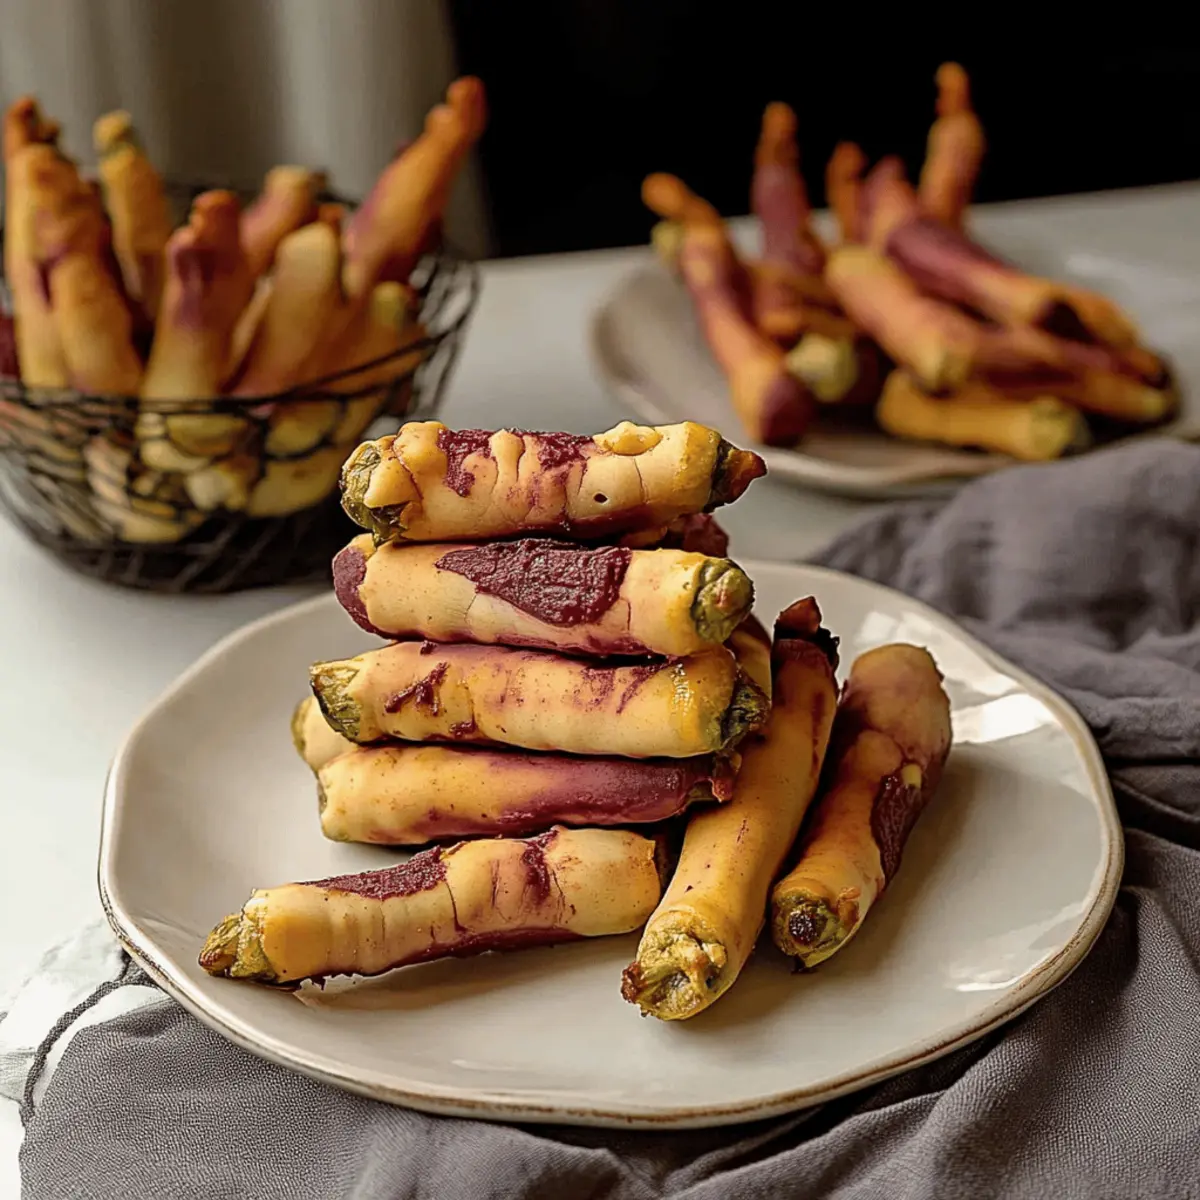
The aroma of baking cookies fills the air, transforming my kitchen into a whimsical bakery just in time for Halloween. As the leaves turn and the nights grow longer, there’s something delightfully mischievous about creating Creepy Witch Finger Cookies. This recipe not only adds a playful twist to any gathering but also provides a fantastic opportunity to involve the kids in the fun! With a quick prep time and a hauntingly beautiful presentation, these cookies are sure to captivate both young and old alike. The combination of colors and textures, enhanced by the almond "nails" and a drizzle of red for that eerie touch, makes them irresistible. So, gather your ingredients and let’s embark on this deliciously spooky adventure together—who’s ready for some ghostly treats?

What makes these cookies a Halloween hit?
Unforgettable Presentation: These Creepy Witch Finger Cookies aren’t just treats; they’re a showstopper! The whimsical, eerie designs paired with vibrant colors will steal the spotlight at any Halloween gathering.
Unique Flavor Combinations: With a buttery base accented by sweet jams and almonds, these cookies deliver a delightful crunch that contrasts beautifully with the soft cookie texture.
Kid-Friendly Fun: Perfect for family baking sessions, this recipe invites kids to unleash their creativity as they shape and decorate their cookies.
Time-Saving Treats: While they may look intricate, the chilling and baking processes let you multitask—perfect for busy schedules!
Memorable Finishing Touch: The blood-red gel or syrup elevates these cookies from simple to spooktacular, ensuring unforgettable reactions from your guests.
Try these cookies for a fun-filled baking adventure this Halloween! If you enjoy festive baking, check out our Halloween-themed Desserts for more delightful ideas.
Creepy Witch Finger Cookies Ingredients
For the Cookie Dough
• 226 g unsalted butter – softening brings out its rich flavor and ensures a creamy texture.
• 140 g confectioner's sugar – this fine sugar provides the sweetness that balances the buttery notes.
• 1 teaspoon sea salt – enhances the sweetness and adds depth to your cookie dough.
• 4 large egg yolks – using room temperature helps the eggs blend smoothly for a cohesive dough.
• 5 mL vanilla extract – a splash of vanilla elevates the flavor profile, making them even more delectable.
• 454 g all-purpose flour – essential for structure, but be careful not to overmix once added.
• ¼ teaspoon baking powder – helps the cookies rise slightly while maintaining a dense texture.
For the Color
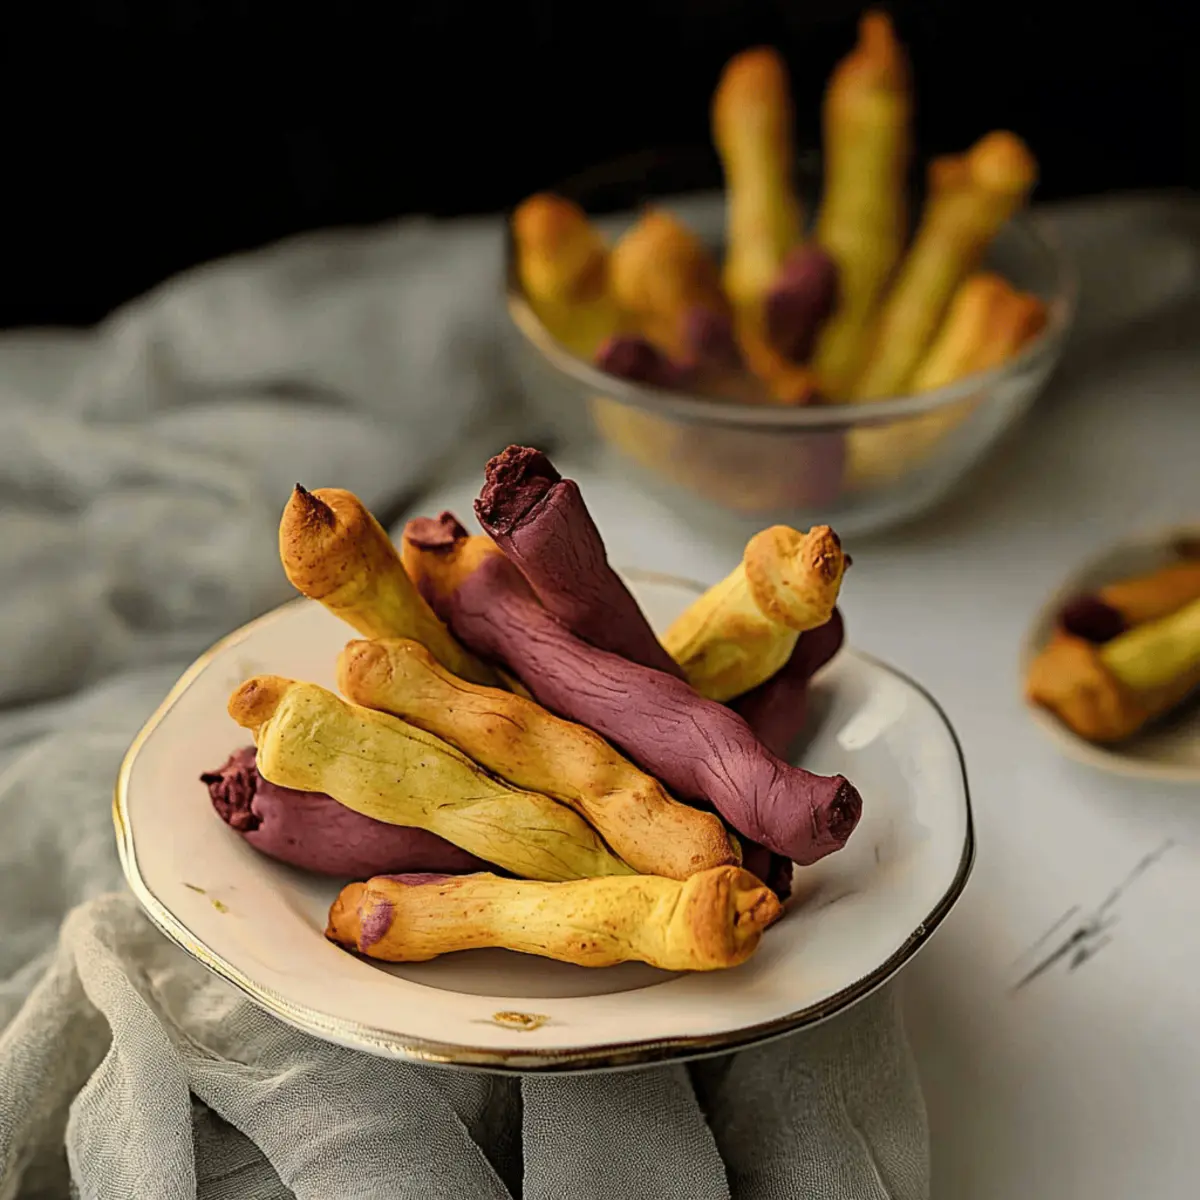
• 4 - 6 g matcha powder – creates a spooky green tint; adjust to your preferred shade!
• 20 - 30 g purple sweet potato powder – gives a fun, vibrant purple hue that’s both natural and eye-catching.
• 5 - 15 g cocoa powder – adds a rich brown color and a hint of chocolate flavor for depth.
For Decoration
• 50 whole blanched almonds – these act as the “nails,” lending a frightful yet delicious touch.
• Cocoa powder – sprinkle for a dusting that mimics shadows and adds dimension.
• Strawberry or raspberry jam – this sticky sweetness fills the cavities of the cookies, enhancing both flavor and appearance.
• Red cake writing gel – for that chilling bloody effect that’s sure to send shivers down your spine!
• Melted white chocolate or colored candy wafers – drizzling adds a beautiful finish, making these cookies truly enchanting.
Now that you have all your ingredients ready, let's dive into the fun part—baking these Creepy Witch Finger Cookies that are sure to be the highlight of your Halloween festivities!
Step‑by‑Step Instructions for Creepy Witch Finger Cookies
Step 1: Cream the Butter and Sugar
In a large mixing bowl, cream together the softened unsalted butter, confectioner's sugar, and sea salt using an electric mixer. Mix on medium speed until the mixture is light and fluffy, about 3–5 minutes. You’ll know it’s ready when it appears pale in color and well combined.
Step 2: Incorporate Egg Yolks and Vanilla
Add the room temperature egg yolks and vanilla extract to the creamed mixture. Continue to mix on medium speed until fully incorporated, which should take about 1–2 minutes. The batter should be smooth and slightly thick, creating a luxurious base for your Creepy Witch Finger Cookies.
Step 3: Add Color Powders
For a fun twist, divide the dough and incorporate the color agents—matcha powder for green, purple sweet potato powder for vibrant color, or cocoa powder for a brown hue. Stir each batch until the colors are fully blended, adjusting to your desired shades. Your cookie dough should have playful hues that make these cookies stand out!
Step 4: Combine Dry Ingredients
In a separate bowl, whisk together the all-purpose flour and baking powder. Gradually fold this dry mixture into the colored butter mixture using a rubber spatula, being careful not to overmix. Stop as soon as a soft dough forms, which will be slightly sticky yet manageable for shaping.
Step 5: Chill the Dough
Wrap the dough in plastic wrap and chill it in the refrigerator for 20–30 minutes. This step is crucial for firming the dough, allowing you to shape it easily into finger cookies. Use this time to clean up your workspace and prepare your baking sheets.
Step 6: Preheat the Oven
While the dough chills, preheat your oven to 325°F (163°C). Line two baking sheets with parchment paper, ensuring they are ready for the spooky shapes you’ll soon create. The preheating step is essential for achieving the perfect cookie texture once baked.
Step 7: Shape the Cookies
Remove the chilled dough from the fridge and portion it into 16–20 g pieces. Roll each piece into a finger shape, creating two thick knuckles for a creepy effect. Use a knife to score lines on the knuckles, enhancing the finger-like appearance, and place a whole blanched almond at the tip as the "nail."
Step 8: Freeze for Firmness
Arrange the shaped cookies on the parchment-lined trays and place them in the freezer for 40–60 minutes. This freezing process helps maintain their shape while baking, ensuring that each Creepy Witch Finger Cookie comes out looking perfectly spooky and detailed.
Step 9: Bake the Cookies
Once the cookies are frozen, bake them in the preheated oven for 20–25 minutes. Keep an eye on them, and look for a light golden color on the bottoms. The cookies should be firm to the touch, signaling they’re ready to be removed and cooled.
Step 10: Assemble with Jam
After letting the cookies cool slightly, carefully remove the almonds and place a dollop of strawberry or raspberry jam into the cavity where the almond was. Press the almond back into place gently, creating the illusion of a creepy nail, enhancing the overall spookiness of your Creepy Witch Finger Cookies.
Step 11: Decorate for Spookiness
Finally, if desired, brush the cookies lightly with cocoa powder for a shadowy effect and use red cake writing gel or a mix of red food color with corn syrup to create a blood-like drizzle on the fingers. These finishing touches will make your cookies not only look horrifying but also irresistibly fun for Halloween!
Creepy Witch Finger Cookies Variations
Get ready to unleash your creativity and customize these cookies to your heart's content!
- Gluten-Free: Substitute all-purpose flour with a gluten-free blend to enjoy these cookies without the gluten!
- Nut-Free: Replace whole blanched almonds with pumpkin seeds or sunflower seeds for a nut-free option that still feels spooky.
- Vegan: Use vegan butter and flax eggs in place of butter and egg yolks; simply mix 1 tablespoon of flaxseed meal with 2.5 tablespoons of water per egg yolk to create a great binder.
- Flavor Boost: Add 1 teaspoon of almond or coconut extract for an extra layer of flavor that pairs well with the sweet jams.
- Spicy Twist: Incorporate a pinch of cayenne or chili powder into the dough! This surprising kick will make your cookies stand out at any gathering and tickle your taste buds.
- Fun Shapes: Instead of fingers, use cookie cutters to create spooky shapes—like bats and ghosts—only limit your imagination! You can still decorate them similarly to keep the Halloween theme alive.
- Chocolate Dipped: After baking, dip the bottoms of cookies in melted dark or white chocolate before adding your usual decorations. This adds a delightful twist to the texture!
- Decorate with Sprinkles: Add a mix of festive Halloween sprinkles on top of the melted chocolate to give the cookies a fun, vibrant appeal.
Remember, the possibilities are endless, so mix and match these variations to create your perfect spooky treat! If you're looking for more fun ways to celebrate Halloween, check out our fantastic guide on Halloween-themed Desserts for additional spooky delights.
What to Serve with Creepy Witch Finger Cookies
The chilling aroma of freshly baked cookies creates an inviting atmosphere; let’s elevate your Halloween gathering with delightful pairings.
- Warm Apple Cider: This comforting drink complements the cookies' sweetness while adding a cozy, autumnal touch to your spread.
- Spooky Cheese Platter: A selection of sharp cheeses pairs gorgeously with the cookie’s sweet notes, offering a savory balance on the palate.
- Chocolate Raspberry Tart: Rich chocolate dessert adds an elegant touch, enhancing the festive spirit with its decadent flavors.
- Pumpkin Spice Latte: Infuse your gathering with seasonal warmth as the spices harmonize beautifully with the witchy theme of your spooky cookies.
- Ghostly Meringue Kisses: Light and airy, these treats provide a playful contrast in texture and are fun for kids and adults alike.
- Caramel Dipped Pretzels: The crunchy, salty snacks create a delightful contrast to the cookie's sweetness and spooky allure.
- Black Cherry Soda: This fizzy, tart drink will not only quench thirst but also add a dark, mysterious element to your Halloween spread.
- Witch’s Brew Punch: A fun, fruity punch full of eye-catching colors that mirrors the playful nature of your Creepy Witch Finger Cookies.
Create unforgettable moments this Halloween with these delightful pairings!
Expert Tips for Creepy Witch Finger Cookies
Chill Your Dough: Make sure to chill the dough for optimal shaping. This prevents the cookies from spreading too much during baking, ensuring they keep their eerie finger shape.
Perfect Almond Placement: When pressing the almond "nail" into the dough, be gentle. Too much pressure can distort the shape; aim for just a snug fit.
Color Adjustments: Experiment with the color powders for a fun twist! If you prefer a bolder hue, don’t hesitate to add a bit more matcha, sweet potato, or cocoa powder to your dough.
Timing is Key: When baking, keep an eye on the cookies. The cooking time can vary slightly depending on your oven, and you want to avoid overbaking for the best texture.
Decorate Creatively: Let your imagination run wild with the finishing touches! Consider adding edible glitter or spooky sprinkles along with the gel for an even more festive touch to your Creepy Witch Finger Cookies.
Enjoy your baking adventure and reap the rewards of these delightfully spooky cookies!
Make Ahead Options
These Creepy Witch Finger Cookies are perfect for meal prep enthusiasts! You can make the dough up to 3 days in advance; simply prepare it, shape into fingers, and freeze them until firm. Wrap the shaped cookies in plastic wrap before freezing to maintain their spooky form. When you're ready to bake, there's no need to thaw—just pop them directly into the preheated oven for 20-25 minutes. Additionally, you can prepare the decorations (like the jam and red gel) a day ahead and store them in the fridge to streamline your cookie assembly. This way, you'll have these charming and eerie treats ready to impress with minimal effort on the day of your celebration!
How to Store and Freeze Creepy Witch Finger Cookies
Room Temperature: Store cooled cookies in an airtight container at room temperature for up to 3 days. This keeps them fresh and delicious for quick snacking!
Fridge: For longer shelf life, you can refrigerate the cookies in a sealed container for up to 1 week. Make sure they are completely cooled to prevent moisture buildup.
Freezer: Freeze the baked cookies in a single layer on a baking sheet until firm, then transfer to a freezer-safe bag or container. They can be stored for up to 3 months for a spooky treat anytime!
Reheating: To enjoy the cookies warm, preheat your oven to 350°F (175°C) and bake them directly from the freezer for 8–10 minutes. This revitalizes their flavor and gives them a freshly-baked taste!

Creepy Witch Finger Cookies Recipe FAQs
How do I select the best almonds for my Creepy Witch Finger Cookies?
Absolutely! Choose whole blanched almonds that are free from dark spots or blemishes, as these are considered high-quality. Make sure they fit well in the cavity you create for the "nail." An almond that's roughly the size of a fingertip looks great!
What’s the best way to store my cookies after baking?
Very easy! Allow your Creepy Witch Finger Cookies to cool completely before placing them in an airtight container. At room temperature, they’ll stay fresh for up to 3 days. For longer storage, refrigerate them for up to a week. Just ensure they are sealed tightly to maintain freshness.
Can I freeze these cookies, and if so, how?
Of course! To freeze your cookies, first allow them to cool completely. Then, arrange them in a single layer on a baking sheet and place them in the freezer until solid. After that, transfer them to a freezer-safe bag or container. They can be stored for up to 3 months. When you’re ready to enjoy them, just heat them directly from the freezer!
What should I do if my cookies spread too much during baking?
If you notice that your Creepy Witch Finger Cookies spread too much, don’t worry! This can happen if the dough isn’t chilled long enough. For best results, ensure that you let the dough chill for the full 20-30 minutes. Additionally, if they still spread, try checking the oven temperature with an oven thermometer; sometimes, oven settings can be off.
Are there any dietary considerations I should be aware of with these cookies?
Great question! These cookies contain gluten and dairy, so if you’re preparing them for anyone with dietary restrictions, make sure to substitute gluten-free flour and dairy-free butter options. Also, if you have nut allergies, be cautious with the almonds or consider omitting them. festive snacks can be adjusted for inclusivity!
What’s the best way to achieve vibrant colors in my cookie dough?
For those show-stopping vibrant hues in your Creepy Witch Finger Cookies, mix in your color powders thoroughly! Start with the recommended amounts and add more gradually to reach your desired intensity. Each powder contributes differently, so feel free to experiment until you achieve the perfect Halloween colors!
Spooktacular Creepy Witch Finger Cookies for Halloween Fun
Ingredients
Equipment
Method
- Cream together the softened unsalted butter, confectioner's sugar, and sea salt using an electric mixer on medium speed until light and fluffy, about 3–5 minutes.
- Add the room temperature egg yolks and vanilla extract to the creamed mixture. Mix until fully incorporated, about 1–2 minutes.
- Divide the dough and incorporate matcha powder, purple sweet potato powder, or cocoa powder for colors. Stir until blended.
- Whisk together the all-purpose flour and baking powder in a separate bowl, and gradually fold into the colored butter mixture.
- Wrap the dough in plastic wrap and chill in the refrigerator for 20–30 minutes.
- Preheat your oven to 325°F (163°C) and line two baking sheets with parchment paper.
- Remove the chilled dough and portion into 16–20 g pieces. Shape into fingers with knuckles and place an almond at the tip.
- Arrange cookies on trays and freeze for 40–60 minutes.
- Bake in the preheated oven for 20–25 minutes or until light golden.
- Once cooled, remove almonds and add a dollop of jam before replacing the almonds.
- Decorate with cocoa powder and red cake writing gel for finishing touches.


Leave a Reply