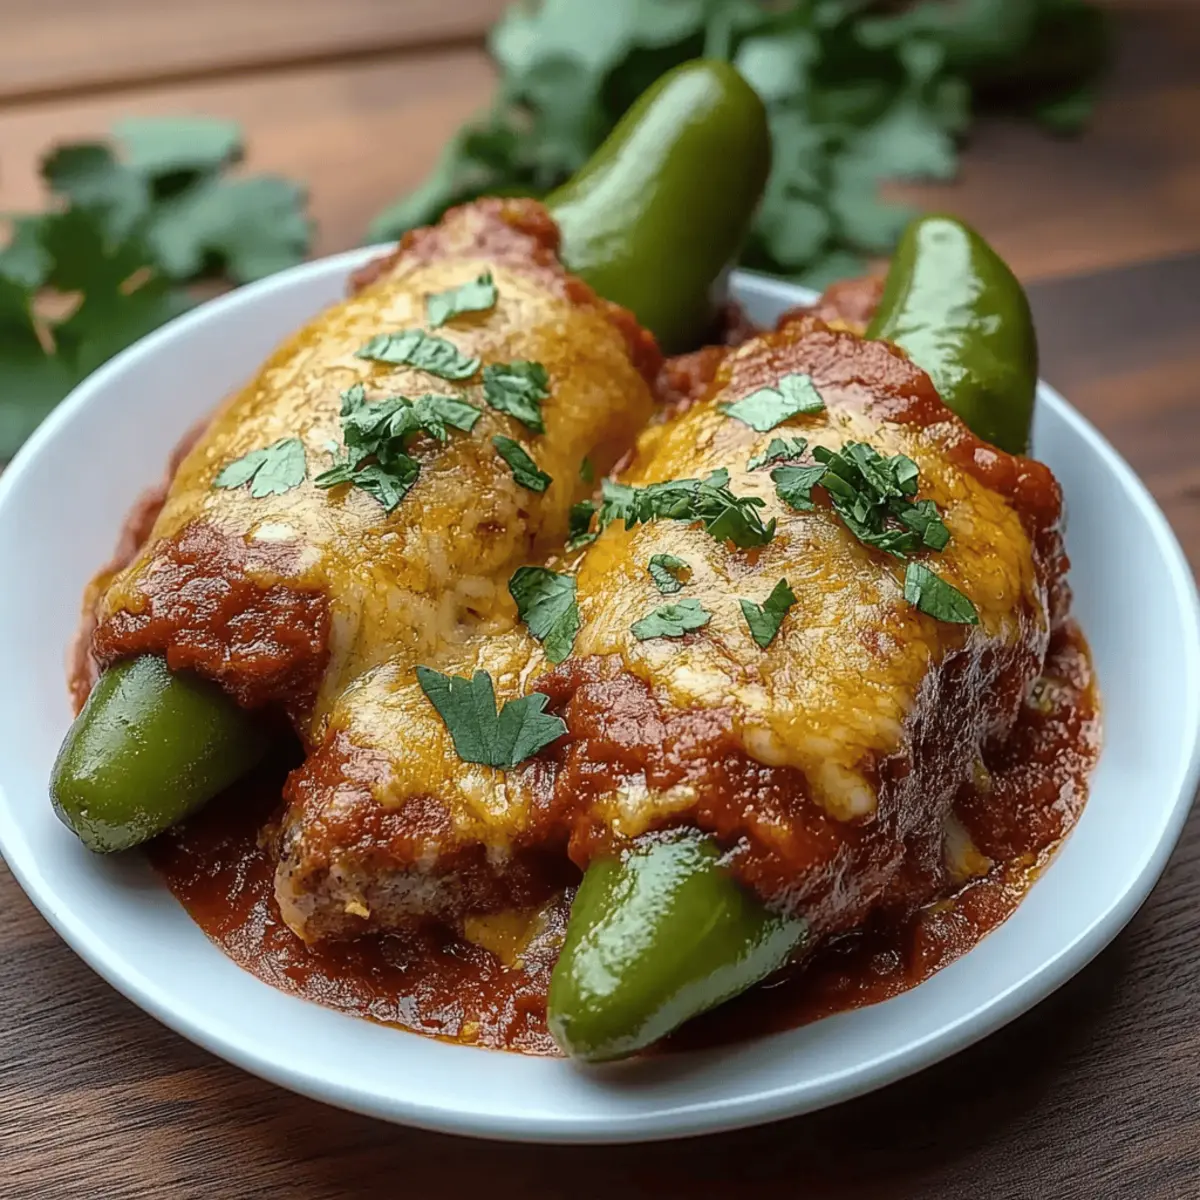
“Have you ever experienced a moment when a dish transports you to a different time and place, filling your heart and stomach with warmth?” That’s how I felt when I first tried Cheesy Hatch Chile Rellenos. This recipe is a delightful twist on the classic that not only celebrates the rich, smoky flavor of roasted hatch chiles but also guarantees a cozy, satisfying meal you can whip up in no time. It's perfect for those evenings when you're craving homemade comfort food but want to impress friends or family with something a little special. These chiles are packed with gooey Oaxaca cheese and have a crispy golden exterior that offers just the right crunch. Plus, they can be made in under an hour, allowing you more time to enjoy the company of your loved ones. Ready to dive into a culinary journey that’s both fun and rewarding? Let’s get cooking!

Why You’ll Crave Cheesy Hatch Chile Rellenos?
Bold flavors: The intense smokiness of roasted hatch chiles combined with gooey cheese creates a flavor explosion that will have your taste buds dancing.
Quick preparation: In just over an hour, you can easily serve a homemade dish that feels gourmet, making it perfect for weeknight meals or special occasions.
Versatile dish: These rellenos are perfect as a satisfying main course or a delicious appetizer, and you can customize the spice level with optional jalapenos.
Crowd-pleaser: Whether you’re entertaining friends or enjoying a cozy family dinner, this recipe is sure to become a family favorite that impresses everyone at your table!
Serve with a fresh homemade sauce for dipping, or pair with a crisp salad for a complete meal. Ready to make it? Check out more delicious recipes like Stuffed Peppers or Mexican Street Corn for more flavorful ideas!
Cheesy Hatch Chile Rellenos Ingredients
• Get ready to savor every bite of these delightful Cheesy Hatch Chile Rellenos!
For the Chiles
- 8 hatch green chiles – These chiles provide the smoky flavor that makes this dish a standout.
- 8 to 10 oz Oaxaca cheese – A melty cheese that oozes out of the chiles when fried, enhancing the creamy texture.
For the Batter
- 6 large eggs, separated – Whipping the egg whites creates a light, airy batter that makes the chiles crispy.
- ⅔ cup all-purpose flour – This forms the coating that gives the chiles a delightful crunch.
- 1 teaspoon salt – Enhances the overall flavor of the batter and the chiles.
- 1 teaspoon garlic powder – Adds a fragrant, savory note to the batter.
For Frying
- vegetable oil – A neutral oil is essential for frying the chiles to a crispy gold perfection.
For the Sauce
- 5 medium tomatoes – Fresh tomatoes will make a vibrant and tasty sauce to accompany your chiles.
- 1 small white onion – Adds sweetness and depth to the sauce.
- 5 garlic cloves – For that delicious garlicky kick that complements the dish.
- 2 tablespoon chopped cilantro – Brightens the sauce with fresh herb flavors.
- 1 teaspoon salt – Balances all the flavors in the sauce.
- ¼ cup sliced jalapenos (optional) – For those who crave an extra spicy kick in your Cheesy Hatch Chile Rellenos!
Step‑by‑Step Instructions for Cheesy Hatch Chile Rellenos
Step 1: Broil the Chiles
Preheat your oven’s broiler and line a baking sheet with foil. Place the 8 hatch green chiles on the sheet, broiling for 5–10 minutes until the skins are blackened and blistered. Turn them over and broil the other side for an additional 5–10 minutes until evenly charred. This roasting process enhances the flavor, making your Cheesy Hatch Chile Rellenos extra delicious.
Step 2: Steam the Chiles
Carefully remove the chiles from the oven and transfer them to a gallon-sized ziplock bag. Seal the bag and let the chiles steam for 10–15 minutes, which will help loosen the skins. Once they're steamed, you’ll notice the skins are much easier to peel off, paving the way for stuffing them with that lovely cheese.
Step 3: Peel and Prepare the Chiles
Once the chiles are cool enough to touch, gently peel off the skins, taking care not to tear them. Cut a slit down one side of each chile to create an opening for the stuffing, and remove the seeds. This preparation step is crucial for the final presentation and taste of your Cheesy Hatch Chile Rellenos.
Step 4: Stuff the Chiles
Generously fill each peeled chile with Oaxaca cheese, ensuring they’re nice and packed. To keep the cheese secure inside, use 1–2 toothpicks to seal each chile closed. This step is important to avoid any cheese spillage during frying, maintaining the integrity of your Cheesy Hatch Chile Rellenos.
Step 5: Prepare the Egg Batter
In a clean mixing bowl, separate the 6 large eggs, placing the whites in one bowl and the yolks in another. Beat the egg whites on high speed until stiff peaks form, which will provide a light and airy texture. Then, turn the mixer to low and gently fold in the yolks, creating a luscious batter to coat your chiles.
Step 6: Mix the Dry Ingredients
In a shallow dish, combine ⅔ cup all-purpose flour, 1 teaspoon salt, and 1 teaspoon garlic powder. This flavorful mixture will coat your chiles, ensuring they turn golden brown during frying and enhancing the overall taste of your Cheesy Hatch Chile Rellenos. Mix well to distribute the spices evenly.
Step 7: Heat the Oil
In a deep pan, heat vegetable oil over medium-high heat until it reaches 350°F (175°C). Use a thermometer to check the temperature, ensuring your oil is hot enough for frying. Proper heating is crucial for achieving that crispy texture on your rellenos while keeping the cheese meltingly gooey.
Step 8: Dredge and Dip
Take each stuffed chile and dredge it in the flour mixture, ensuring it’s well-coated. Next, dip it into the prepared egg batter, fully coating the chile. This two-step coating process will create a wonderful crunchy exterior for your Cheesy Hatch Chile Rellenos, making them irresistible!
Step 9: Fry the Chiles
Carefully place each coated chile into the hot oil, frying them for about 2–3 minutes on one side until they turn golden brown. Flip them gently and fry for an additional 2–3 minutes on the other side. It’s best to fry them in batches to maintain consistent oil temperature and avoid overcrowding.
Step 10: Drain the Chiles
Once fried to a beautiful golden brown, remove the chiles from the oil using a slotted spoon and let them drain on paper towels. This step will help absorb any excess oil, keeping your Cheesy Hatch Chile Rellenos light and crisp, ready for serving.
Step 11: Blend the Sauce
In a blender, combine 5 medium tomatoes, 1 small white onion, 5 garlic cloves, 2 tablespoons chopped cilantro, and 1 teaspoon salt. If desired, add jalapeños for an extra kick. Blend until smooth to create the vibrant sauce that will complement your Cheesy Hatch Chile Rellenos wonderfully.
Step 12: Heat the Sauce
Transfer the blended sauce to a medium saucepan and heat over medium heat until it begins to boil. Once it reaches a boil, reduce the heat to a low simmer, allowing the flavors to meld and develop, creating a perfect accompaniment for your chiles.
Step 13: Serve and Enjoy
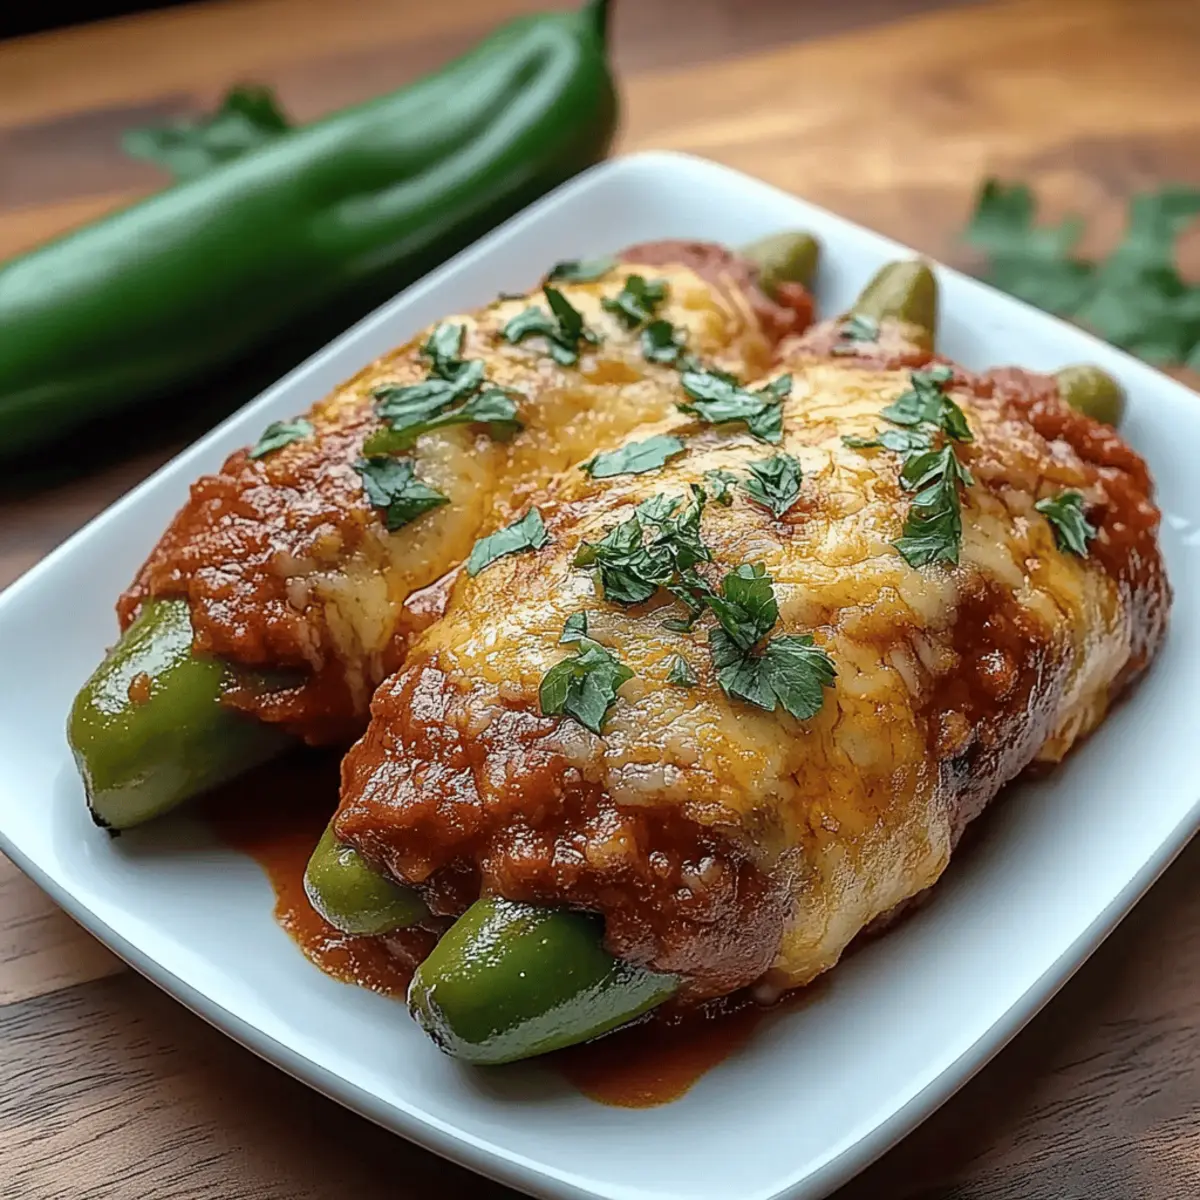
Plate the hot, fried Cheesy Hatch Chile Rellenos and serve immediately alongside the freshly made sauce. This final step is essential—enjoy the delightful contrast of crispy exterior and gooey cheese while savoring the rich, flavorful sauce, bringing your cooking adventure to a delicious close!
How to Store and Freeze Cheesy Hatch Chile Rellenos
Fridge: Store any leftovers in an airtight container for up to 3 days. Reheat in the oven at 350°F (175°C) until warmed through for best results.
Freezer: For long-term storage, freeze unbattered chiles after stuffing them with cheese. Wrap individually in plastic wrap and place in a freezer bag for up to 3 months.
Reheating: To reheat frozen Cheesy Hatch Chile Rellenos, thaw in the fridge overnight, batter, and fry as instructed, or bake at 375°F (190°C) for 20-25 minutes until hot.
Sauce Storage: Store the sauce separately in a sealed container in the fridge for up to 5 days. Reheat on the stovetop for a fresh taste!
Cheesy Hatch Chile Rellenos Variations
Feel free to let your creativity shine in the kitchen by customizing these delightful Cheesy Hatch Chile Rellenos!
-
Dairy-Free: Substitute the Oaxaca cheese with plant-based cheese or a mixture of silken tofu blended with nutritional yeast for a creamy alternative.
For a nutty flavor, consider adding a sprinkle of your favorite dairy-free cheese on top. -
Spicy Kick: Add diced serrano peppers to the cheese filling or increase the amount of jalapeños in the sauce for an electrifying heat.
This variation will satisfy those who love a fiery flavor in their cooking! -
Vegetable Boost: Incorporate sautéed veggies like spinach or mushrooms into the cheese filling for added nutrients and flavor.
This not only makes the dish healthier but also adds delightful texture and color to the rellenos. -
Gluten-Free: Replace all-purpose flour with a gluten-free flour blend or cornstarch for a crispy batter that everyone can enjoy.
Your Cheesy Hatch Chile Rellenos will turn out just as delicious and accommodate anyone with dietary restrictions! -
Herb Infusion: Mix in freshly chopped herbs, like parsley or basil, into the cheese filling for an aromatic twist on the classic flavor.
This simple addition will elevate the dish, bringing in fresh notes that harmonize beautifully with the smoky chiles. -
Baked Instead of Fried: For a healthier option, bake the stuffed chiles in a preheated oven at 375°F (190°C) until golden and crispy, about 25-30 minutes.
It’s a great way to cut down on oil while still enjoying that classic crispy exterior! -
Loaded Rellenos: Top your finished chiles with a dollop of sour cream or guacamole for a creamy, rich experience.
These toppings complement the warmth of the chiles and enhance the overall flavor profile of the dish.
For more fun ideas in your cooking adventures, try out my Stuffed Peppers or get inspired by a twist on classic flavors with Mexican Street Corn – your taste buds will thank you!
Make Ahead Options
These Cheesy Hatch Chile Rellenos are perfect for meal prep enthusiasts looking to save time during busy weeknights! You can broil, peel, and stuff the chiles up to 24 hours in advance. Simply follow the initial steps and refrigerate the stuffed chiles in an airtight container. The egg batter can also be prepared and held in the fridge separately for up to 3 days—just be sure to re-whisk it before use to restore its fluffiness. When you're ready to enjoy, heat the oil, dredge the chiles, and fry them to golden perfection, ensuring that the cheese remains gooey and delicious. With these make-ahead tips, you’ll have a restaurant-quality meal in no time!
Expert Tips for Cheesy Hatch Chile Rellenos
-
Choose the Right Chiles: Use fresh hatch green chiles when in season for the best smoky flavor. Look for chiles that are firm and not too soft.
-
Avoid Overcrowding: When frying, cook only a few chiles at a time to maintain the oil temperature. This ensures even cooking and a perfectly crispy exterior for your Cheesy Hatch Chile Rellenos.
-
Perfect Egg Whites: Beat the egg whites until they hold stiff peaks, which makes the batter light and airy. This is key to achieving that delightful crunch we all love.
-
Seal Well: Use toothpicks to secure the stuffed chiles tightly; this prevents cheese from leaking out during frying and keeps your Chiles Rellenos intact.
-
Don’t Skip the Steaming: Steaming the chiles in a ziplock bag after broiling helps soften their skins, making peeling much easier and preserving their structure.
What to Serve with Cheesy Hatch Chile Rellenos
Looking for perfect accompaniments to elevate your meal experience? Here are some delightful pairings to complement your Cheesy Hatch Chile Rellenos.
-
Cilantro Lime Rice: A zesty, fluffy rice that adds a refreshing touch, balancing the rich flavors of the chiles.
-
Creamy Guacamole: The creaminess and avocado richness pair beautifully with the spicy chiles, creating a well-rounded bite.
-
Fresh Corn Salad: This vibrant salad brings sweetness and crunch, making it a wonderful contrast to the soft, cheesy filling.
-
Mexican Black Beans: Seasoned black beans offer a hearty protein option that enhances the meal’s flavor profile.
-
Tortilla Chips with Salsa: A crunchy, fun way to start your meal! Serve with a spicy salsa to get everyone excited.
-
Classic Margaritas: A tangy drink that cuts through the richness of the chiles while offering a festive flair to your gathering.
-
Churros with Chocolate Sauce: Indulge in a sweet finale! These crispy churros dipped in chocolate sauce are the perfect ending to your flavorful feast.
-
Charred Vegetables: Roasted or grilled veggies provide a smoky element that complements the hatch chiles nicely for a satisfying balance.
Cheesy Hatch Chile Rellenos Recipe FAQs
How do I choose the right hatch chiles?
Absolutely! When selecting hatch chiles, look for ones that are firm and bright green. Avoid chiles with dark spots or excessive wrinkling, as these can indicate overripeness. The best hatch chiles are typically in season from late summer to early fall, so that’s when you should find the freshest ones!
How should I store leftover Cheesy Hatch Chile Rellenos?
Very simply! Store any leftovers in an airtight container in the fridge for up to 3 days. When you’re ready to enjoy them again, reheat in an oven preheated to 350°F (175°C) for about 10-15 minutes until warmed through. This method helps retain their crispy texture.
Can I freeze Cheesy Hatch Chile Rellenos?
Of course! For freezing, it’s best to freeze the chiles after they have been stuffed with cheese but before frying. Wrap each stuffed chile in plastic wrap and place them in a freezer bag. They'll keep well for up to 3 months. When ready to serve, thaw them overnight in the fridge, batter, and fry as described.
What should I do if the chiles split during frying?
No worries! If you see any splits, it might mean they were a bit overstuffed or the oil temperature was too high. To avoid this, make sure to seal each chile securely with toothpicks and maintain the oil temperature around 350°F (175°C) for optimal frying. Just remember, even if they split, they're still delicious!
Are there any dietary considerations for this recipe?
Definitely! If you’re making this for someone with allergies, be cautious with the ingredients. The chiles are naturally gluten-free, but the all-purpose flour can easily be substituted with a gluten-free flour blend. Also, ensure the cheese doesn’t contain any additives that some may be allergic to. For a spicy option, you can adjust the amount of jalapeños according to personal spice tolerance.

Melt-in-Your-Mouth Cheesy Hatch Chile Rellenos Recipe
Ingredients
Equipment
Method
- Preheat your oven’s broiler and line a baking sheet with foil. Place the chiles on the sheet, broiling for 5–10 minutes until the skins are blackened and blistered. Turn them over and broil the other side for an additional 5–10 minutes.
- Transfer the chiles to a ziplock bag and seal. Let the chiles steam for 10–15 minutes.
- Peel off the skins and cut a slit down one side of each chile. Remove the seeds to prepare for stuffing.
- Fill each chile with Oaxaca cheese and use toothpicks to seal them.
- Separate the egg whites and yolks. Beat the egg whites until stiff peaks form, then fold in the yolks.
- In a shallow dish, combine flour, salt, and garlic powder to create the dry mixture.
- Heat vegetable oil in a deep pan to 350°F (175°C).
- Dredge the stuffed chiles in the flour mixture, then dip them into the egg batter.
- Fry the coated chiles for 2–3 minutes per side until golden brown.
- Remove the fried chiles and drain on paper towels.
- Blend tomatoes, onion, garlic, cilantro, and salt until smooth to make the sauce.
- Heat the blended sauce in a medium saucepan until it boils, then reduce to a simmer.
- Serve the hot, fried chiles with the sauce.

Leave a Reply