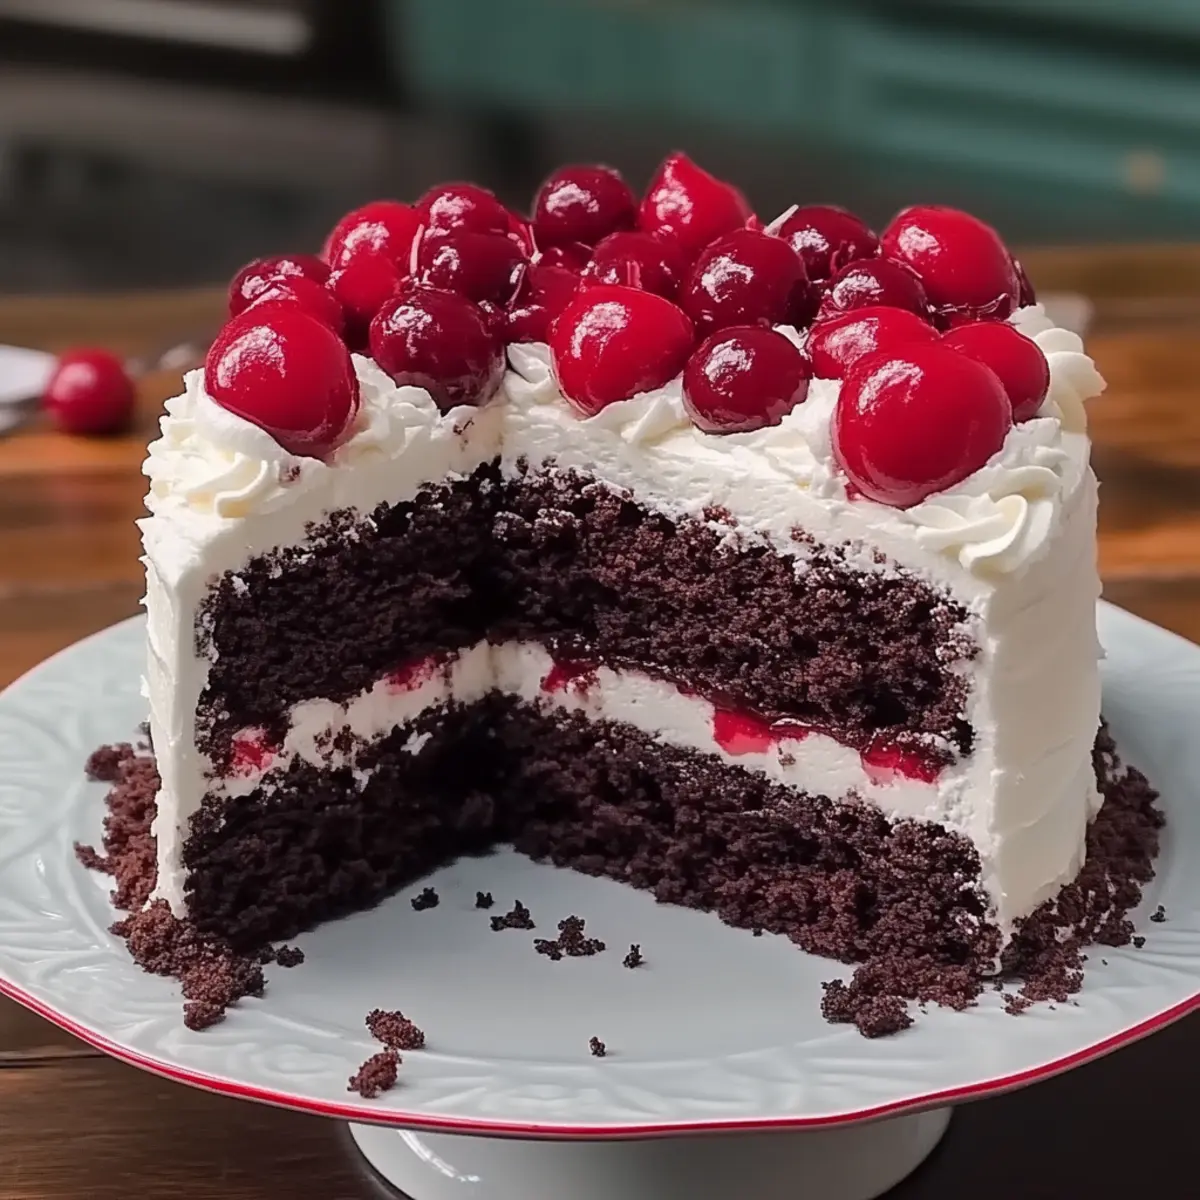
As I stood in my kitchen, the scent of chocolate wafted through the air, transporting me to joyous celebrations and cherished memories. Today, I'm excited to share my twist on a classic indulgence: Black Forest Cake. This delightful treat combines rich chocolate layers with the sweetness of cherries and luscious whipped cream—a true showstopper for any occasion! Not only is this cake a crowd-pleaser, but its surprisingly quick prep time means you can whip it up during a busy week or save it for a special gathering. Plus, it’s a guaranteed mood booster, making it perfect for sharing with loved ones (or savoring solo!). So, are you ready to dive into the layers of deliciousness? Let's get baking!
Why is Black Forest Cake irresistible?
Decadent flavors: The rich chocolate layers blend perfectly with tangy cherries, creating a taste explosion that steals the show.
Effortless preparation: With just a few simple steps, it's easy for anyone to craft this showstopper at home, giving you a delicious reward without the hassle.
Crowd-pleaser: Perfect for birthdays, holidays, or just because; this cake will impress friends and family alike, making every occasion special!
Customizable toppings: Feel free to experiment and add a personal touch with different fruits or even using Fruity Pebbles Cheesecake for a fun twist.
Make-ahead option: Preparing the cake a day in advance enhances the flavors, allowing you to enjoy the moment stress-free!
Black Forest Cake Ingredients
• Get ready for a deliciously rich experience!
For the Cake Layers
• All-purpose flour – Gives structure and stability to your Black Forest Cake.
• Granulated sugar – Adds sweetness and helps create a tender crumb.
• Unsweetened cocoa powder – Provides that deep chocolate flavor essential for succulence.
• Baking powder – Helps the cake rise beautifully, ensuring a light texture.
• Baking soda – Works alongside baking powder to enhance the cake's fluffiness.
• Salt – Balances sweetness and intensifies the chocolate flavor.
• Large eggs – Essential for moisture and a rich, dense texture.
• Whole milk – Adds creaminess and helps create a moist cake.
• Vegetable oil – Keeps the cake moist (and offers a lighter crumb!).
• Vanilla extract – Enhances the overall flavor profile of the cake.
• Boiling water – Activates the cocoa powder, making the cake extra rich.
For the Whipped Cream Filling
• Heavy whipping cream – The star of the show, creating luscious layers for the Black Forest Cake!
• Powdered sugar – Sweetens the cream and helps it hold its shape.
• Vanilla extract – Adds a lovely aromatic flavor to the whipped cream.
For Decoration
• Cherries – Fresh and juicy, these add a pop of color and flavor; use them generously!
• Chocolate shavings – Sprinkle them on top for a stunning finish and extra chocolatey goodness.
Now that you're all set with the Black Forest Cake ingredients, let’s dive into crafting this divine dessert together!
Step‑by‑Step Instructions for Black Forest Cake
Step 1: Preheat and Prepare
Start by preheating your oven to 350°F (175°C). While it warms, grease and flour two 9-inch round cake pans to ensure your Black Forest Cake layers release effortlessly once baked. This step is crucial for a clean finish, so take your time to coat the pans evenly.
Step 2: Mix Dry Ingredients
In a large bowl, whisk together 2 cups of all-purpose flour, 2 cups of granulated sugar, ¾ cup of unsweetened cocoa powder, 1½ teaspoons of baking powder, 1½ teaspoons of baking soda, and 1 teaspoon of salt. Blend these dry ingredients thoroughly until uniformly mixed, which will create a rich foundation for your cake.
Step 3: Combine Wet Ingredients
Add 2 large eggs, 1 cup of whole milk, ½ cup of vegetable oil, and 2 teaspoons of vanilla extract to the dry mixture. Beat on medium speed for about two minutes until the batter becomes smooth and glossy. This step introduces air into the batter, contributing to the delightful fluffiness of your Black Forest Cake layers.
Step 4: Incorporate Boiling Water
Carefully stir in 1 cup of boiling water to the batter. Expect it to become thin, but that's perfectly normal! The hot water activates the cocoa powder, enhancing the overall flavor and richness of your cake. Mix just until combined, ensuring no dry spots remain.
Step 5: Bake the Cake Layers
Divide the batter evenly between the prepared pans. Slide them into your preheated oven and bake for 30–35 minutes, or until a toothpick inserted in the center comes out clean. Keep an eye on the cakes—they should rise beautifully and spring back when lightly touched.
Step 6: Cool and Slice
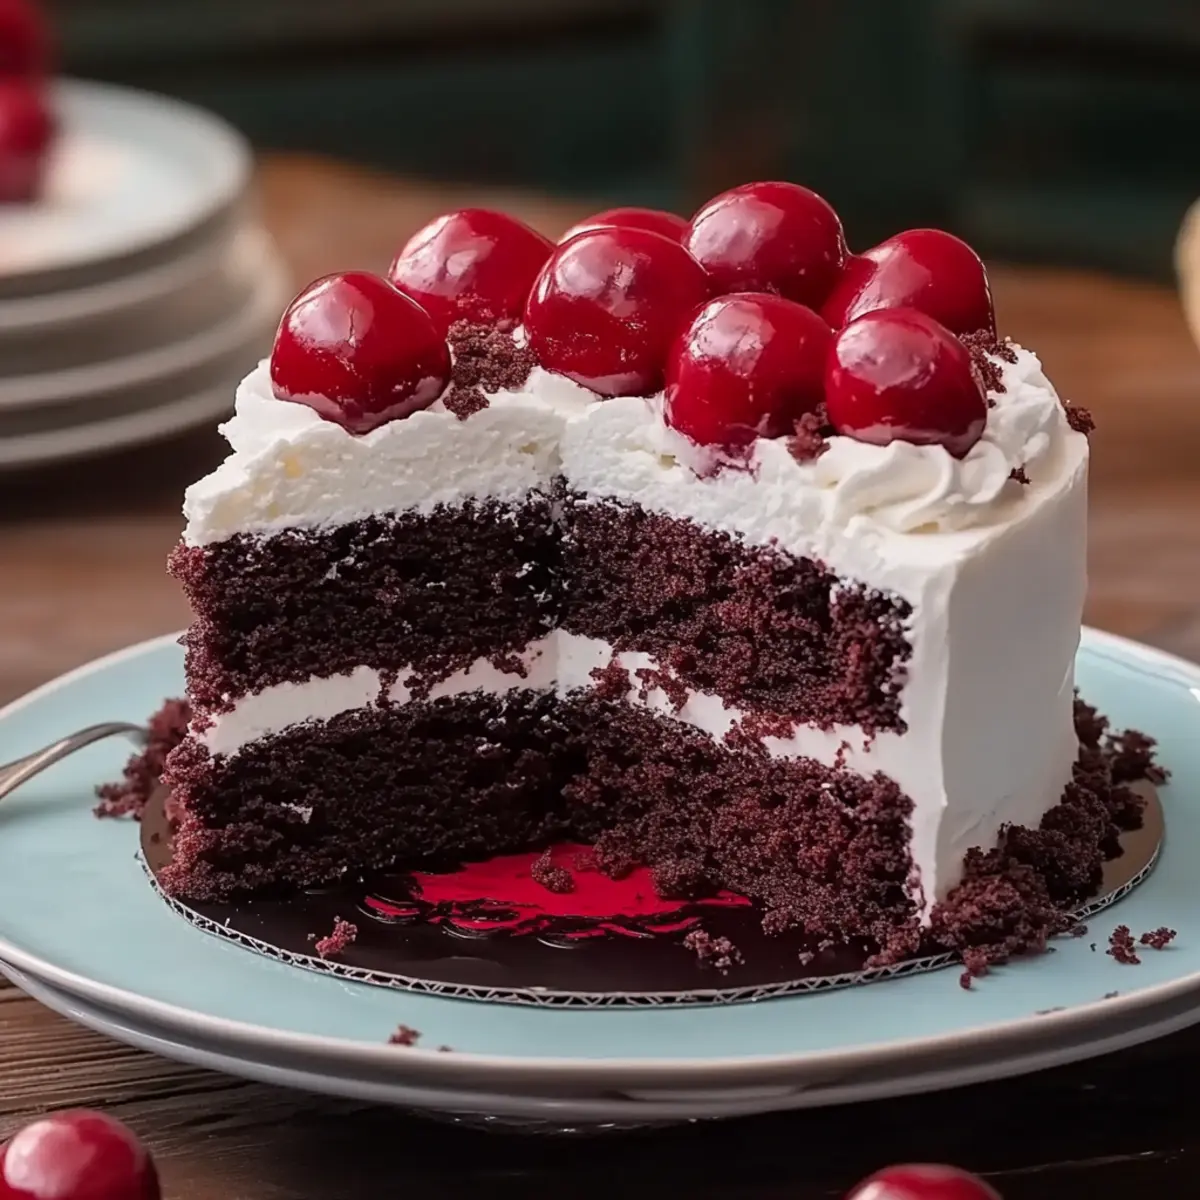
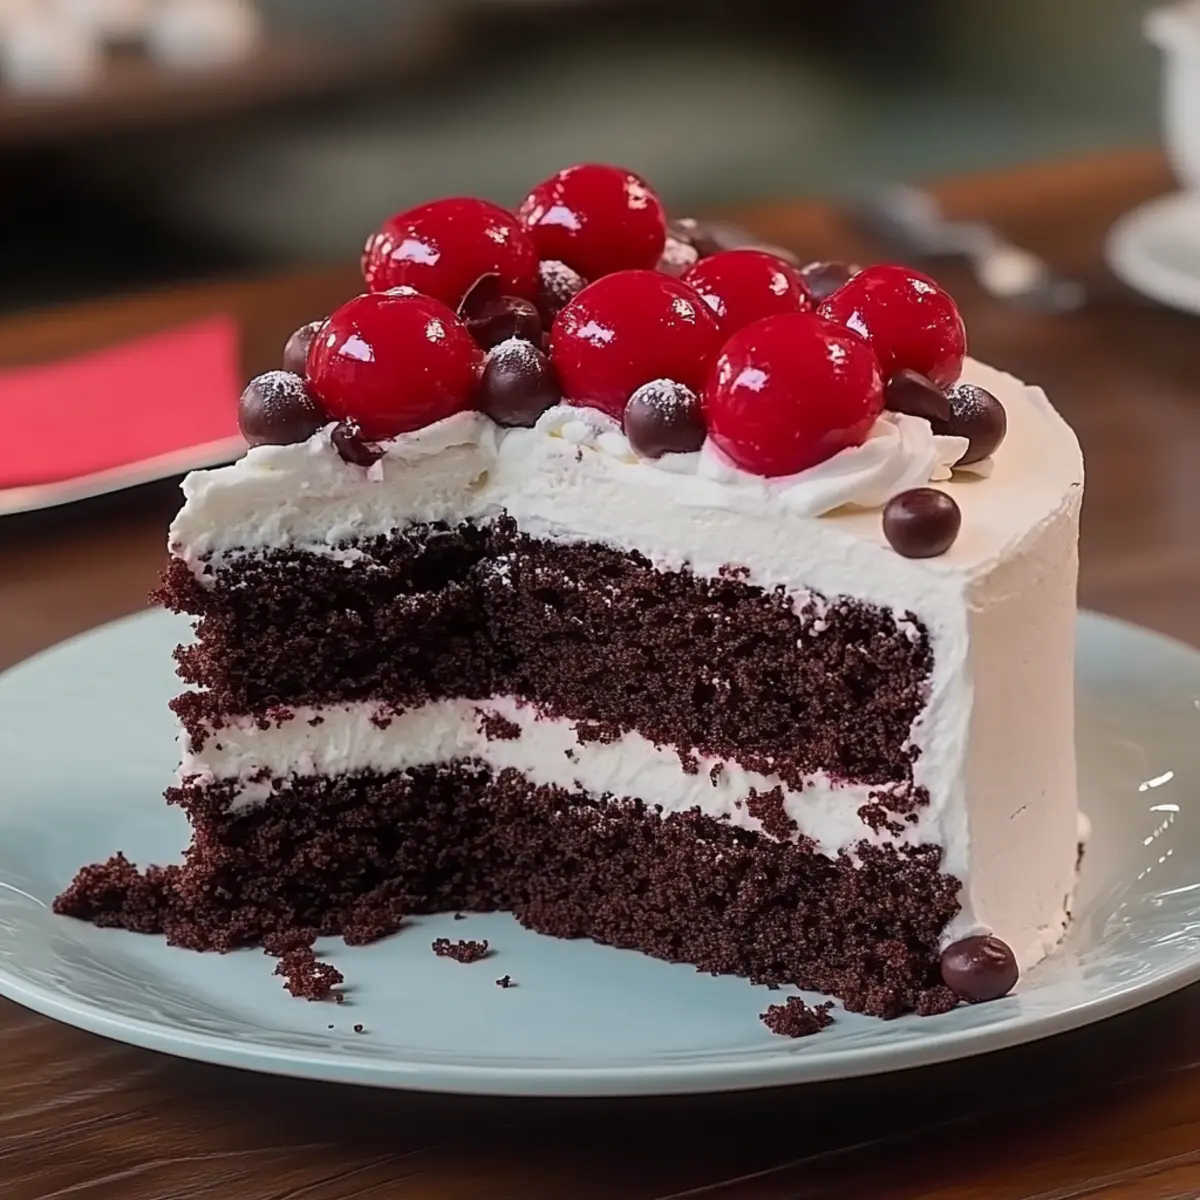
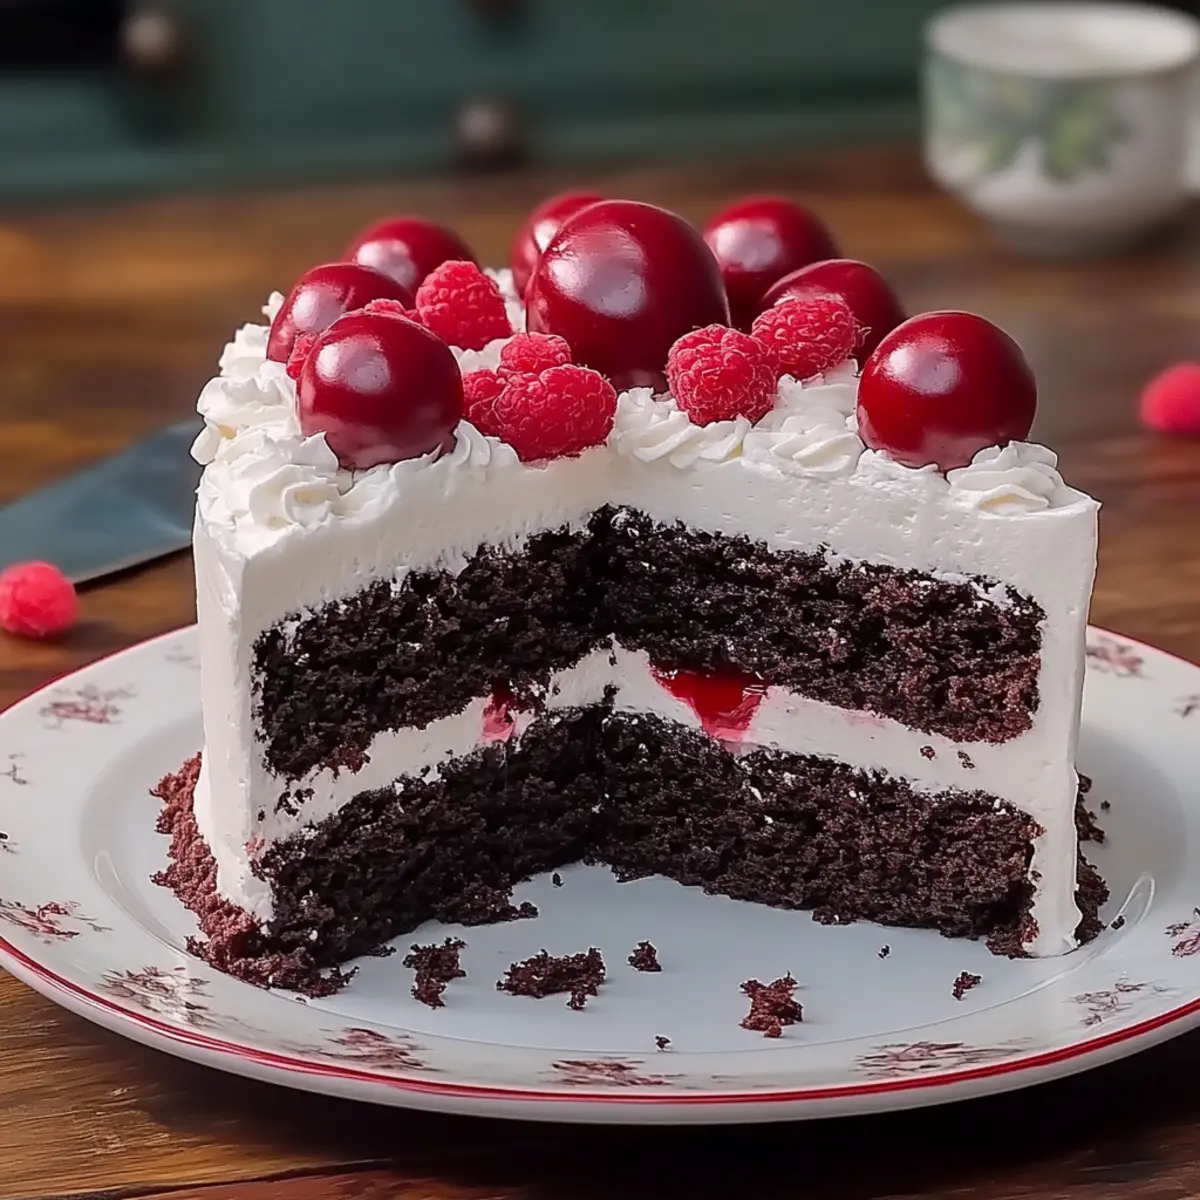
Once baked, let the cakes cool in their pans for about ten minutes. Then, gently transfer them to wire racks to cool completely. After they’re fully cooled, slice each cake layer in half horizontally to create four layers. This will allow for a delightful layering of cherries and cream in your Black Forest Cake.
Step 7: Prepare the Cherries
Next, drain your cherries, reserving the juice for later. This step adds moisture to your cake layers, enhancing the overall flavor. You can use fresh or maraschino cherries, but ensure they are well-drained to avoid sogginess in your cake.
Step 8: Whip the Cream
In a mixing bowl, combine 3 cups of heavy whipping cream, ½ cup of powdered sugar, and 1 teaspoon of vanilla extract. Whip on high speed until stiff peaks form, taking care not to overwhip. This whipped cream will create a luscious filling and frosting, making your Black Forest Cake irresistibly creamy.
Step 9: Layer the Cake
Place the first layer of cake on a serving platter. Moisten it with the reserved cherry juice, then spread a layer of whipped cream over it, followed by a generous scattering of cherries. Repeat this process until all layers are stacked, ensuring each one is adorned with cream and cherries for that iconic flavor.
Step 10: Finish with Whipped Cream
Once the final layer is placed on top, cover the entire cake with the remaining whipped cream. The smooth, creamy finish adds to the luxurious experience of your Black Forest Cake. Use a spatula to create swirls for an elegant look that will impress your guests.
Step 11: Decorate and Chill
To add the final touches, decorate the top with chocolate shavings and additional cherries for a vibrant presentation. Finally, chill the assembled cake in the refrigerator for at least thirty minutes before slicing, allowing the flavors to meld beautifully for a truly decadent treat.
Make Ahead Options
These Black Forest Cakes are perfect for meal prep enthusiasts! You can prepare the cake layers up to 2 days in advance by baking and cooling them, then wrapping them tightly in plastic wrap to maintain freshness. The cherry filling can also be prepared ahead of time; just keep the drained cherries refrigerated until you're ready to assemble. When you're set to serve, simply whip the heavy cream for the frosting and layer it with the prepped cake and cherries, finishing with the chocolate shavings. This way, you’ll have a stunning dessert ready with minimal effort, allowing you to enjoy your time with loved ones!
What to Serve with Black Forest Cake
Indulging in a slice of rich chocolate goodness is just the beginning; let’s create a delightful meal experience!
- Rich Coffee: A strong cup of freshly brewed coffee beautifully contrasts the sweetness of the cake, enhancing its chocolate richness.
- Vanilla Ice Cream: Creamy ice cream melts softly against the cake, bringing a delightful temperature contrast that elevates each bite.
- Fresh Berries: Mixed berries provide a refreshing, tart flavor that perfectly balances the sweet and creamy cake layers.
- Chocolate-Covered Strawberries: These add an extra layer of decadence, creating a romantic and lush pairing with your dessert.
- Mint Tea: Light and fragrant, mint tea offers a refreshing palate cleanse, making it a perfect accompaniment after a rich dessert.
- Caramel Sauce: Drizzling warm caramel over your cake adds a luscious sweetness while accentuating the chocolate and cherry flavors.
- Chocolate Milkshake: A thick, chocolatey milkshake will please any chocoholic, making for a fun and indulgent treat alongside your cake.
- Chardonnay: A chilled glass of white wine can refreshingly cut through the richness, allowing for a balanced dining experience.
- Pecan Pie: For an added dessert option, the nutty flavor of pecan pie complements the chocolate while adding a delightful crunch.
- Fruit Salad: A light, zesty fruit salad brings a fresh element that brightens up your dessert table and contrasts beautifully with the cake.
How to Store and Freeze Black Forest Cake
Fridge: Store leftover Black Forest Cake in an airtight container in the refrigerator for up to 3 days. This keeps the whipped cream fresh and the cake moist.
Freezer: For longer storage, wrap individual slices tightly in plastic wrap, followed by aluminum foil. Freeze for up to 2 months for the best taste and texture.
Reheating: To enjoy frozen slices, let them thaw in the fridge overnight, then allow to come to room temperature before serving to fully savor the flavors.
Assembly Tips: If freezing a whole assembled cake, note that the whipped cream may change texture. Consider freezing the layers separately and assembling just before serving for optimal results.
Expert Tips for Black Forest Cake
- Proper Measurement: Use a kitchen scale if possible. Accurate measurements ensure the perfect texture and balance in your Black Forest Cake.
- Cool Completely: Allow the cake layers to cool completely on wire racks. Warm layers can lead to soggy whipped cream and uneven stacking.
- Juice Control: Be careful with the reserved cherry juice; moisten each layer lightly. Too much can make the cake overly soggy, affecting the overall structure.
- Whipped Cream Consistency: Watch the consistency of your whipped cream—stop mixing once stiff peaks form to avoid turning it into butter.
- Layer Generously: Don’t skimp on the cherries or cream layers; they bring that essential flavor and moisture to your Black Forest Cake.
- Chill Before Serving: Let the cake chill in the fridge for at least thirty minutes. This step helps the flavors meld and makes cutting easier!
Black Forest Cake Variations & Substitutions
Feel free to explore and personalize this delightful dessert to suit your taste buds!
-
Gluten-Free: Replace all-purpose flour with a 1:1 gluten-free baking blend for a gluten-free version that everyone can enjoy.
-
Dairy-Free: Swap whole milk with almond or coconut milk, and use coconut cream for a luscious, dairy-free whipped topping that shines.
-
Rich Flavor: Add a tablespoon of espresso powder to the batter to enhance the chocolate flavor and create a deliciously deep taste.
-
Fruity Twist: Incorporate other berries like raspberries or strawberries between the layers for a mixed berry explosion that compliments the chocolate and cherries beautifully.
-
Nutty Crunch: Crushed walnuts or hazelnuts can be sprinkled between layers for a delightful texture contrast, adding a lovely nuttiness to each bite.
-
Less Sweet: Reduce the sugar in the whipped cream by half for a lighter cream that balances beautifully with the sweetness of the cake.
-
Boozy Delight: Drizzle a little cherry liqueur or kirsch over the cake layers to add a spirited touch that boosts the overall flavor.
-
Fun Versions: For kids’ parties, try decorating with colorful sprinkles or using Oreo Pancakes Brighten for an unexpected, playful twist that’s sure to delight!
These variations will not only change the flavor profile but also make your Black Forest Cake an inviting centerpiece for any gathering—embrace your creativity!
Black Forest Cake Recipe FAQs
How do I choose ripe cherries for my Black Forest Cake?
Absolutely! For the best flavor, look for fresh cherries that are plump with a vibrant red color. Avoid any that have dark spots or are overly soft. Opt for sweet cherries for a luscious sweetness that complements the chocolate beautifully; they should feel firm but not hard.
How do I store leftover Black Forest Cake?
Very! Place any leftover cake in an airtight container and store it in the refrigerator, where it will stay fresh for up to 3 days. This preservation method helps maintain the whipped cream's texture and prevents the cake layers from drying out.
Can I freeze Black Forest Cake?
Absolutely! To freeze, wrap individual slices tightly in plastic wrap, making sure no air can get in, and then cover with aluminum foil. This way, you can store them for up to 2 months. When you're ready to indulge again, simply let the slices thaw in the fridge overnight and bring them to room temperature before serving.
What if my whipped cream doesn't hold its shape?
Not to worry! If your whipped cream isn't thickening as expected, check that your mixing bowl and beaters are completely clean and dry. Once you start whipping, keep a close eye on it and stop as soon as you see stiff peaks form. If whipped cream turns grainy, it may have been over-whipped—don’t despair; you can salvage it! Gently fold in a tablespoon of fresh cream to restore some moisture.
Are there any dietary considerations for this cake recipe?
Very! This Black Forest Cake contains dairy and eggs, making it unsuitable for those with lactose intolerance or egg allergies. You can make substitutions such as using almond milk instead of whole milk and aquafaba (chickpea brine) in place of eggs for a vegan-friendly version. Always double-check for allergens if serving to others, especially with cherries, as they can trigger allergies in some individuals.
How long should I chill the cake before serving?
Absolutely! It's best to chill your assembled Black Forest Cake for at least 30 minutes in the refrigerator before slicing. This step not only helps the flavors meld together beautifully but also ensures the whipped cream stays stable for that perfect slice!
Decadent Black Forest Cake That Will Wow Your Guests
Ingredients
Equipment
Method
- Preheat your oven to 350°F (175°C). Grease and flour two 9-inch round cake pans.
- In a large bowl, whisk together flour, sugar, cocoa powder, baking powder, baking soda, and salt.
- Add eggs, milk, oil, and vanilla extract to the dry mixture. Beat on medium speed for two minutes.
- Stir in boiling water to the batter until combined. Expect a thin consistency.
- Divide the batter between the pans and bake for 30-35 minutes until a toothpick comes out clean.
- Cool in pans for 10 minutes, then transfer to wire racks to cool completely.
- Drain cherries, reserving the juice.
- Whip the cream with powdered sugar and vanilla extract until stiff peaks form.
- Layer the cake, moistening each layer with cherry juice and adding whipped cream and cherries in between.
- Cover the entire cake with whipped cream and decorate with chocolate shavings and cherries.
- Chill in the refrigerator for at least 30 minutes before serving.


Leave a Reply