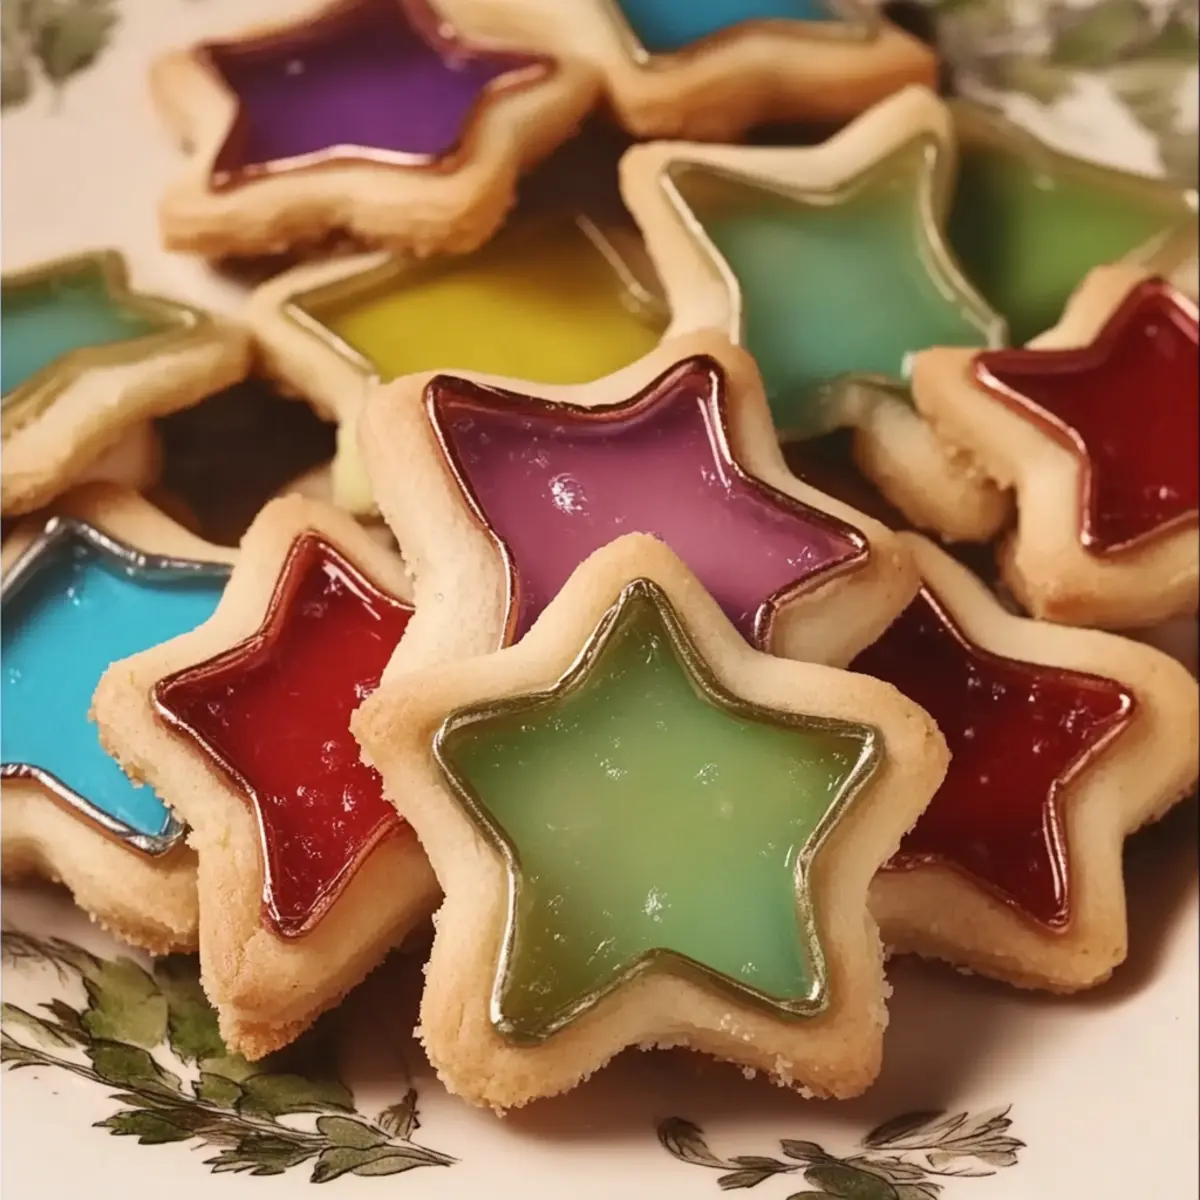
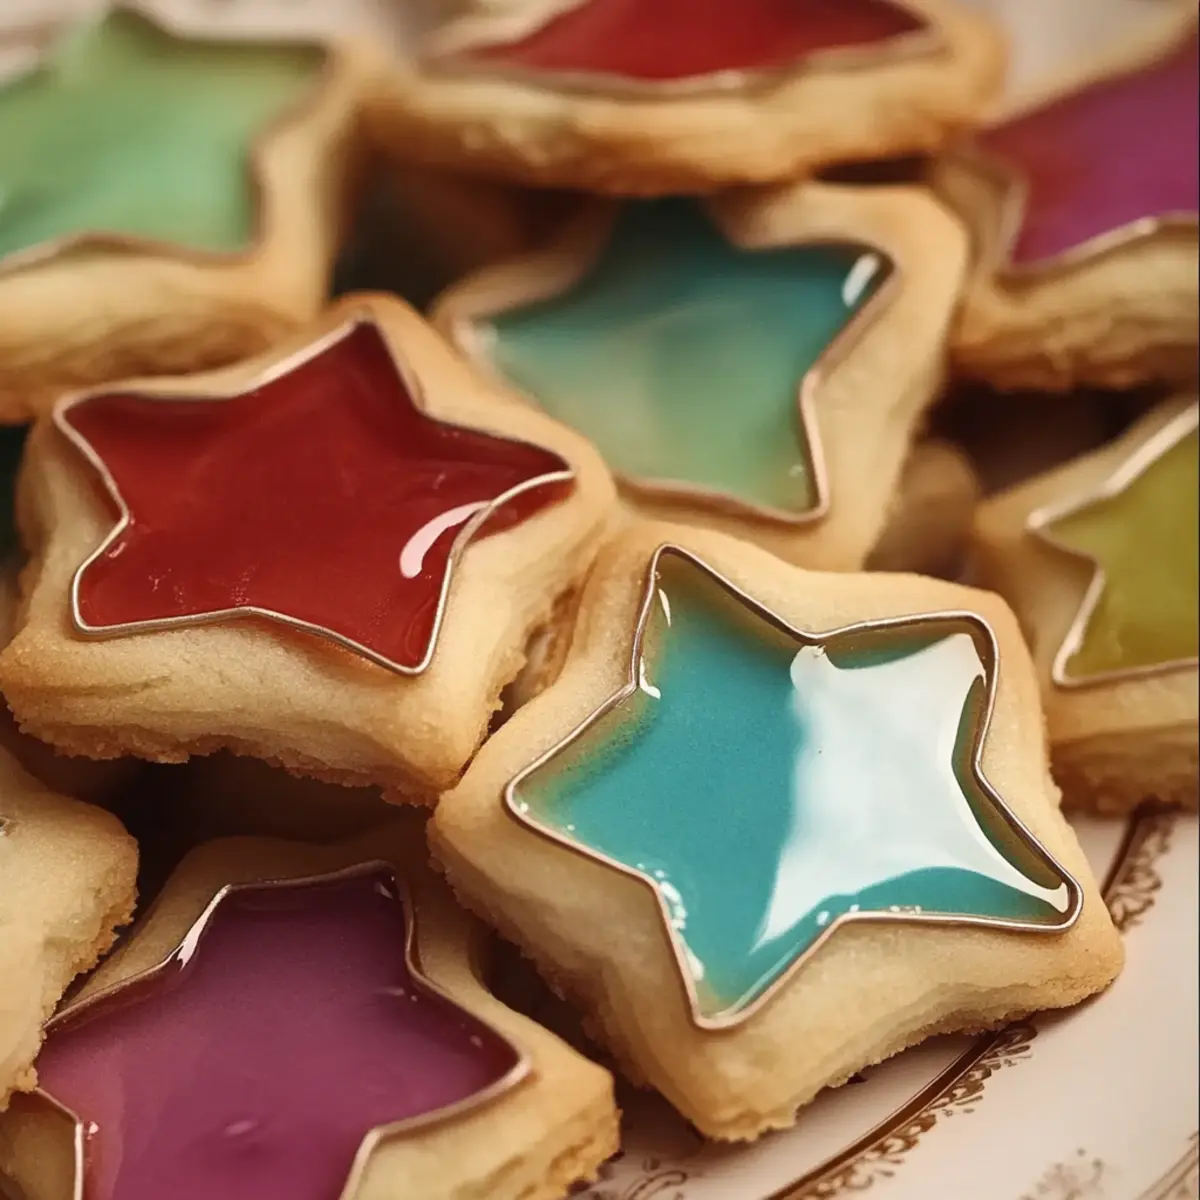
As I stood in my kitchen, the smell of warm butter mingling with sweet vanilla filled the air, evoking memories of childhood baking sessions. That's when I knew it was time to whip up a batch of Stained Glass Cookies. These enchanting treats not only bring a pop of color to your cookie platter but are also surprisingly easy to make! They’re the perfect balance of delicious and fun, making them a hit for both kids and adults alike. With minimal prep time and the chance to get creative by using your favorite hard candies, you're sure to create something that wows everyone. Ready to dive into this delightful recipe and add a little sparkle to your day? Let’s get baking!

Why Are Stained Glass Cookies a Must-Try?
Visually Stunning: The vivid colors from the crushed hard candies create a mesmerizing stained-glass effect that’s sure to impress.
Easy to Make: With just a few simple steps, even novice bakers can whip these up in no time.
Endless Customization: Choose your favorite candies to personalize each batch and surprise your guests with unique flavor combinations.
Great for Any Occasion: Whether it's a holiday gathering or a weekend treat, these cookies add a festive touch to any dessert table.
Fun for Everyone: Get the family involved in the decorating process; it's a creative activity that's enjoyable for both kids and adults.
Ready to dive into more delightful recipes? Check out my guide on easy cookie recipes for quick and tasty treats!
Stained Glass Cookies Ingredients
For the Cookie Dough
• All-purpose flour – This forms the base of the dough, giving the cookies their structure.
• Baking powder – Ensures your cookies rise and have a light texture.
• Salt – A pinch enhances the overall flavor of the cookies.
• Softened butter – Gives the cookies a rich taste and helps create a tender texture.
• Granulated sugar – Sweetens the dough and contributes to the cookie's delightful crunch.
• Large egg – Acts as a binder, keeping the dough together and adding moisture.
• Vanilla extract – Infuses the cookies with a warm, inviting flavor.
• Almond extract (optional) – Adds an extra layer of taste that's surprisingly delightful.
For the Filling
• Assorted hard candies, crushed – These bring the "stained glass" effect; select your favorites for a colorful surprise!
Get ready to create these stunning Stained Glass Cookies and share them with your loved ones!
Step‑by‑Step Instructions for Stained Glass Cookies
Step 1: Prepare the Dry Ingredients
In a medium bowl, whisk together 2 ½ cups of all-purpose flour, 1 teaspoon baking powder, and ½ teaspoon salt until well combined. This mixture will be the foundation for your Stained Glass Cookies, providing the perfect structure and balance of flavors. Set it aside for later use, ensuring it's ready when combining with your wet ingredients.
Step 2: Cream Butter and Sugar
In a large mixing bowl, cream together 1 cup of softened butter and 1 cup of granulated sugar using an electric mixer on medium speed. Beat until the mixture is light and fluffy, which should take about 3-5 minutes. This process incorporates air, creating a tender cookie texture. A pale color and creamy consistency will signal it’s time to move to the next step.
Step 3: Combine Wet Ingredients
Add 1 large egg, 2 teaspoons of vanilla extract, and ½ teaspoon of almond extract (if using) to the butter and sugar mixture. Beat the ingredients until well combined, which should take about 1-2 minutes. This step adds moisture and flavor to your dough, making your Stained Glass Cookies irresistibly delicious.
Step 4: Mix Dry and Wet Ingredients
Gradually add the flour mixture to the wet ingredients, mixing on low speed until just combined. Be careful not to overmix, as this can lead to tough cookies. You’ll know it’s ready when there are no more visible flour streaks, and a smooth dough forms.
Step 5: Chill the Dough
Divide the dough in half and shape each portion into a disc. Wrap them tightly in plastic wrap and refrigerate for at least 1 hour, or until firm. Chilling the dough is essential for easy rolling and cutting, which will help maintain the shape of your delightful Stained Glass Cookies during baking.
Step 6: Preheat the Oven
While the dough chills, preheat your oven to 350°F (175°C) and line baking sheets with parchment paper. This preparation ensures that your baking surface is ready for the cookies once they are cut, helping to achieve a beautifully even bake.
Step 7: Roll Out the Dough
On a lightly floured surface, roll out one disc of chilled dough to about ¼ inch thick. Use your favorite cookie cutters to cut out various shapes. Don’t forget to use a smaller cutter to create the inner “glass” shape for each cookie. This step adds to the charm of your Stained Glass Cookies, allowing light to shine through once baked.
Step 8: Fill with Crushed Candy
Carefully place the cut cookies onto the prepared baking sheets. Fill the center of each cookie with your choice of crushed hard candies, making sure not to overfill. The candies will melt and create the stained glass effect, transforming your cookies into a colorful masterpiece as they bake.
Step 9: Bake the Cookies
Bake the cookies in the preheated oven for 8-10 minutes, or until the edges are lightly golden. Keep an eye on them to avoid over-baking; the centers should look slightly soft. This baking process will melt the candy, creating that stunning stained-glass look we love in these cookies.
Step 10: Cool and Transfer
After baking, allow the Stained Glass Cookies to cool completely on the baking sheets for about 5 minutes before carefully transferring them to a wire rack. This cooling process ensures they firm up properly, preventing breakage. Once cool, enjoy the colorful results of your delightful baking adventure!
Expert Tips for Stained Glass Cookies
Chill the Dough: Make sure to chill the dough for at least 1 hour; this is essential for easy rolling and cutting without the dough sticking.
Mixing Technique: Be careful not to overmix when combining wet and dry ingredients; overmixing can lead to tough cookies instead of the tender texture we love.
Choosing Candies: Use a mix of hard candies for a colorful filling, but avoid candies with a high sugar content, which can burn easily during baking.
Watch the Bake Time: Keep a close eye on your cookies in the oven; they should be lightly golden on the edges but soft in the center. Overbaking can ruin the texture.
Cooling Time: Allow cookies to cool completely on the baking sheets before transferring them to a wire rack; this prevents the delicate cookies from breaking.
Enjoy your baking adventure with these delightful Stained Glass Cookies!
Make Ahead Options
These Stained Glass Cookies are perfect for meal prep enthusiasts! You can prepare the dough up to 3 days in advance; just shape it into discs, wrap in plastic wrap, and refrigerate until ready to use. For an even quicker option, you can also make the cookie shapes, fill them with crushed hard candies, and freeze them for up to 24 hours—after freezing, simply bake them straight from the freezer, adding an extra minute or two to the baking time. This way, you’ll have delicious homemade cookies ready to bake with minimal effort, ensuring you can treat your loved ones without the last-minute rush!
What to Serve with Stained Glass Cookies
Bright and delightful, these colorful cookies make for an enchanting dessert, but why not create a full experience?
-
Milk & Cookies: A classic pairing, the creaminess of milk beautifully balances the sweetness of the cookies, making each bite delightful.
-
Fruit Platter: Fresh fruits like strawberries and citrus provide a juicy contrast to the cookies, enhancing their flavors while adding a refreshing crunch.
-
Ice Cream Scoops: Serve with a scoop of vanilla or berry ice cream. The creamy texture pairs perfectly with the crispness of the cookies for a decadent dessert.
-
Herbal Tea: A light chamomile or mint tea adds a soothing element that complements the sweet, buttery flavors, making for a relaxing dessert time.
-
Chocolate Drizzle: Drizzling a bit of melted chocolate over the cookies brings an extra layer of richness, elevating your delightful treat to gourmet status.
-
Cappuccino: The frothy milk and bold coffee flavors enhance the cookie enjoyment, creating the perfect afternoon pick-me-up.
-
Chocolate-Covered Strawberries: These add a more sophisticated touch while providing an extra sweet and decadent option alongside your cookies.
Explore these pairings and turn your treat time into a delightful experience!
How to Store and Freeze Stained Glass Cookies
Room Temperature: Keep your Stained Glass Cookies in an airtight container at room temperature for up to 3 days to maintain their freshness and texture.
Fridge: If you want to extend shelf life, store the cookies in the fridge for up to a week. Just ensure they are in a sealed container to prevent them from drying out.
Freezer: For longer storage, freeze Stained Glass Cookies for up to 3 months. Place them in a single layer in an airtight container with parchment paper between layers.
Reheating: To enjoy warm cookies, reheat them in the oven at 350°F (175°C) for about 5 minutes. This will restore their delightful texture and flavor!
Stained Glass Cookies Variations & Substitutions
Feel free to let your creativity shine by customizing these cookies with delightful twists and alternatives!
- Gluten-Free: Substitute all-purpose flour with a gluten-free blend, ensuring a soft and delicious cookie.
- Sugar-Free: Use a sugar substitute like erythritol or a mix of stevia and monk fruit for a healthier take. These options allow you to savor the same delightful flavor without the sugar spikes.
- Citrus Zest: Add the zest of an orange or lemon to the dough for a refreshing citrus flavor that brightens each bite. You'll love the cheerful burst of citrus combined with candy colors!
- Chocolate Lovers: Incorporate cocoa powder into the dough for a chocolatey version. Use white chocolate chips in place of hard candy for a sweet pairing that will please any chocolate fan.
- Nutty Twist: Fold in finely chopped nuts like almonds or pecans into the dough for added texture and flavor, creating a lovely contrast with the colorful candy.
- Spicy Kick: Add a pinch of cinnamon or ginger for a warm spice note that complements the sweetness, giving your cookies a unique twist.
- Less Sweet: Reduce the sugar by a quarter for a less sweet cookie and let the flavors of the candies shine through without overwhelming sweetness.
- Dairy-Free: Replace butter with coconut oil or a plant-based butter to enjoy these cookies while keeping them dairy-free, retaining all the flavor and texture.
Looking for other scrumptious cookie ideas? Explore my collection of easy cookie recipes for more delicious treats!

Stained Glass Cookies Recipe FAQs
What type of hard candies work best for the filling?
Absolutely! You can use a variety of hard candies to create vibrant stained glass effects. Popular choices include Jolly Ranchers, Life Savers, and Werther's Original. Just make sure to crush them into small pieces—about the size of a marble—so they melt evenly and fit nicely in the cookie centers.
How should I store Stained Glass Cookies?
To keep your baked Stained Glass Cookies fresh, store them in an airtight container at room temperature for up to 3 days. If you’d like to extend their shelf life, place them in the fridge where they will stay fresh for about a week. Just ensure they’re sealed well to avoid any dryness!
Can I freeze Stained Glass Cookies? How do I do it?
Yes, you can freeze Stained Glass Cookies for up to 3 months! To do this, allow the cookies to cool completely, then place them in a single layer in an airtight container. It’s a good idea to place parchment paper between layers if you have multiple layers. When you’re ready to enjoy them, simply thaw them in the refrigerator overnight.
What should I do if my cookie dough is too sticky?
If your dough feels sticky and hard to handle, don’t worry! This can happen if the butter is too warm or if the dough hasn't chilled long enough. Simply sprinkle a little more flour on your work surface and rolling pin while rolling out the dough. If needed, you can also refrigerate the dough for an additional 15-30 minutes to make it easier to handle.
Are Stained Glass Cookies safe for pets?
Be cautious! While Stained Glass Cookies are free from toxic ingredients for humans, they contain sugar and butter, which aren’t ideal for pets. It’s best to keep these delicious treats away from your furry friends. Always consult your veterinarian regarding specific dietary questions about your pet.
Why were my cookie centers not see-through after baking?
Very! If your cookie centers didn’t turn out clear, it’s likely that the hard candies were not crushed finely enough or that they were overbaked. Ensure your candy pieces are small and uniform, about the size of a pea, and keep a close eye on the baking time so they melt just right without browning. Also, remember, they should look soft in the center when pulled from the oven, which allows them to settle perfectly as they cool.
Delightful Stained Glass Cookies for Festive Sweet Moments
Ingredients
Equipment
Method
- In a medium bowl, whisk together 2 ½ cups of all-purpose flour, 1 teaspoon baking powder, and ½ teaspoon salt until well combined.
- In a large mixing bowl, cream together 1 cup of softened butter and 1 cup of granulated sugar using an electric mixer on medium speed for 3-5 minutes until light and fluffy.
- Add 1 large egg, 2 teaspoons of vanilla extract, and ½ teaspoon of almond extract (if using) to the butter and sugar mixture and beat until well combined for 1-2 minutes.
- Gradually add the flour mixture to the wet ingredients, mixing on low speed until just combined.
- Divide the dough in half, shape each portion into a disc, wrap tightly in plastic wrap, and refrigerate for at least 1 hour.
- Preheat your oven to 350°F (175°C) and line baking sheets with parchment paper.
- On a lightly floured surface, roll out one disc of chilled dough to about ¼ inch thick and cut out shapes with cookie cutters.
- Place the cut cookies onto prepared baking sheets and fill the center with crushed hard candies.
- Bake the cookies in the preheated oven for 8-10 minutes, or until the edges are lightly golden.
- Allow the cookies to cool on the baking sheets for about 5 minutes before transferring to a wire rack.


Leave a Reply