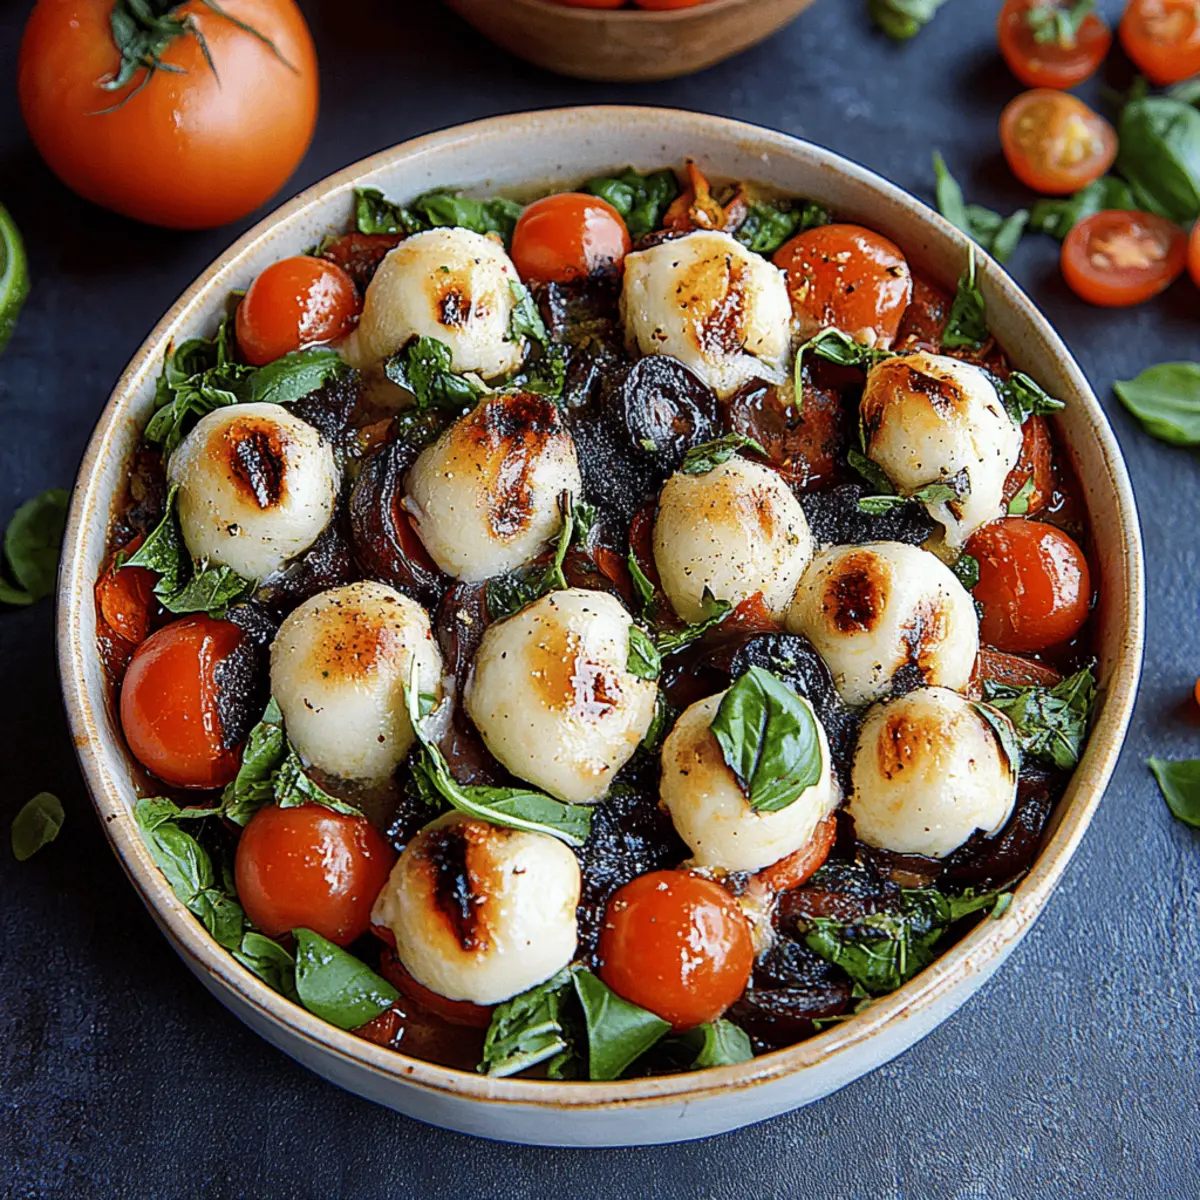
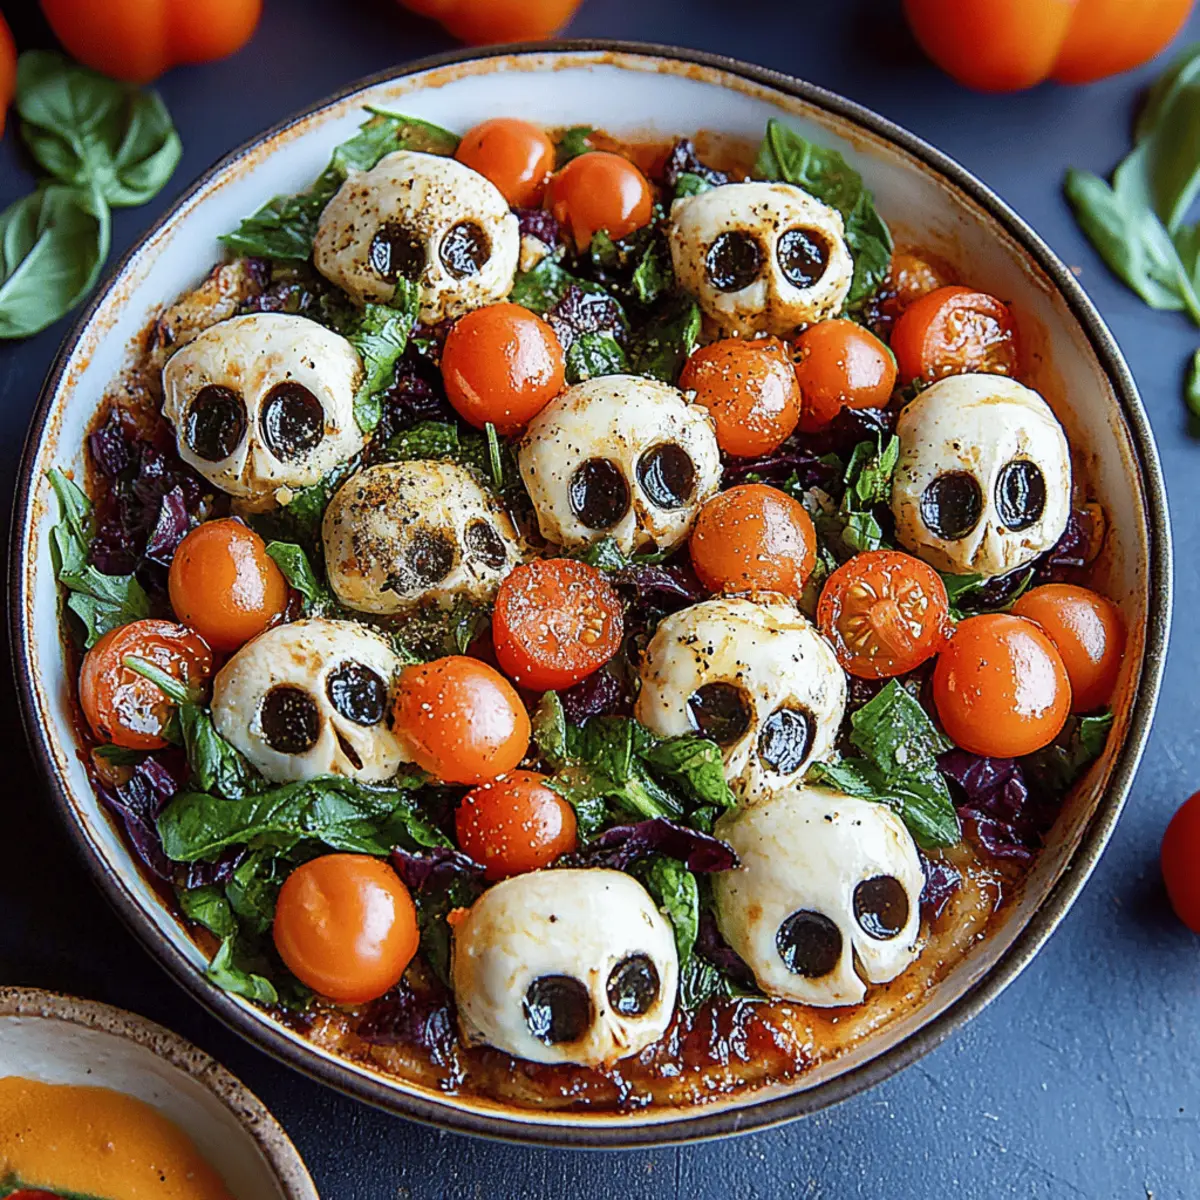
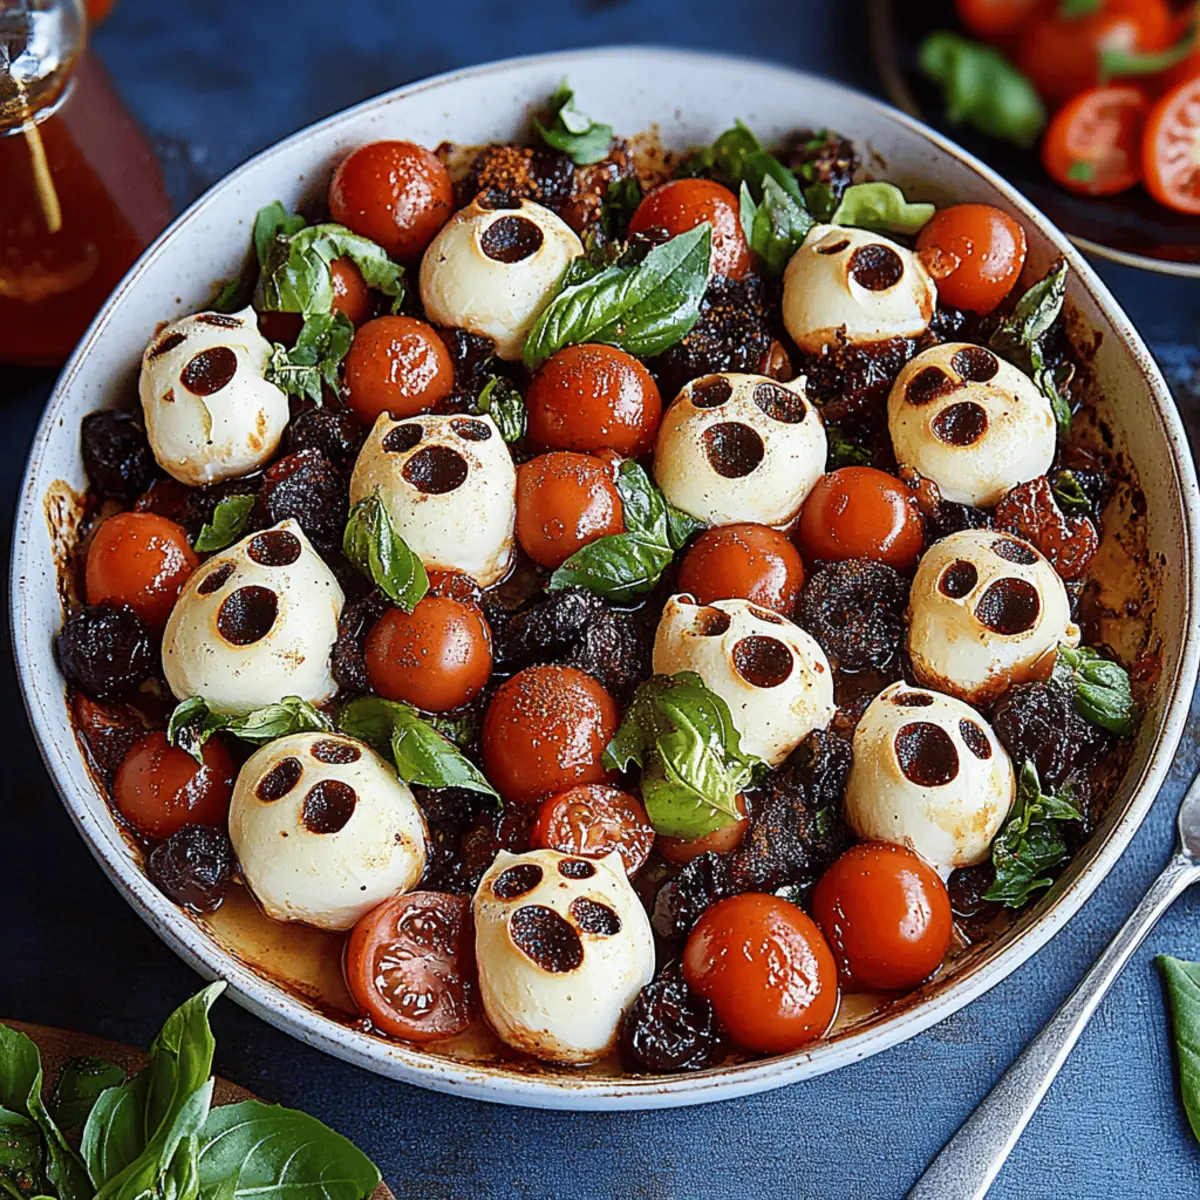
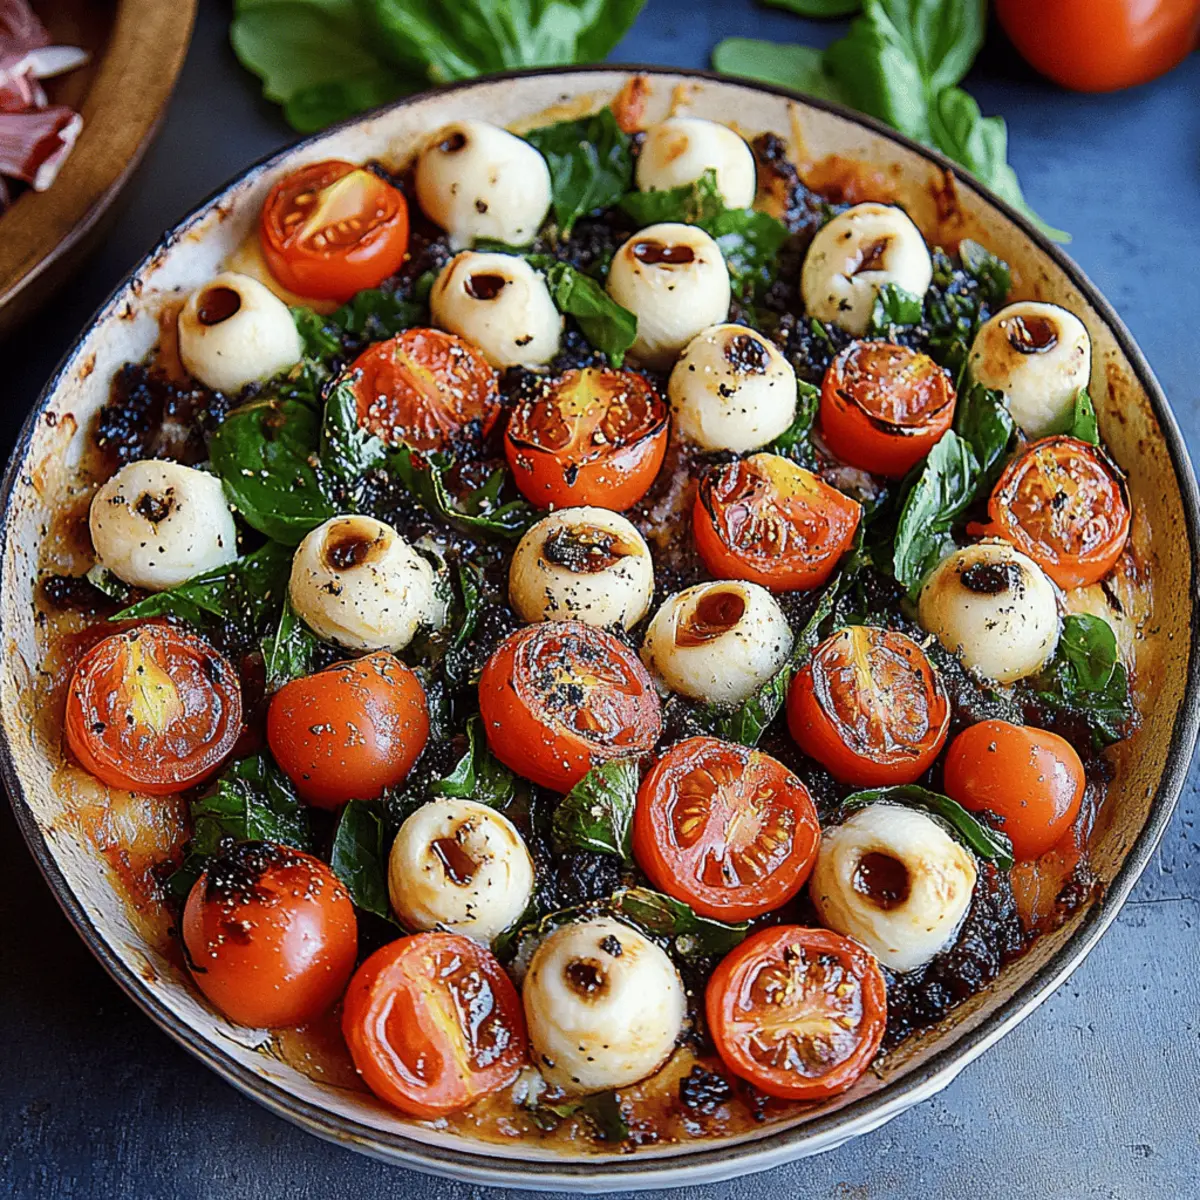
As I prepared for the upcoming Halloween festivities, I couldn't shake off the desire to create something playful yet wholesome. Enter my Halloween Salad, a seasonal delight that turns a simple dish into a conversation starter. This vibrant salad not only brings a colorful twist to your table but also boasts a quick prep time, making it perfect for those busy days when you want to impress without the stress. With creamy mozzarella skulls nestled among fresh greens and juicy cherry tomatoes, this recipe is a crowd-pleaser that delights all ages. Whether you're hosting a spooky soirée or just aiming to elevate your weeknight dinner, this Halloween Salad fits right in. Curious about how to create these spooky yet scrumptious mozzarella skulls? Let’s dive in!
Why Is This Salad So Fun?
Whimsical presentation: The mozzarella skulls add a playful twist that will have your guests smiling at the table.
Quick to prepare: In just 16 minutes, you can whip up this eye-catching salad, leaving you plenty of time for your Halloween festivities.
Fresh flavors: The combination of mixed greens, sweet cherry tomatoes, and fresh basil creates a vibrant taste explosion that’s both nutritious and delicious.
Versatile dish: Perfect as an appetizer or a light main course, this Halloween Salad suits a variety of occasions and satisfies different palates.
Family-friendly: Kids and adults alike will enjoy the fun shapes and flavors, making it an excellent choice for any gathering.
Transform your mealtime with this unique recipe that’s bound to impress!
Halloween Salad Ingredients
• Get ready for a spooky treat!
For the Mozzarella Skulls
- 8 oz mozzarella balls – use about 16 balls for the perfect skull shapes.
- Olive oil – a light drizzle helps grease the molds for easy removal.
For the Salad Base
- 6 oz mixed salad greens – any blend of your choice adds a fresh crunch.
- 1 pint sweet cherry tomatoes – their juicy sweetness perfectly complements the creamy mozzarella.
- 3 tablespoons fresh basil – thinly sliced, it adds an aromatic touch to your salad.
For the Dressing & Seasoning
- Balsamic glaze – drizzling this on top elevates the flavors with a touch of sweetness.
- Flaky sea salt – enhances the overall taste while adding a delightful texture.
- Freshly cracked black pepper – adds a mild kick, balancing the richness of the mozzarella.
- ½ lemon (optional) – a squeeze of lemon brightens up the flavors beautifully.
Craft your own Halloween Salad and enjoy a delightful display of flavors and a fun presentation that will surely be a hit!
Step‑by‑Step Instructions for Halloween Salad
Step 1: Preheat the Oven
Start by preheating your oven to 350°F (175°C). This warm environment will be perfect for melting the mozzarella balls into spooky skull shapes. While the oven is heating, gather your ingredients and skull molds, ensuring you're all set for a fun kitchen adventure.
Step 2: Prepare the Molds
Place one mozzarella ball into each skull mold. If you prefer easy removing later, consider lightly greasing the molds with a bit of olive oil. This will help the mozzarella pop out smoothly after baking, leaving you with perfectly shaped skulls for your Halloween Salad.
Step 3: Bake the Mozzarella
Carefully place the filled molds in the oven and bake at 350°F for about 6 minutes. You're looking for the mozzarella to soften, but it shouldn’t melt completely. When done, the balls should maintain their shape, just starting to show a glossy surface, creating a spooky skull effect.
Step 4: Shape the Skulls
Remove the molds from the oven and, using the back of a spoon, gently press the softened mozzarella into the molds. This step ensures all crevices are filled, enhancing the skull detail. Allow them to cool slightly, giving them a fun, fleshy appearance perfect for your Halloween Salad.
Step 5: Chill the Skulls
To solidify the mozzarella skulls, place the molds in the refrigerator for 10-15 minutes. This cooling period not only helps them hold their shape but also is a great time to prep your salad ingredients and gather your serving bowl for this festive creation.
Step 6: Pop Out the Skulls
Once the mozzarella has set, carefully remove the skulls from the molds. They should slide out easily, and each one should boast clear, defined features. Set them aside as you prepare to build your delightful Halloween Salad.
Step 7: Toss the Greens
In a large mixing bowl, add the mixed salad greens. Drizzle with a little olive oil and, if desired, a squeeze of lemon for brightness. Toss gently until the greens are well-coated and glistening, creating a beautiful base for your Halloween Salad that balances freshness with flavor.
Step 8: Assemble the Salad
Layer the salad with sliced cherry tomatoes and the prepared mozzarella skulls. Arrange these vibrant ingredients artistically in the bowl, allowing the colors and textures to shine. This step will not only make your Halloween Salad eye-catching but also tantalizingly delicious.
Step 9: Add Final Touches
To finish off your Halloween Salad, drizzle a little olive oil and balsamic glaze over the top. Sprinkle with flaky sea salt and freshly cracked black pepper to enhance the flavors. These final touches will add depth and richness to your plate, perfect for any festive occasion.
Step 10: Serve Immediately
Now that your Halloween Salad is beautifully assembled, it's time to serve! This vibrant and playful dish is best enjoyed fresh, so gather your guests and watch their faces light up at the sight of your spooktacular salad creation.
Make Ahead Options
These Halloween Salad components are perfect for busy home cooks looking to save time! You can prepare the mozzarella skulls up to 24 hours in advance by baking and chilling them in the refrigerator, allowing the flavors to deepen. Simply make the mozzarella skulls as directed, then keep them assembled in an airtight container to maintain their shape and quality. You can also wash and toss the mixed greens with olive oil, and store them separately for up to 3 days. When you’re ready to serve, simply layer the greens, tomatoes, and mozzarella skulls together, drizzle with balsamic glaze, and season to taste for a quick yet stunning meal!
What to Serve with Halloween Salad
Elevate your Halloween feast with delightful pairings that complement the playful spirit of this vibrant salad.
-
Garlic Bread: This warm and crunchy side brings comforting flavors, perfect for scooping up those delicious salad bites.
-
Pumpkin Soup: A creamy, spiced pumpkin soup creates a warm contrast to the cool, crisp salad, enhancing seasonal flavors.
-
Roasted Vegetables: Their caramelized sweetness adds depth, offering a heartier side that pairs wonderfully with the fresh greens.
-
Stuffed Peppers: Colorful, savory stuffed peppers make for an eye-catching dish that balances flavors while embracing the Halloween theme.
-
Spiced Apple Cider: Serve this warm, spiced drink to compliment the freshness of the salad and infuse your gathering with cozy aromas.
-
Chocolate Mousse: End the meal on a sweet note; the rich, velvety texture provides a perfect indulgent contrast to the salad's lightness.
Pair these delicious options with your Halloween Salad, and watch your gathering turn into a festive celebration of flavors!
Halloween Salad Variations & Substitutions
Feel free to get creative and make this Halloween Salad uniquely yours with these delicious twists!
-
Vegan Option: Swap mozzarella balls for marinated tofu or almond-based cheese for a dairy-free alternative. This change keeps the spooky vibe alive while catering to plant-based diets.
-
Nutty Flavor: Add a handful of toasted pine nuts or walnuts to the salad. Their crunchy texture and earthy flavor will elevate your dish and add a delightful surprise in every bite.
-
Colorful Spin: Incorporate seasonal veggies like roasted butternut squash or purple cabbage for a vibrant visual. These bright additions will not only enhance the presentation but also boost nutritional benefits.
-
Extra Spice: Toss in some sliced jalapeños or a pinch of red pepper flakes for a spicy kick. This fiery twist can turn your Halloween Salad into a thrilling experience that warms up the palate.
-
Herb Infusion: Mix in other fresh herbs like cilantro or dill alongside the basil. Their aromatic qualities will create a fusion of flavors, making your salad even more enticing.
-
Dressing Variations: Play with different dressings such as a lemon-tahini sauce or a spicy ranch for a unique flavor profile. Each option will offer a new dimension to your Halloween Salad, delighting everyone's taste buds.
-
Crunchy Topping: Sprinkle some crispy bacon bits or fried onions over your salad just before serving. This adds a satisfying crunch and a savory element that balances the salad's creaminess beautifully.
-
Seasonal Fruits: Add slices of crisp apples or pears for a touch of sweetness. Their juicy bites will complement the savory mozzarella and add a refreshing contrast that's perfect for fall.
Embark on your flavorful adventure and make this Halloween Salad a true reflection of your taste. If you're seeking more ideas on delightful dish pairings, check out our guide on what to serve with salads.
Expert Tips for Halloween Salad
-
Choose Quality Mozzarella: Use fresh mozzarella balls for the best flavor and texture, ensuring your skulls hold their shape well in the molds.
-
Greasing Molds: Lightly grease your skull molds with olive oil before adding mozzarella. This simple step prevents sticking and ensures perfect skulls for your Halloween Salad.
-
Watch the Bake Time: Keep an eye on the mozzarella in the oven. Overbaking can cause them to lose their shape; they should be soft but not fully melted.
-
Cool Down Properly: Allow the mozzarella skulls to chill adequately in the fridge. This setting time is crucial to help them firm up and maintain their spooky silhouette.
-
Mix It Up: Feel free to add other vegetables or nuts to your salad base. Ingredients like cucumbers or sunflower seeds can enhance both the flavor and the texture of your Halloween Salad.
-
Dress to Impress: Drizzle the dressing just before serving to maintain the freshness of the greens and the crispness of the tomatoes.
How to Store and Freeze Halloween Salad
Fridge: Store any leftover Halloween Salad in an airtight container for up to 3 days. Keep the mozzarella skulls separate from the greens to maintain their texture.
Freezer: It’s best to avoid freezing the assembled salad, as the greens and mozzarella won’t hold up well. Instead, you can freeze any unused mozzarella balls for up to 2 months for later use.
Reheating: If you’ve stored the mozzarella separately, you can lightly rewarm them in the oven at 350°F for about 5 minutes before serving. Avoid reheating the salad greens to prevent wilting.
Halloween Salad Recipe FAQs
What type of mozzarella balls should I use for the Halloween Salad?
Absolutely! Using fresh mozzarella balls is key for the best flavor and texture. Look for ones packed in water for the creamiest and most delicious results. You want them to hold their shape when they're baked into those spooky skulls!
How should I store leftover Halloween Salad?
To keep your Halloween Salad fresh, store any leftovers in an airtight container in the fridge for up to 3 days. Remember to keep the mozzarella skulls separate from the greens; this way, the skulls stay firm while the salad maintains its crispness and flavor.
Can I freeze the mozzarella skulls?
Yes, you can freeze the unused mozzarella balls! Simply wrap them tightly in plastic wrap or place them in a freezer bag for up to 2 months. When you're ready to use them, thaw in the fridge overnight, then rewarm in the oven at 350°F for about 5 minutes to bring them back to life!
What should I do if my mozzarella skulls don’t hold their shape?
If your mozzarella skulls don’t turn out as expected, try this step: ensure you don’t overbake them in the oven. Ideally, they should be soft, not fully melted, so keep an eye on them while they bake. If they still lose shape, they can still be delicious—just crumble them over the salad for a fun twist!
Is this salad suitable for people with allergies?
Great question! This Halloween Salad contains dairy (mozzarella), which may not be suitable for those with lactose intolerance. For a dairy-free option, consider substituting the mozzarella with marinated tofu or nut-based cheese alternatives. Always check other ingredients like dressings to ensure they meet dietary needs.
How long can I keep the salad in the fridge before it goes bad?
You can keep your Halloween Salad in the fridge for up to 3 days. Just be mindful that the greens may wilt over time, so it's best to enjoy it fresh. If possible, assemble right before serving for the best flavors and textures!
Spooktacular Halloween Salad with Mozzarella Skulls
Ingredients
Equipment
Method
- Preheat your oven to 350°F (175°C). Gather your ingredients and skull molds.
- Place one mozzarella ball into each skull mold and lightly grease the molds with olive oil.
- Bake the filled molds in the oven for about 6 minutes until the mozzarella softens but does not melt completely.
- Remove the molds and press the softened mozzarella into the molds with the back of a spoon.
- Chill the molds in the refrigerator for 10-15 minutes to solidify the mozzarella skulls.
- Carefully remove the skulls from the molds once set, ensuring clear features.
- In a large mixing bowl, toss the mixed salad greens with olive oil and lemon if desired.
- Assemble the salad with sliced cherry tomatoes and the prepared mozzarella skulls.
- Drizzle olive oil and balsamic glaze over the salad, and sprinkle with sea salt and black pepper.
- Serve immediately for a fresh and vibrant Halloween Salad.


Leave a Reply