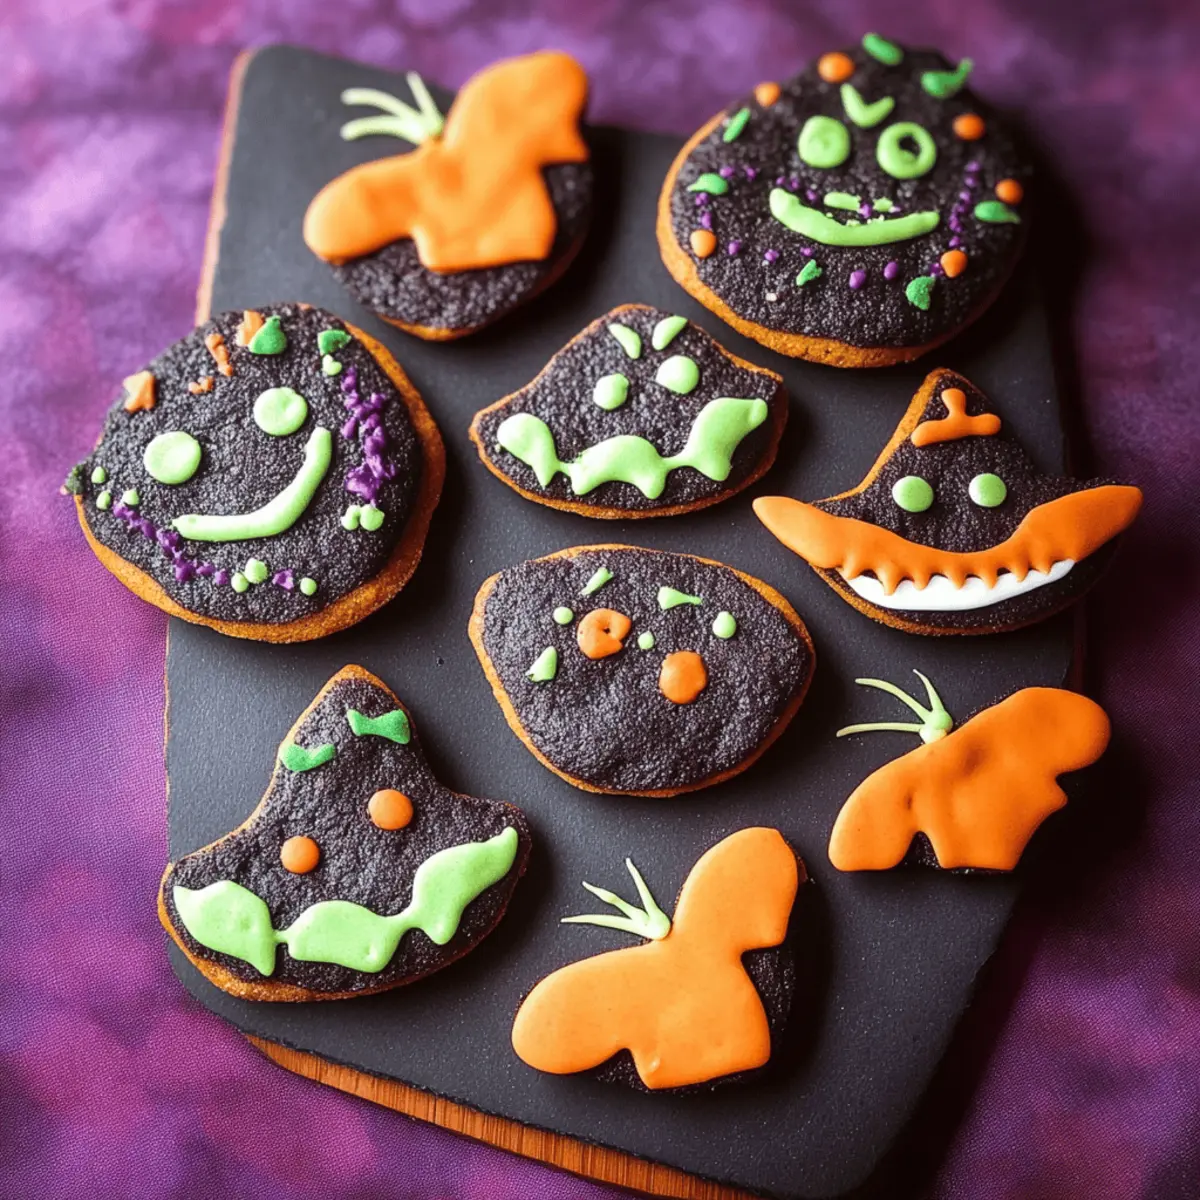
As I rummaged through my baking supplies, I stumbled upon a forgotten bag of black cocoa powder. It struck me like a lightbulb moment—what better time to bring it back to life than with some vividly spooky Halloween Decorated Cookies? These whimsical treats not only promise to be the highlight of your festive gathering, but they also require minimal prep time, allowing you to whip up a batch of joy in no time. Ideal for family bonding or a cozy night in, these cookies can be transformed with colorful royal icing that even a beginner could master. Fancy making magic in your kitchen this Halloween? Let’s dive into the world of cookie decorating!
Why Make These Halloween Cookies?
Deliciously Unique: These Halloween Decorated Cookies are not your average treat; their blend of black and Dutch process cocoa creates an intriguing flavor profile that will enchant your taste buds.
Perfect for Creative Freedom: With the royal icing, you'll enjoy a fun canvas for creative designs—let your imagination run wild!
Quick Prep Time: Spend as little as 30 minutes whipping up the dough, plus some chill time, and you’re ready to bake.
Family Fun: Ideal for kids and adults alike, decorating cookies turns into a delightful family activity, making memories together.
Make Ahead: These cookies freeze beautifully, allowing you to prepare well in advance for your Halloween festivities. Grab your cookie cutters and let’s make this spooky season unforgettable!
Halloween Decorated Cookies Ingredients
• Let’s gather all the essentials for these charming treats!
For the Cookie Dough
- 1 cup butter – Ensures a rich, creamy base that adds decadence to your cookies.
- 2 cups powdered sugar – Sweetens and helps achieve that melt-in-your-mouth texture.
- 1 large egg – Binds the ingredients together for a perfect cookie consistency.
- 3 cups flour – Provides structure; be sure to sift for a light dough.
- ½ cup black cocoa powder – Adds a deep, dark chocolate flavor that’s perfect for Halloween.
- ½ cup Dutch process cocoa powder – Balances the flavors and enhances the cookies’ dark hue.
- ½ teaspoon salt – Elevates the flavors and rounds out the sweetness.
For the Royal Icing
- Royal icing (ingredients not specified) – Perfect for decorating; make it vibrant with food coloring and unleash your creativity!
Now you’re all set to whip up these delightful Halloween Decorated Cookies!
Step‑by‑Step Instructions for Halloween Decorated Cookies
Step 1: Cream the Butter
In the bowl of a stand mixer fitted with a paddle attachment, add 1 cup of softened butter. Mix on medium speed until the butter becomes creamy and light in color, about 2 to 3 minutes. This will create a silky base for your Halloween Decorated Cookies, ensuring they are rich and tasty.
Step 2: Incorporate Powdered Sugar
Gradually add 2 cups of powdered sugar to the creamed butter, continuing to mix on medium speed. Beat until the mixture is fully combined, fluffy, and pale in color, roughly 3 to 5 minutes. This step is crucial for achieving that melt-in-your-mouth texture characteristic of soft cookies.
Step 3: Add the Egg
Crack 1 large egg into the mixing bowl and blend until completely incorporated, taking about 1 to 2 minutes. The egg will help bind your Halloween Decorated Cookies together, creating a cohesive dough that's perfect for shaping and baking.
Step 4: Mix Dry Ingredients
In a separate bowl, sift together 3 cups of flour, ½ cup of black cocoa powder, ½ cup of Dutch process cocoa powder, and ½ teaspoon of salt. This step not only combines the ingredients but also aerates the flour, ensuring your cookies are light. Gradually add this mixture to the wet ingredients, mixing on low until just combined.
Step 5: Form the Dough
Turn the dough out onto a clean surface and use your hands to bring it together into a cohesive ball. Knead gently for about a minute to achieve a smooth consistency, then flatten the dough into a disc about 1-inch thick. This ensures easy handling when rolling.
Step 6: Chill the Dough
Wrap the formed disc of dough in plastic wrap and place it in the refrigerator to chill for at least 30-45 minutes, or up to 2 days. Chilling is essential for firming up the dough, which will make rolling and cutting easier and help maintain the cookie shape during baking.
Step 7: Roll Out the Dough
Once chilled, remove the dough from the refrigerator and roll it out between two sheets of parchment paper until it reaches a thickness of 4 mm. This technique prevents sticking and allows for an even surface for cutting out your Halloween Decorated Cookies.
Step 8: Cut the Cookies
Using your favorite cookie cutters, cut out shapes from the rolled dough and place them onto a baking tray lined with baking paper. For best results, chill the cut-out cookies again for 1 hour or overnight, helping them hold their shape during baking.
Step 9: Preheat and Bake
Preheat your oven to 160°C (320°F, fan-assisted). Once the oven is ready, bake the cookies for about 10 minutes until set but not over-browned. Keep an eye on them; they should feel firm to the touch, ensuring they’re perfectly baked for decorating.
Step 10: Cool the Cookies
Allow the cookies to cool on the baking sheets for 5 minutes before carefully transferring them to a cooling rack. Once cooled completely, your Halloween Decorated Cookies will be ready for their festive royal icing embellishments.
Step 11: Prepare Royal Icing
To make the royal icing, beat an egg white in a mixing bowl on medium-low speed until frothy. Gradually add powdered sugar, beating until the mixture forms shiny peaks, about 5 to 7 minutes. You’ll want this icing to be smooth for decorating your cookies beautifully.
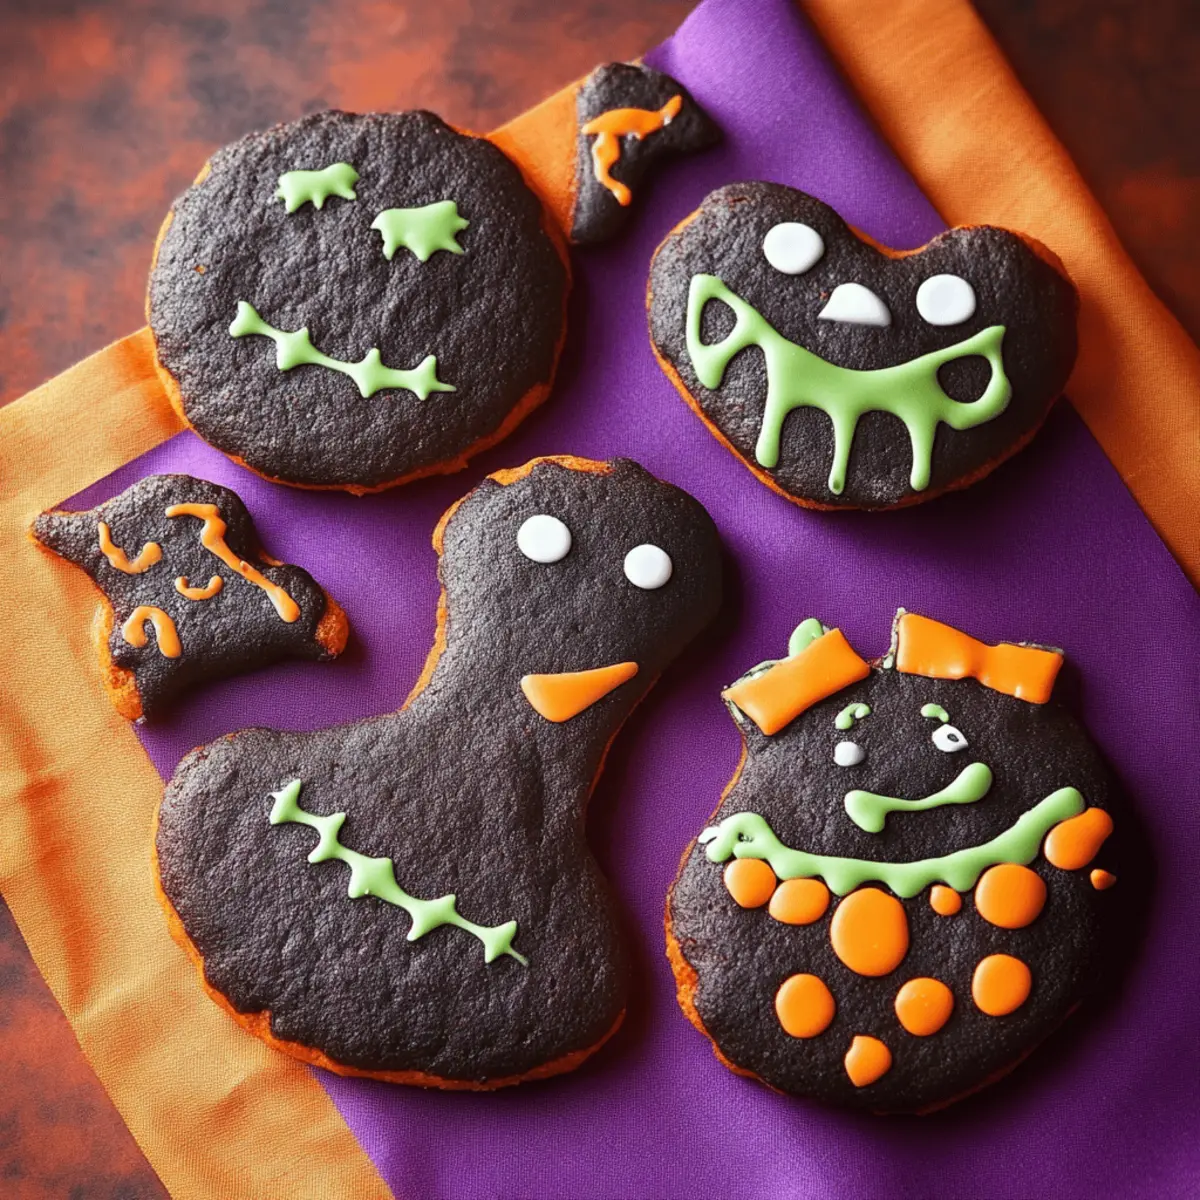
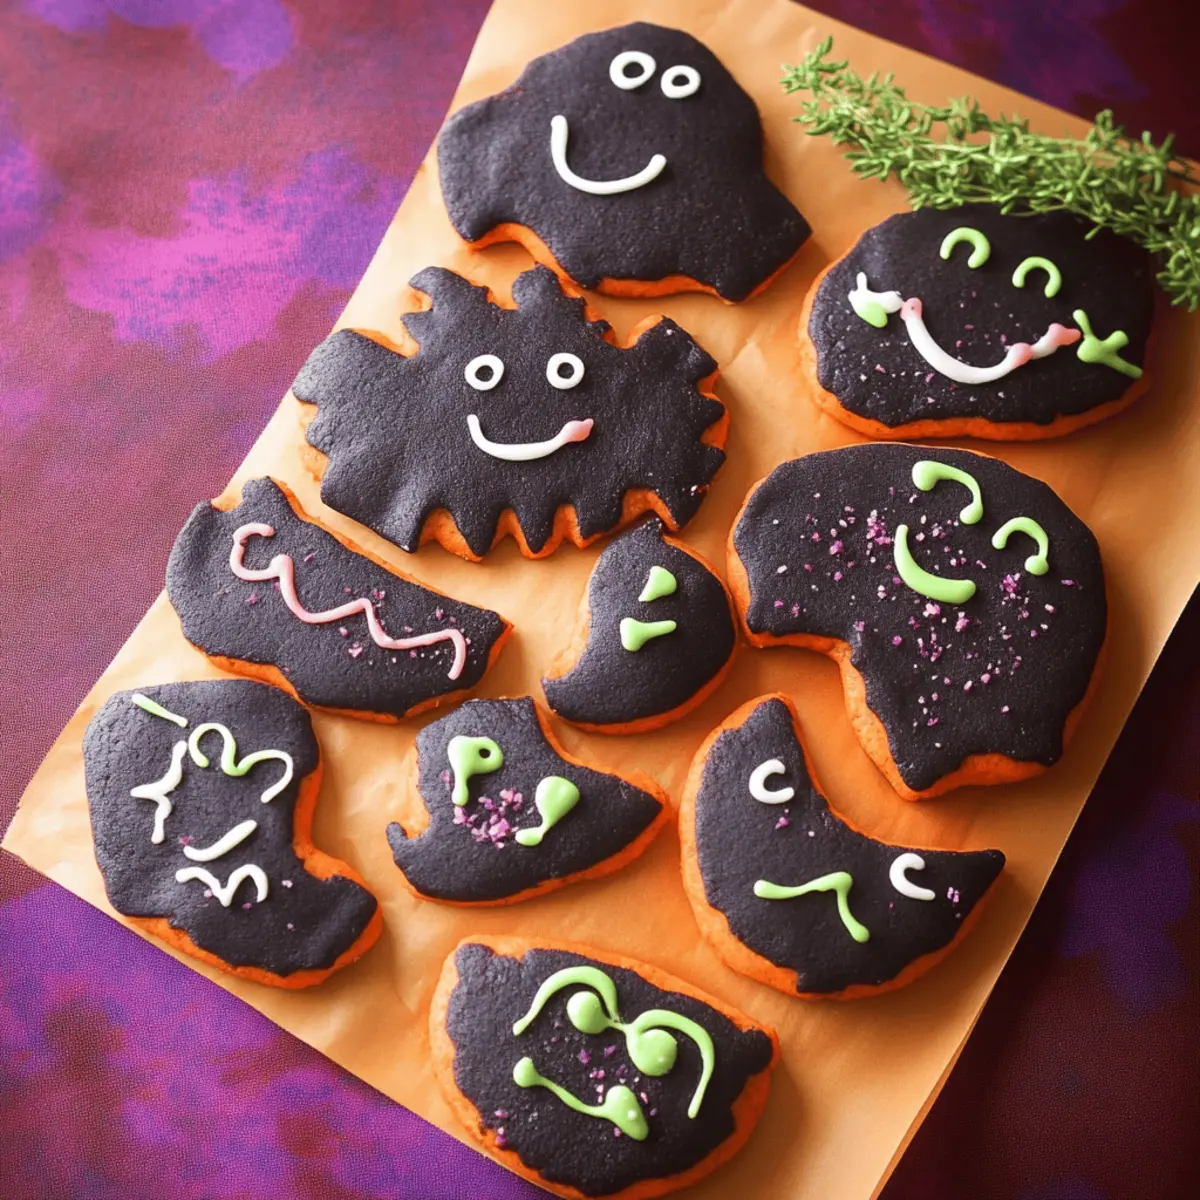
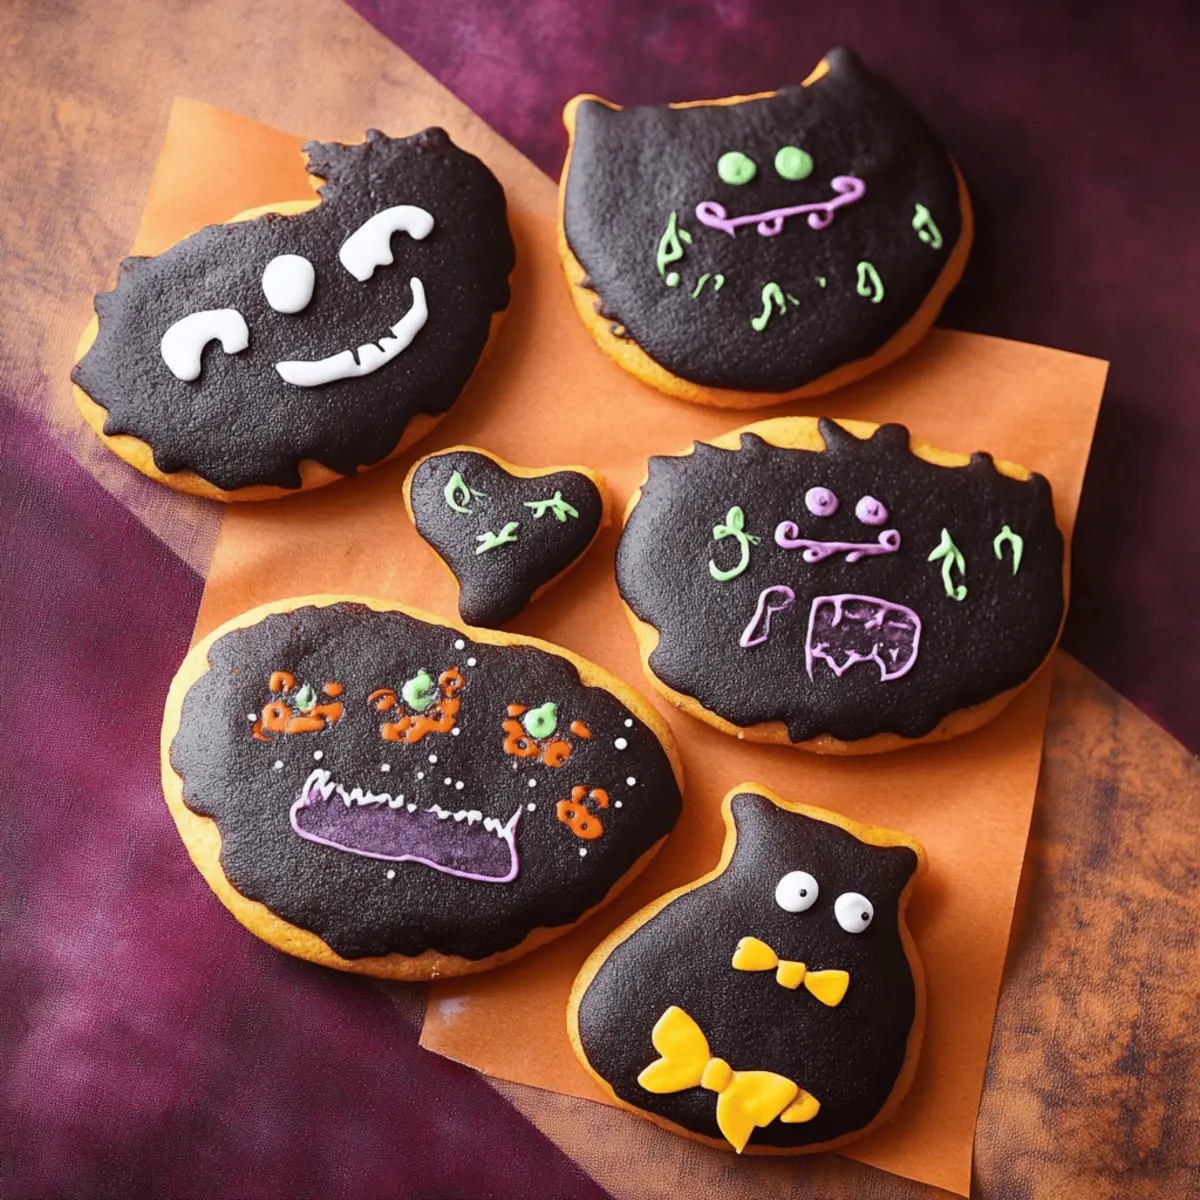
Step 12: Color & Decorate
Divide the royal icing among small bowls and mix in gel food coloring if desired. Transfer the icing to piping bags and, using your creative flair, decorate your cookies to transform them into spectacular Halloween treats.
Step 13: Let Icing Set
Allow your decorated Halloween Decorated Cookies to dry for 3 to 6 hours at room temperature, ensuring the royal icing hardens perfectly. This step is crucial for displaying your designs beautifully!
How to Store and Freeze Halloween Decorated Cookies
Room Temperature: Store decorated Halloween Decorated Cookies in an airtight container at room temperature for up to 1 week. This keeps them fresh and ready for snacking!
Fridge: If you live in a warmer climate, feel free to keep the decorated cookies in the fridge to extend their shelf life a bit longer, storing them in a sealed container for up to 2 weeks.
Freezer: For long-term storage, freeze undecorated cookies wrapped with cling film in an airtight container for up to 1 month. This allows you to have cookie bases on hand for last-minute decorating fun.
Reheating: If you’ve frozen the cookies, simply let them thaw at room temperature before decorating. There’s no need to reheat them, ensuring the freshest texture once you’re ready to indulge!
Halloween Decorated Cookies Variations
Feel free to get creative and make these Halloween Decorated Cookies uniquely yours!
- Gluten-Free: Substitute regular flour with a gluten-free blend to cater to dietary needs without sacrificing taste.
- Chocolate Overload: Add ½ cup of chocolate chips to the cookie dough for an extra gooey and chocolatey treat. Your taste buds will thank you for this delightful twist!
- Spicy Kick: Mix in a teaspoon of cinnamon and a pinch of cayenne pepper to the dough for a warm, spicy flavor that complements the sweetness beautifully.
- Nutty Crunch: Incorporate ½ cup of finely chopped nuts like walnuts or pecans for a delightful crunch that contrasts with the soft cookie texture.
- Vegan-Friendly: Swap the egg for a flaxseed egg (1 tablespoon ground flaxseed mixed with 3 tablespoons water) and use plant-based butter for a vegan festive treat. Enjoy guilt-free indulgence!
- Seasonal Flavors: Fold in a teaspoon of pumpkin spice for a fall-inspired twist that will totally evoke cozy autumn vibes. Perfect for pumpkin lovers!
- Fruit Zest: Add a teaspoon of orange or lemon zest to the dough for a refreshing citrus note that brightens up the chocolaty flavors. A tasty, aromatic surprise awaits!
- Royal Icing Variations: Experiment with flavored extracts like almond or peppermint in your royal icing for a fun twist that adds depth to your decorations.
With these variations, the possibilities are endless! Consider trying out different designs and flavors as a fun way to engage the family—especially kids, because they love exploring new treats! You might also want to check out my tips on making the perfect royal icing for these cookies or explore more cookie ideas that are sure to impress. Happy baking!
What to Serve with Halloween Decorated Cookies
As you enjoy the sweet charm of these cookies, consider delightful accompaniments that enhance the festive spirit.
-
Spiced Apple Cider: Warm, aromatic cider pairs beautifully, bringing a comforting warmth to your cookie festivities.
-
Pumpkin Soup: A creamy, spiced pumpkin soup offers a savory contrast, heightening the flavors of your sweet treats. Imagine cozying up with a bowl during a flickering candlelight dinner.
-
Cheese Platter: A selection of sharp cheeses balances the sweetness of the cookies, providing a conversation starter that pleases every palate.
-
Decorated Halloween Cupcakes: Keep the festive theme alive with colorful cupcakes topped with playful, spooky designs that mirror your cookies.
-
Blackberry Lemonade: The zesty twist of this refreshing drink adds brightness, making each bite of cookie even more delightful!
-
Ginger Snaps: These spiced cookies add a crunchy texture that contrasts with your soft Halloween Decorated Cookies, creating a perfect festive dessert spread.
-
Chocolate Milk: A childhood classic, served chilled or warm, chocolate milk is a comforting beverage that complements the rich cocoa flavor of your cookies.
-
Pecan Pie Bites: Miniature pecan pie bites provide a delightful nutty crunch, harmonizing with the chocolaty sweetness and creating a treat tableau everyone will love.
Make Ahead Options
These Halloween Decorated Cookies are perfect for busy home cooks looking to streamline their baking process! You can prepare the cookie dough up to 2 days in advance by wrapping it tightly in plastic wrap and refrigerating it. Additionally, once you've cut out your cookies, they can be chilled for 1 hour or even overnight, ensuring they hold their shape while baking. To keep things fresh, you can freeze the undecorated cookies wrapped in cling film in an airtight container for up to 1 month. When you're ready to serve, simply bake the cookies, let them cool, and decorate with royal icing for deliciously impressive treats that save you time and add festive flair to your celebrations!
Expert Tips for Halloween Decorated Cookies
-
Chill the Dough: Always chill the cookie dough before rolling; it’s essential to help maintain their cut shapes and prevents spreading during baking.
-
Mixing Techniques: Cream the butter and sugar thoroughly until light and fluffy—this aeration gives your cookies that delightful melt-in-your-mouth texture.
-
Cookie Thickness: Roll out dough to a consistent thickness of around 4 mm; this ensures even baking for your Halloween Decorated Cookies.
-
Watch the Bake Time: Keep an eye on your cookies while they bake; they should set without browning, yielding a soft, tender bite.
-
Royal Icing Mastery: Use gel food coloring for vibrant shades, and remember to let the icing dry completely for the best decorative finish.
-
Storage Secrets: Freeze undecorated cookies in an airtight container to preserve their freshness, making them conveniently ready for decorating whenever you like!
Halloween Decorated Cookies Recipe FAQs
What is the best way to select ripe ingredients for this recipe?
Absolutely! For the best cookies, choose room temperature ingredients. Ensure that your butter is softened (not melted) and the egg is at room temperature for easier blending. Fresh butter should be creamy and pale yellow without any off-putting odor.
How should I store Halloween Decorated Cookies?
Store decorated Halloween Decorated Cookies in an airtight container at room temperature for up to 1 week. If your home is warm, consider refrigerating them for added freshness, which can extend their shelf life to about 2 weeks. Just make sure they are in a sealed container to keep their delightful texture intact!
Can I freeze the cookies, and if so, how?
Very much so! For the best results, freeze undecorated cookies. Wrap each cookie tightly in cling film and place them in an airtight container. They can be stored in the freezer for up to 1 month. When you're ready to decorate, simply remove the cookies from the freezer and let them thaw at room temperature—no need to reheat!
What should I do if my royal icing doesn’t get to the right consistency?
If your icing is too runny, add a bit more powdered sugar, a tablespoon at a time, until you achieve the desired thick but spreadable consistency. On the other hand, if it’s too thick, add a few drops of water to loosen it up. Mix thoroughly after each adjustment.
Are there any dietary considerations for allergies?
Absolutely! If anyone in your household has allergies, you can make substitutions for the egg by using a flaxseed egg (1 tablespoon of ground flaxseed mixed with 2.5 tablespoons of water, let it sit for 5 minutes) or a commercial egg replacer. For the royal icing, make sure to use pasteurized egg whites or meringue powder to ensure safety!
How long should I let the royal icing dry before serving the cookies?
I recommend allowing the royal icing to dry for at least 3 to 6 hours at room temperature. This drying time ensures that the icing hardens adequately, making your decorated cookies not only beautiful but also easy to handle and serve without smudging the designs.
Spooktacular Halloween Decorated Cookies to Impress Your Guests
Ingredients
Equipment
Method
- Cream the Butter: In the bowl of a stand mixer fitted with a paddle attachment, add 1 cup of softened butter. Mix on medium speed until creamy and light in color, about 2 to 3 minutes.
- Incorporate Powdered Sugar: Gradually add 2 cups of powdered sugar, continuing to mix on medium speed until fluffy and pale, roughly 3 to 5 minutes.
- Add the Egg: Crack 1 large egg into the mixing bowl and blend until completely incorporated, about 1 to 2 minutes.
- Mix Dry Ingredients: In a separate bowl, sift together 3 cups of flour, ½ cup of black cocoa powder, ½ cup of Dutch process cocoa powder, and ½ teaspoon of salt. Gradually add to wet ingredients, mixing on low until just combined.
- Form the Dough: Turn the dough out onto a clean surface and bring it together into a cohesive ball, kneading gently for about a minute.
- Chill the Dough: Wrap the formed disc of dough in plastic wrap and chill in the refrigerator for at least 30-45 minutes.
- Roll Out the Dough: Once chilled, roll it out between two sheets of parchment paper until it reaches a thickness of 4 mm.
- Cut the Cookies: Cut out shapes from the rolled dough using cookie cutters and place on a lined baking tray.
- Preheat and Bake: Preheat your oven to 160°C (320°F). Bake cookies for about 10 minutes until set but not over-browned.
- Cool the Cookies: Allow cookies to cool for 5 minutes on the baking sheets before transferring to a cooling rack.
- Prepare Royal Icing: Beat an egg white until frothy, gradually add powdered sugar, beating until shiny peaks form.
- Color & Decorate: Divide royal icing among bowls, mix in gel food coloring, and decorate cookies.
- Let Icing Set: Allow decorated cookies to dry for 3 to 6 hours at room temperature.


Leave a Reply